MCPChatbot Example
A chatbot implementation compatible with MCP (terminal / streamlit supported)
- other
About
What is MCPChatbot Example?
MCPChatbot Example is a demonstration project integrating the Model Context Protocol (MCP) with customized LLMs (e.g., Qwen) to create a chatbot that can interact with external tools through MCP servers. It runs on Python 3.10+ and includes CLI, terminal, and Streamlit web interfaces for developers exploring MCP-based tool‑augmented LLM applications.
How to use MCPChatbot Example?
Clone the repository, set up a Python virtual environment, install dependencies via pip install -r requirements.txt, configure the .env file with LLM API keys and folder paths, then modify mcp_servers/servers_config.json to point to local paths. Run examples from the example/ directory, e.g., streamlit run example/chatbot_streamlit/app.py for the web chatbot.
Key features of MCPChatbot Example
- Supports multiple LLM providers (e.g., Qwen, Ollama)
- Includes CLI, terminal, and Streamlit web chatbot interfaces
- Provides both regular and streaming response modes
- Integrates built‑in MCP servers (e.g., Markdown processing tools)
- Offers single‑prompt examples and interactive chat examples
- Visualizes MCP tool workflow in the Streamlit sidebar
Use cases of MCPChatbot Example
- Prototyping an MCP‑enabled chatbot with custom LLM backends
- Demonstrating LLM tool calls through MCP servers (e.g., Markdown processing)
- Testing single‑prompt interactions in regular or streaming mode
- Building an interactive terminal chatbot that chains multiple MCP tool calls
- Creating a web‑based chatbot with real‑time streaming and tool workflow traces
FAQ from MCPChatbot Example
What LLM models does MCPChatbot Example support?
It supports customized LLMs via the OpenAI‑compatible API (e.g., Qwen) and Ollama, configured through the .env file.
How do I configure MCP servers?
Edit mcp_servers/servers_config.json with the absolute path to your uv executable and the project’s mcp_servers directory. Windows users should adjust the command and path accordingly.
What are the software requirements?
Python 3.10 or higher, and dependencies including python-dotenv, mcp[cli], openai, and colorama (automatically installed).
Is there a web interface?
Yes, a Streamlit web chatbot example is included; run streamlit run example/chatbot_streamlit/app.py.
Can I extend the project with new MCP servers?
Yes, you can add new MCP servers in mcp_servers/, update servers_config.json, and implement new functionalities.
Details
- Author
- keli-wen
- GitHub stars
- 144
- Category
- other
- Repository
- keli-wen/mcp_chatbot
This project demonstrates how to integrate the Model Context Protocol (MCP) with customized LLM (e.g. Qwen), creating a powerful chatbot that can interact with various tools through MCP servers. The implementation showcases the flexibility of MCP by enabling LLMs to use external tools seamlessly.
> [!TIP]
> For Chinese version, please refer to README_ZH.md.
Overview
Chatbot Streamlit Example
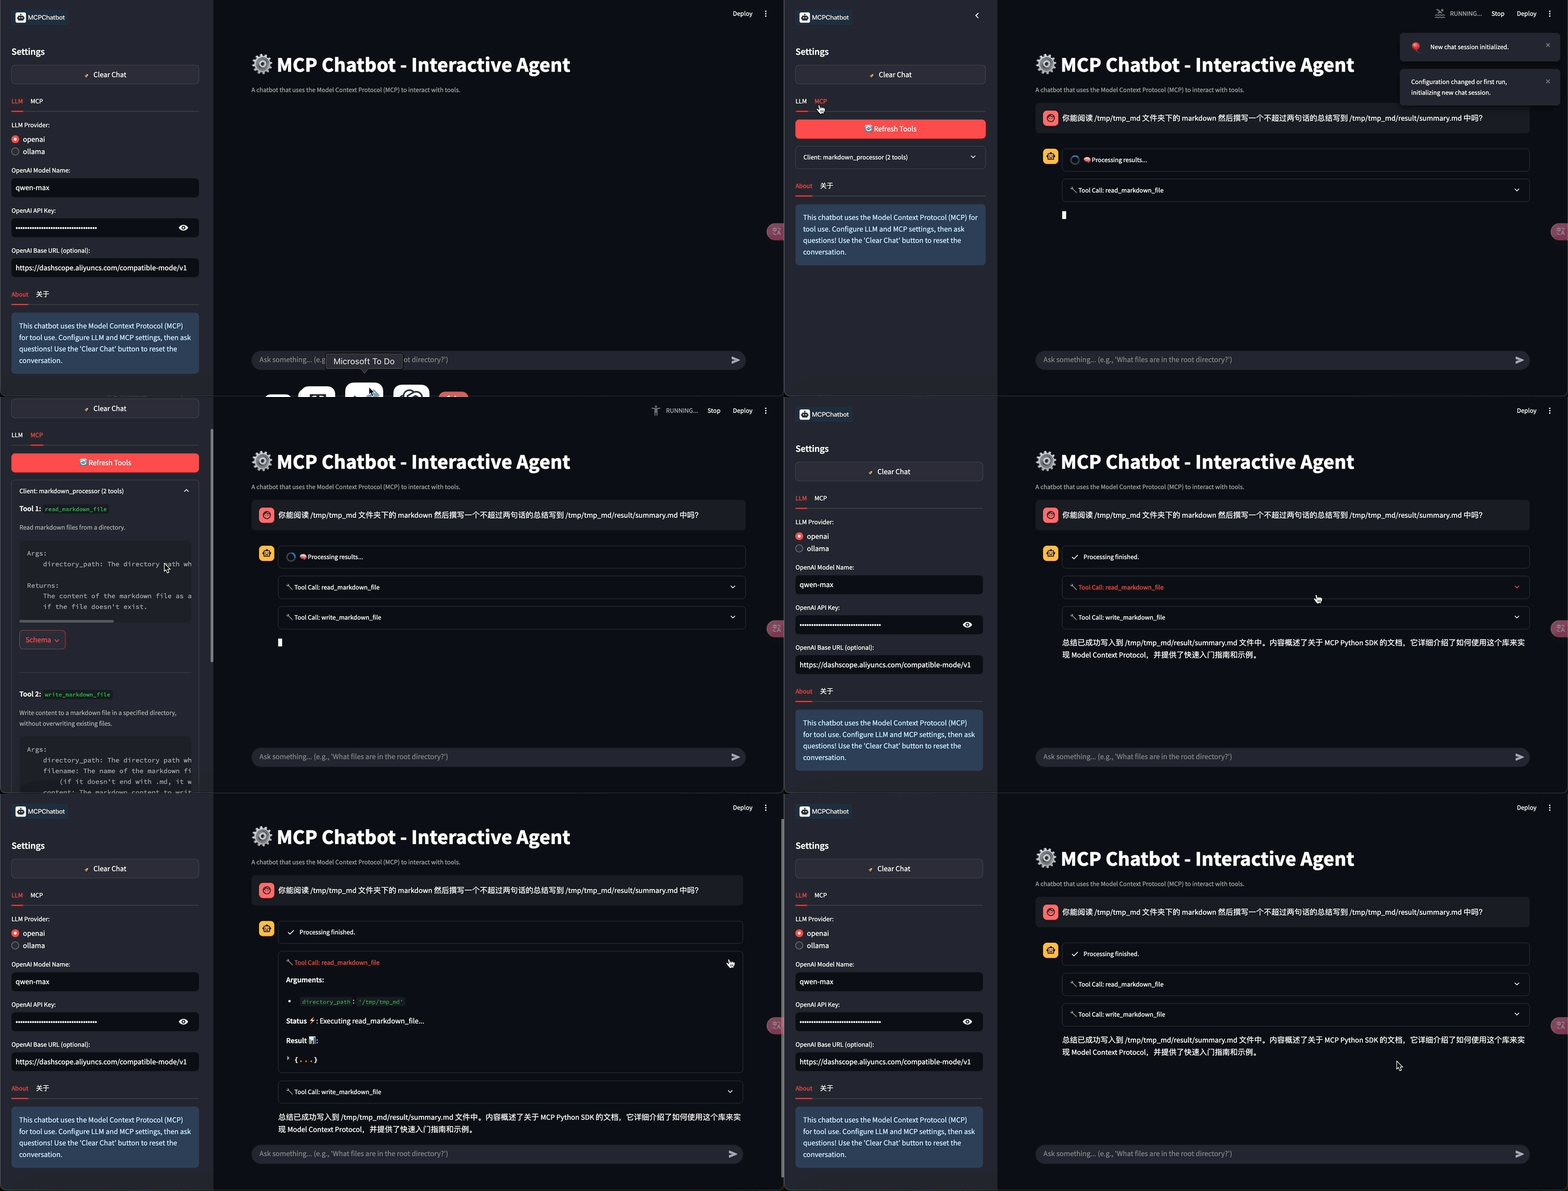
Workflow Tracer Example
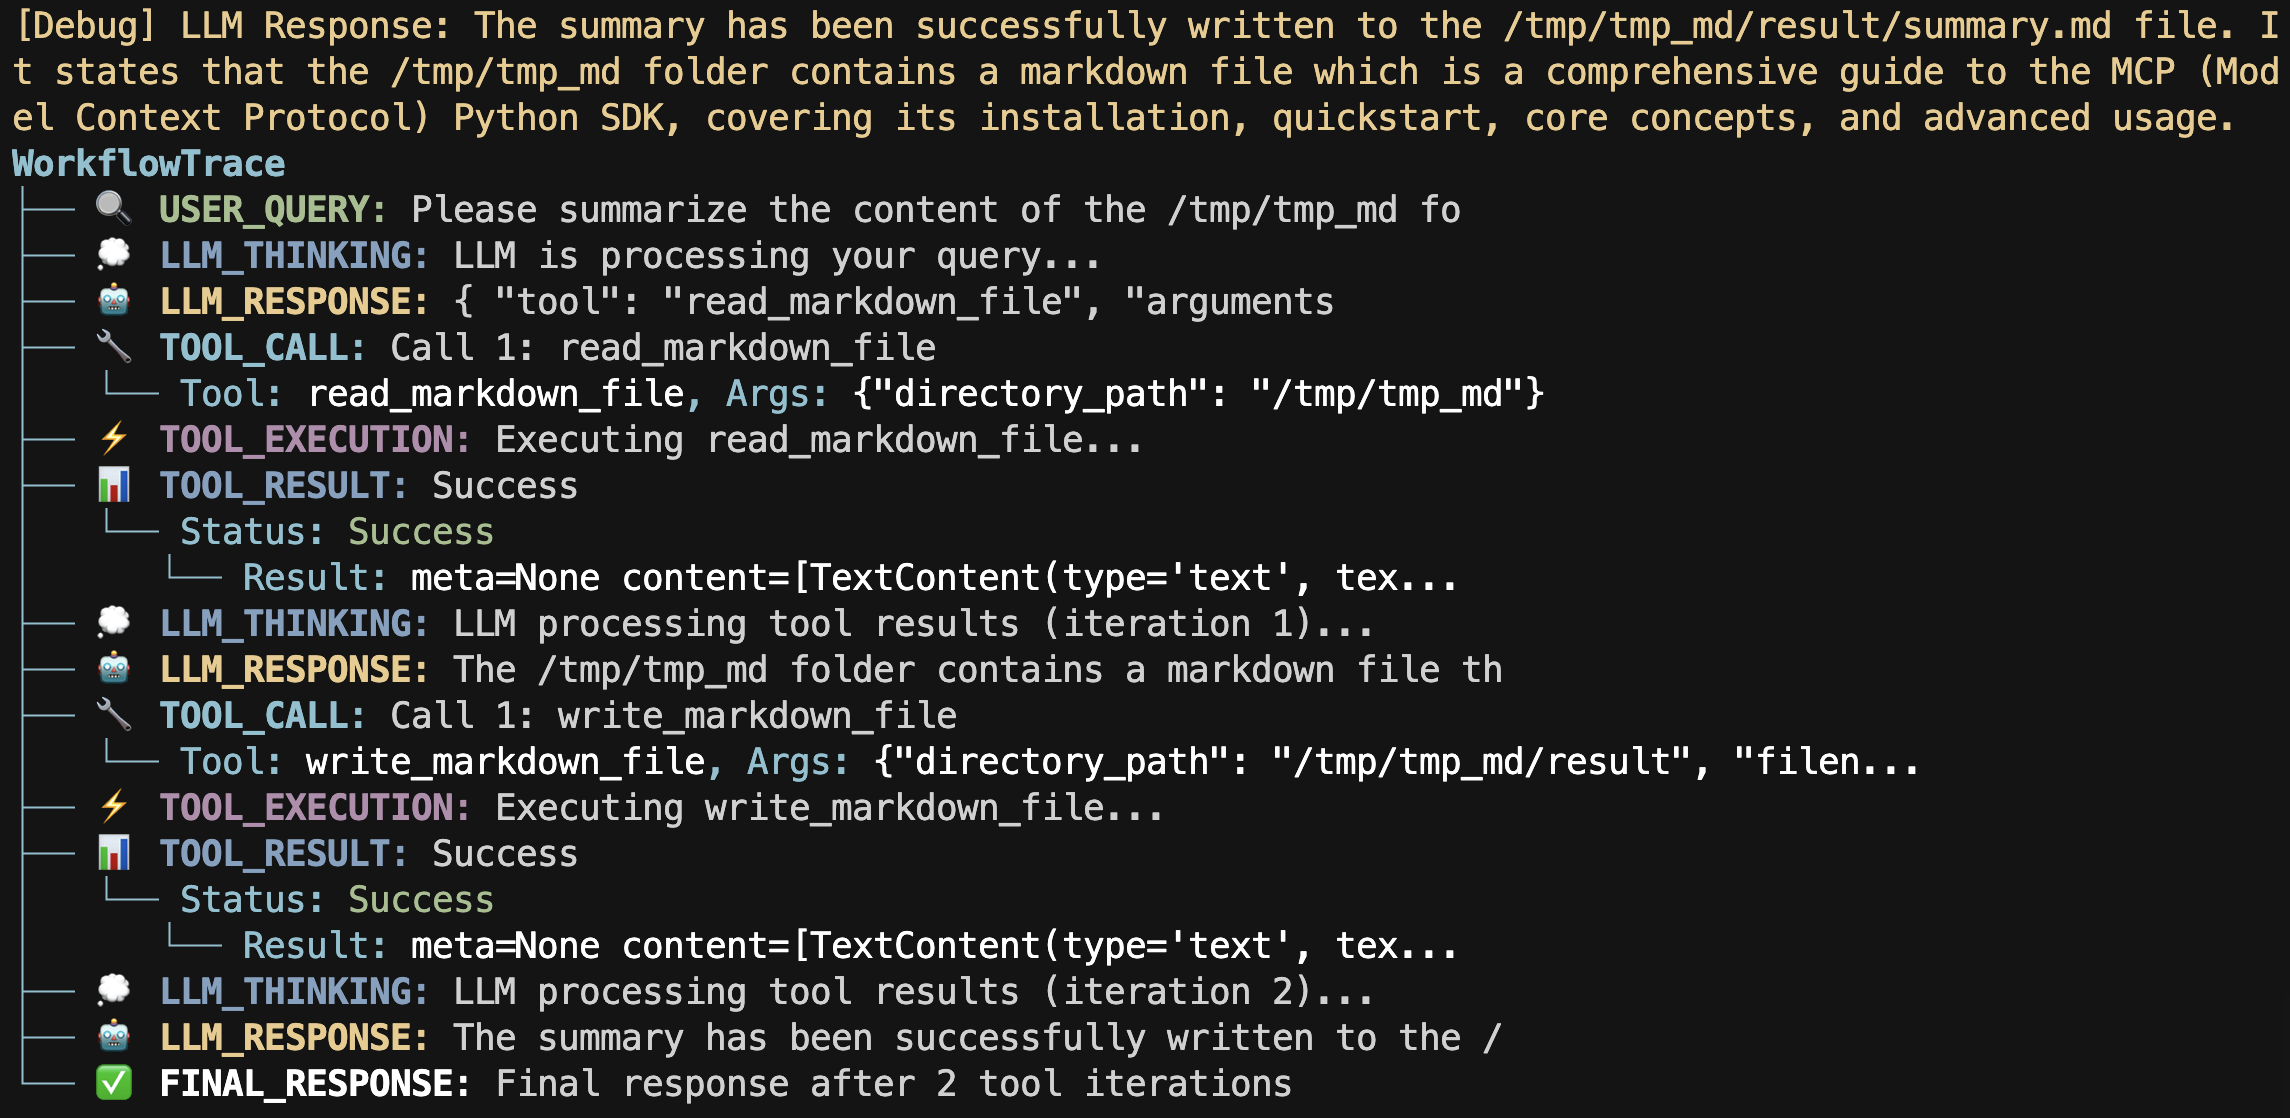
- 🚩 Update (2025-04-11):
- Added chatbot streamlit example.
- 🚩 Update (2025-04-10):
- More complex LLM response parsing, supporting multiple MCP tool calls and multiple chat iterations.
- Added single prompt examples with both regular and streaming modes.
- Added interactive terminal chatbot examples.
This project includes:
- Simple/Complex CLI chatbot interface
- Integration with some builtin MCP Server like (Markdown processing tools)
- Support for customized LLM (e.g. Qwen) and Ollama
- Example scripts for single prompt processing in both regular and streaming modes
- Interactive terminal chatbot with regular and streaming response modes
Requirements
- Python 3.10+
- Dependencies (automatically installed via requirements):
- python-dotenv
- mcp[cli]
- openai
- colorama
Installation
1. Clone the repository:
   git clone [email protected]:keli-wen/mcp_chatbot.git
   cd mcp_chatbot
2. Set up a virtual environment (recommended):
   cd folder

   # Install uv if you don't have it already
   pip install uv
# Create a virtual environment and install dependencies

   uv venv .venv --python=3.10
# Activate the virtual environment

   # For macOS/Linux

   source .venv/bin/activate

   # For Windows

   .venv\Scripts\activate
# Deactivate the virtual environment

   deactivate
3. Install dependencies:
   pip install -r requirements.txt
   # or use uv for faster installation
   uv pip install -r requirements.txt
4. Configure your environment:
- Copy the .env.example file to .env:
cp .env.example .env
- Edit the .env file to add your Qwen API key (just for demo, you can use any LLM API key, remember to set the base_url and api_key in the .env file) and set the paths:
     LLM_MODEL_NAME=your_llm_model_name_here
     LLM_BASE_URL=your_llm_base_url_here
     LLM_API_KEY=your_llm_api_key_here
     OLLAMA_MODEL_NAME=your_ollama_model_name_here
     OLLAMA_BASE_URL=your_ollama_base_url_here
     MARKDOWN_FOLDER_PATH=/path/to/your/markdown/folder
     RESULT_FOLDER_PATH=/path/to/your/result/folder
Important Configuration Notes ⚠️
Before running the application, you need to modify the following:
1. MCP Server Configuration:
Edit mcp_servers/servers_config.json to match your local setup:
   {
       "mcpServers": {
           "markdown_processor": {
               "command": "/path/to/your/uv",
               "args": [
                   "--directory",
                   "/path/to/your/project/mcp_servers",
                   "run",
                   "markdown_processor.py"
               ]
           }
       }
   }
Replace /path/to/your/uv with the actual path to your uv executable. You can use which uv to get the path.
Replace /path/to/your/project/mcp_servers with the absolute path to the mcp_servers directory in your project. (For Windows users, you can take a look at the example in the Troubleshooting section)
2. Environment Variables:
Make sure to set proper paths in your .env file:
   MARKDOWN_FOLDER_PATH="/path/to/your/markdown/folder"
   RESULT_FOLDER_PATH="/path/to/your/result/folder"
The application will validate these paths and throw an error if they contain placeholder values.
You can run the following command to check your configuration:
bash scripts/check.sh
Usage
Unit Test
You can run the following command to run the unit test:
bash scripts/unittest.sh
Examples
Single Prompt Examples
The project includes two single prompt examples:
1. Regular Mode: Process a single prompt and display the complete response
python example/single_prompt/single_prompt.py
2. Streaming Mode: Process a single prompt with real-time streaming output
python example/single_prompt/single_prompt_stream.py
Both examples accept an optional --llm parameter to specify which LLM provider to use:
python example/single_prompt/single_prompt.py --llm=ollama
> [!NOTE]
> For more details, see the Single Prompt Example README.
Terminal Chatbot Examples
The project includes two interactive terminal chatbot examples:
1. Regular Mode: Interactive terminal chat with complete responses
python example/chatbot_terminal/chatbot_terminal.py
2. Streaming Mode: Interactive terminal chat with streaming responses
python example/chatbot_terminal/chatbot_terminal_stream.py
Both examples accept an optional --llm parameter to specify which LLM provider to use:
python example/chatbot_terminal/chatbot_terminal.py --llm=ollama
> [!NOTE]
> For more details, see the Terminal Chatbot Example README.
Streamlit Web Chatbot Example
The project includes an interactive web-based chatbot example using Streamlit:
streamlit run example/chatbot_streamlit/app.py
This example features:
- Interactive chat interface.
- Real-time streaming responses.
- Detailed MCP tool workflow visualization.
- Configurable LLM settings (OpenAI/Ollama) and MCP tool display via the sidebar.
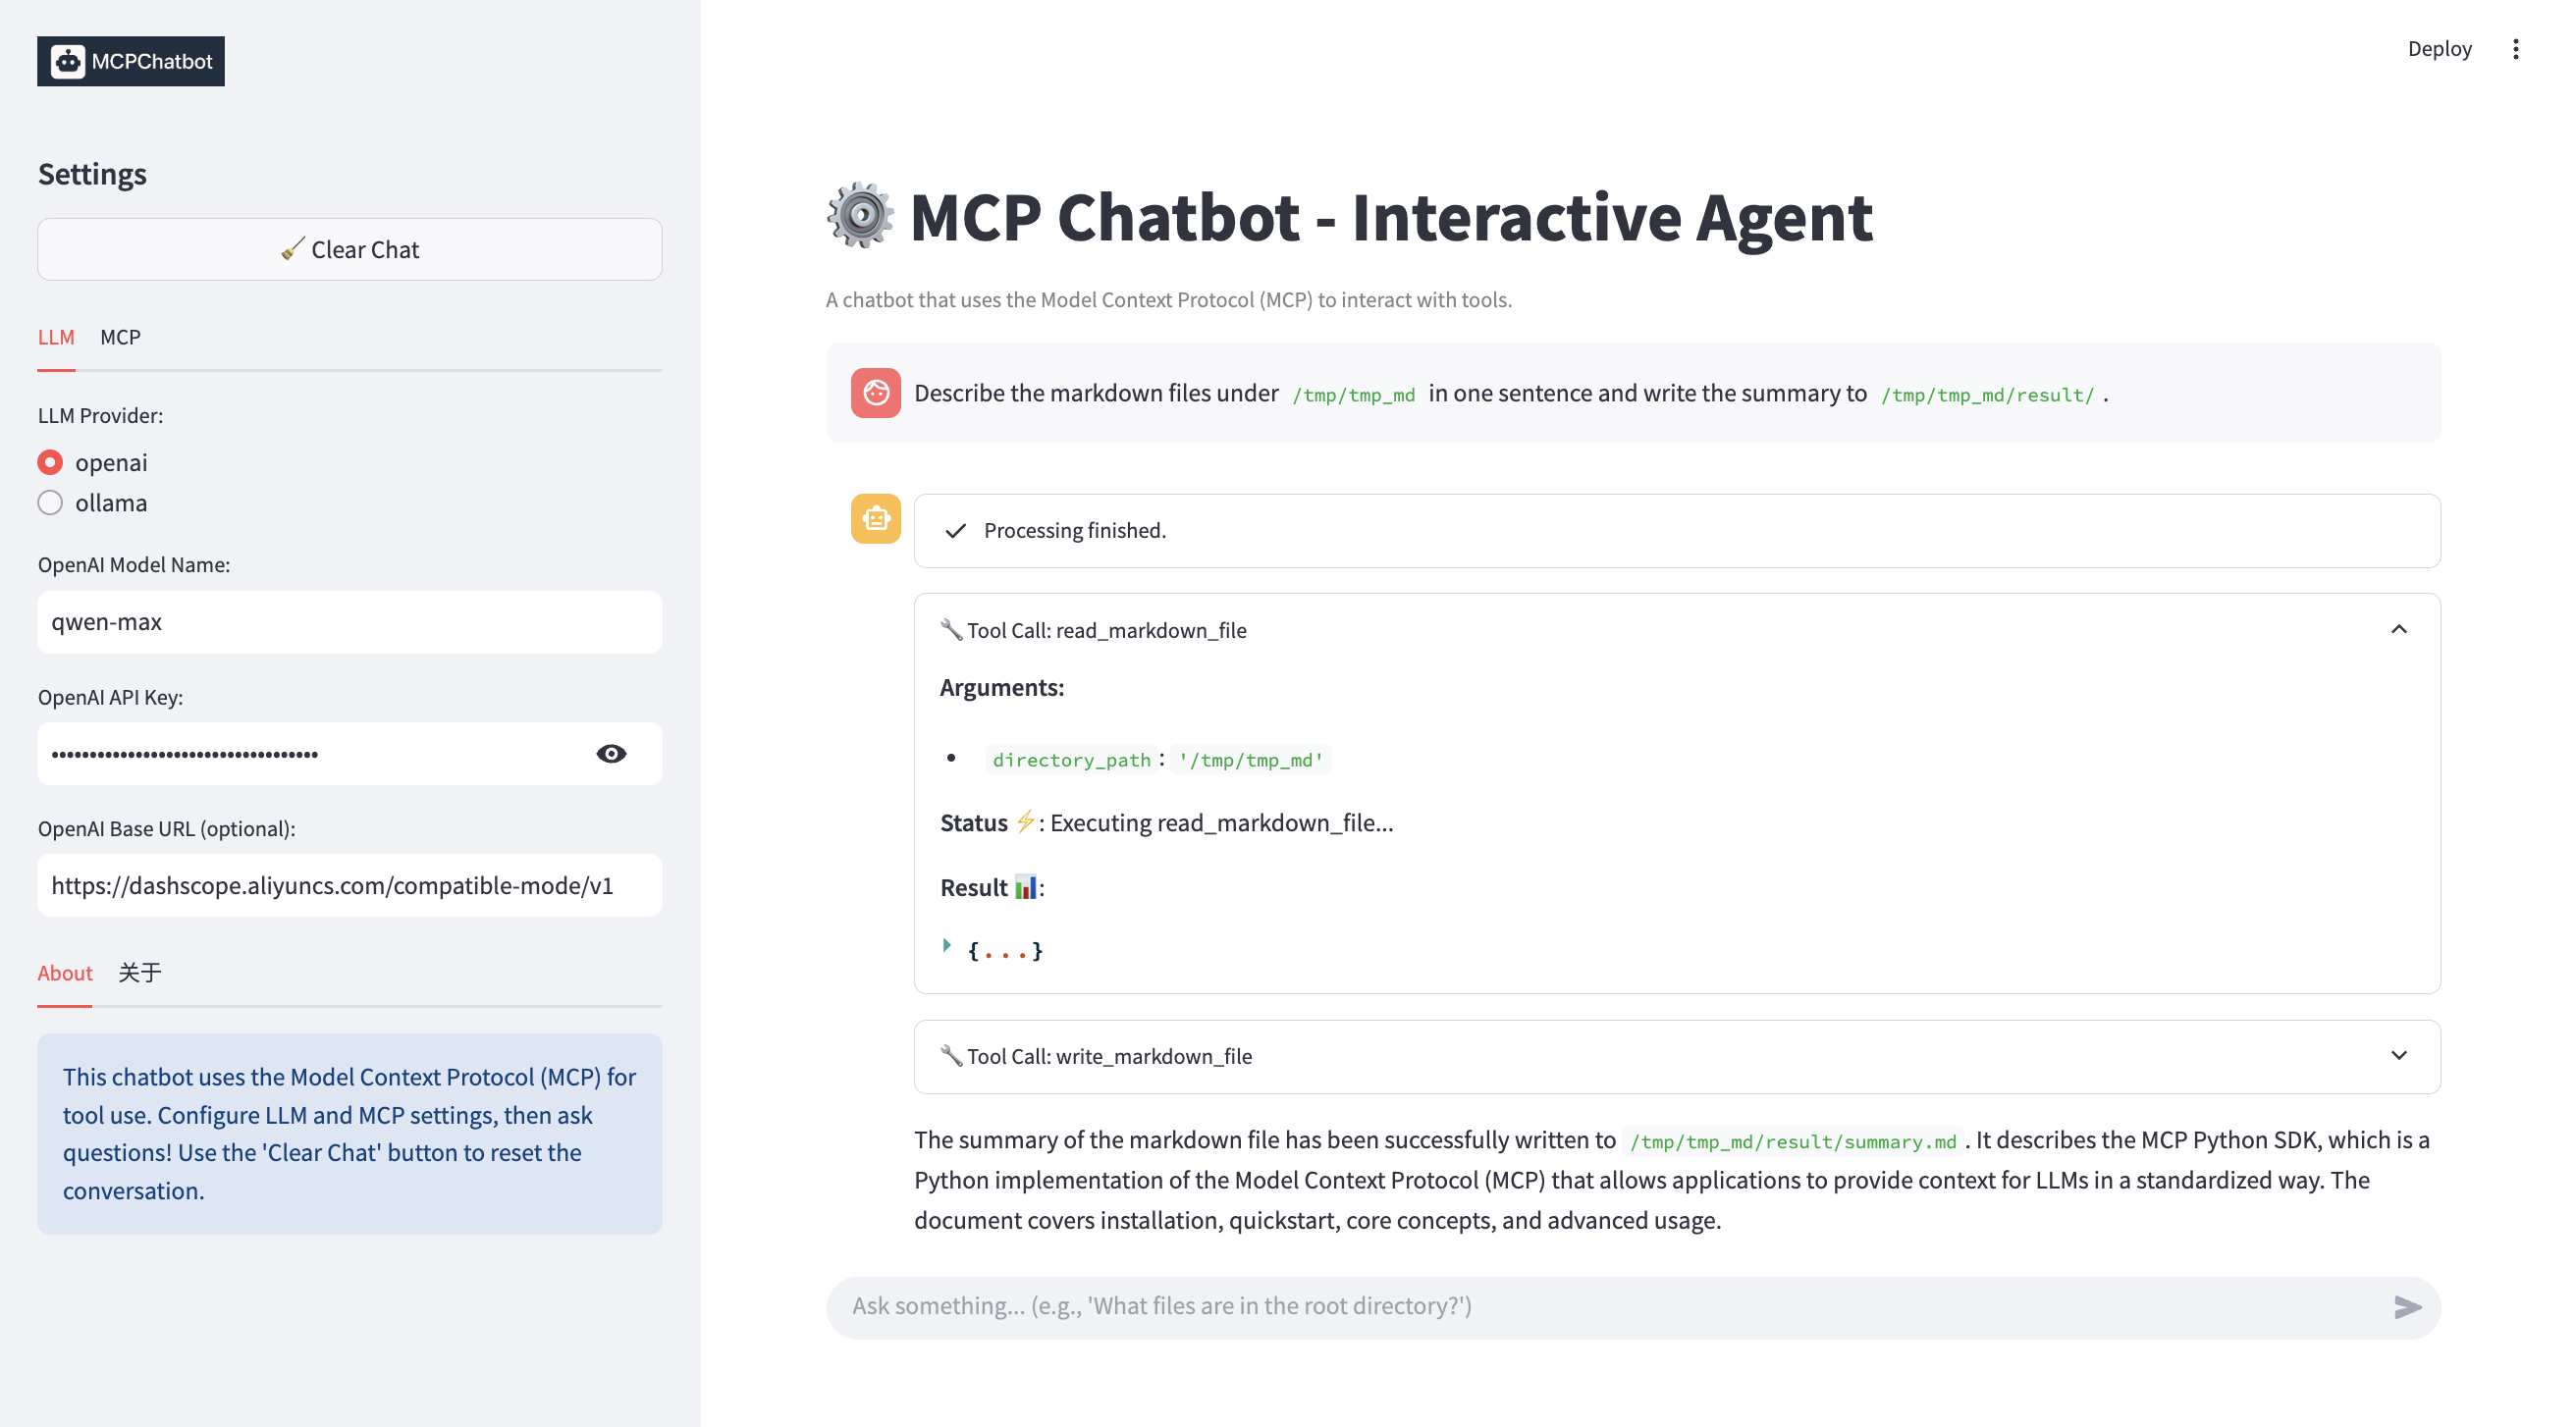
> [!NOTE]
> For more details, see the Streamlit Chatbot Example README.
</details>
Project Structure
- mcp_chatbot/: Core library code
- chat/: Chat session management
- config/: Configuration handling
- llm/: LLM client implementation
- mcp/: MCP client and tool integration
- utils/: Utility functions (e.g. WorkflowTrace and StreamPrinter)
- mcp_servers/: Custom MCP servers implementation
- markdown_processor.py: Server for processing Markdown files
- servers_config.json: Configuration for MCP servers
- data-example/: Example Markdown files for testing
- example/: Example scripts for different use cases
- single_prompt/: Single prompt processing examples (regular and streaming)
- chatbot_terminal/: Interactive terminal chatbot examples (regular and streaming)
- chatbot_streamlit/: Interactive web chatbot example using Streamlit
Extending the Project
You can extend this project by:
1. Adding new MCP servers in the mcp_servers/ directory
2. Updating the servers_config.json to include your new servers
3. Implementing new functionalities in the existing servers
4. Creating new examples based on the provided templates
Troubleshooting
For Windows users, you can take the following servers_config.json as an example:
{
    "mcpServers": {
        "markdown_processor": {
            "command": "C:\\Users\\13430\\.local\\bin\\uv.exe",
            "args": [
                "--directory",
                "C:\\Users\\13430\\mcp_chatbot\\mcp_servers",
                "run",
                "markdown_processor.py"
            ]
        }
    }
}
- Path Issues: Ensure all paths in the configuration files are absolute paths appropriate for your system
- MCP Server Errors: Make sure the tools are properly installed and configured
- API Key Errors: Verify your API key is correctly set in the .env file