
Model Context Protocol(MCP) 编程极速入门
About
This is a step‑by‑step tutorial that teaches how to build a Model Context Protocol (MCP) server and client from scratch using Python 3.11 and the uv package manager. It focuses on implementing a web‑search tool via the ZhiPu API and integrating it with a large language model…
Explore
- Builds an MCP server with the FastMCP abstraction.
- Implements a real‑world web‑search tool using the ZhiPu web‑search‑pro API.
- Uses stdio transport to communicate between server and client.
- Demonstrates how to call MCP tools from a client using ClientSession.
- Integrates a DeepSeek‑compatible LLM with MCP tools via function calling.
- Covers the Sampling feature for human‑in‑the‑loop approval.
- Provides a minimal, self‑contained code example with no persistent storage.

Setting up with Highlight
This MCP is not yet compatible with Highlight’s one-click setup. However, you can still use it with Highlight by following these steps:
- Download and install Highlight from highlightai.com/download
- Navigate to the plugins tab and select "Add Custom Plugin"
-
Configure the plugin with the settings below
Plugin Name
Model Context Protocol(MCP) 编程极速入门Command (node, npx, python, etc.)Please refer to the README for specific instructions on how to obtain API keys or other required environment variables.
- Enable "Start Automatically" if you want the plugin to start when Highlight launches





From the repository
Follow the tutorial in order: initialize a uv project, install dependencies (mcp[cli], httpx, openai), write an MCP server using FastMCP, run it via uv run web_search.py, debug with the MCP Inspector (npx -y @modelcontextprotocol/inspector or mcp dev), and finally build a client that uses the OpenAI‑compatible API and the MCP SDK to call tools.
response = self.client.chat.completions.create(
model=os.getenv("OPENAI_MODEL"),
messages=messages,
tools=available_tools
)
Claude Desktop / Cursor
Paste into your MCP client config file to install this server.
{
    "mcpServers": {
        "model context protocol(mcp) \u7f16\u7a0b\u6781\u901f\u5165\u95e8": {
            "MCP-Chinese-Getting-Started-Guide": {
                "command": "uv",
                "args": [
                    "init",
                    "mcp_getting_started"
                ]
            }
        }
    }
}McpServers
{
    "MCP-Chinese-Getting-Started-Guide": {
        "command": "uv",
        "args": [
            "init",
            "mcp_getting_started"
        ]
    }
}
[TOC]
简介
模型上下文协议(MCP)是一个创新的开源协议,它重新定义了大语言模型(LLM)与外部世界的互动方式。MCP 提供了一种标准化方法,使任意大语言模型能够轻松连接各种数据源和工具,实现信息的无缝访问和处理。MCP 就像是 AI 应用程序的 USB-C 接口,为 AI 模型提供了一种标准化的方式来连接不同的数据源和工具。
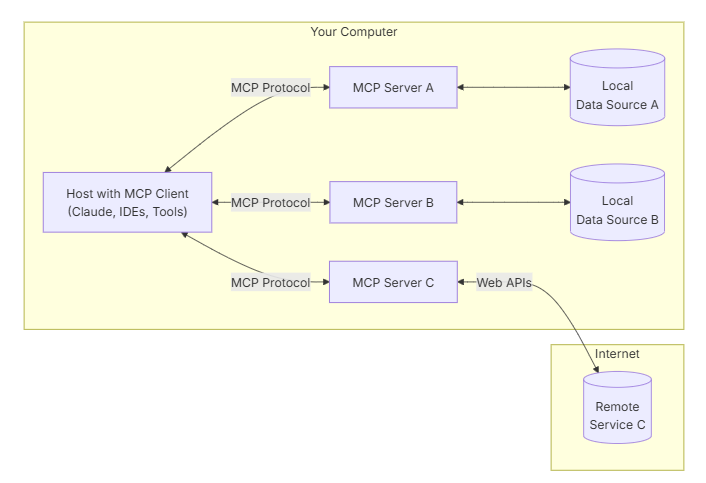
MCP 有以下几个核心功能:
- Resources 资源
- Prompts 提示词
- Tools 工具
- Sampling 采样
- Roots 根目录
- Transports 传输层
因为大部分功能其实都是服务于 Claude 客户端的,本文更希望编写的 MCP 服务器服务与通用大语言模型,所以本文将会主要以“工具”为重点,其他功能会放到最后进行简单讲解。
其中 MCP 的传输层支持了 2 种协议的实现:stdio(标准输入/输出)和 SSE(服务器发送事件),因为 stdio 更为常用,所以本文会以 stdio 为例进行讲解。
本文将会使用 3.11 的 Python 版本,并使用 uv 来管理 Python 项目。同时代码将会在文末放到 Github 上,废话不多说,我们这就开始吧~
开发 MCP 服务器
在这一小节中,我们将会实现一个用于网络搜索的服务器。首先,我们先来通过 uv 初始化我们的项目。
> uv 官方文档:https://docs.astral.sh/uv/
```shell
Sign in to leave a review
Use Google, GitHub, or an email account so ratings stay tied to real people.
No reviews posted yet.



