
Building a Simple MCP Server in Python Using the MCP Python SDK
About
The Model Context Protocol (MCP) is a standardized way to supply context to large language models (LLMs). Using the MCP Python SDK, you can build servers that expose data (resources), functionality (tools), and interaction templates (prompts) to LLM applications in a secure and m
Explore
During initialization, an MCP server advertises which features it supports. Clients (and front‑ends) can adapt dynamically based on these flags:
| Capability | Feature Flag | Description |
|--------------|--------------|---------------------------------------------|
| prompts | listChanged | Prompt template management |
| resources | subscribe<br>listChanged | Resource exposure and live updates |
| tools | listChanged | Tool discovery and execution |
| logging | – | Server logging configuration |
| completion | – | Argument completion suggestions |
- listChanged signals that the set of available prompts/resources/tools can change at runtime.
- subscribe lets clients register for updates when resource data changes.
- logging and completion are simple toggles for debug output and autocomplete help.
This tutorial will guide you through creating a simple MCP server using the MCP Python SDK.

Setting up with Highlight
This MCP is not yet compatible with Highlight’s one-click setup. However, you can still use it with Highlight by following these steps:
- Download and install Highlight from highlightai.com/download
- Navigate to the plugins tab and select "Add Custom Plugin"
-
Configure the plugin with the settings below
Plugin Name
Building a Simple MCP Server in Python Using the MCP Python SDKCommand (node, npx, python, etc.)Please refer to the README for specific instructions on how to obtain API keys or other required environment variables.
- Enable "Start Automatically" if you want the plugin to start when Highlight launches





From the repository
Before you begin, ensure you have the following installed:
- Python 3.7+ (preferably 3.11 or higher)
- pip – the Python package installer
- Node.js 18.x
You will also need to install the MCP Python SDK. You have two options:
- Using pip directly:
pip install "mcp[cli]"
uv:
If you are managing your project with uv, initialize your project and add MCP as a dependency.
uv init mcp-server
cd mcp-server
uv add "mcp[cli]"
For more detailed installation instructions, please check the MCP Python SDK documentation.
This section details how to set up your development environment on Ubuntu 22.04 using Python 3.11, ensuring you have the correct Python version and the MCP Python SDK installed.
Option 1: Manual Installation
If you prefer a step-by-step approach, follow these instructions:
1. Add the deadsnakes PPA: This repository provides more recent Python versions for Ubuntu.
sudo add-apt-repository ppa:deadsnakes/ppa -y
2. Update package lists:
sudo apt update
3. Install Python 3.11 and essential tools:
sudo apt install -y python3.11 python3.11-venv python3.11-distutils python3-apt
python3.11: The Python 3.11 interpreter.
python3.11-venv: The virtual environment module for Python 3.11.
python3.11-distutils: Essential tools for building and installing Python packages.
python3-apt: A Python interface to the APT package management system (helps resolve potential dependency issues).
4. Set Python 3.11 as the default python3 (optional but recommended): This simplifies using Python 3.11 without needing to specify python3.11 every time.
sudo update-alternatives --install /usr/bin/python3 python3 /usr/bin/python3.10 1
sudo update-alternatives --install /usr/bin/python3 python3 /usr/bin/python3.11 2
sudo update-alternatives --config python3
You will be prompted to select the default Python 3 version. Choose Python 3.11.
5. Install pip for Python 3.11: pip is the package installer for Python.
curl -sS https://bootstrap.pypa.io/get-pip.py | sudo python3.11
6. Verify Python and pip versions:
python3 --version
python3 -m pip --version
Confirm that the output shows Python 3.11 and a recent version of pip.
8. Setting up NodeSource for Node.js 18.x…
curl -fsSL https://deb.nodesource.com/setup_18.x | sudo -E bash -
sudo apt-get update
sudo apt-get install -y nodejs
9. Create and activate a virtual environment: Using a virtual environment isolates your project's dependencies.
python3 -m venv .venv
source .venv/bin/activate
A .venv directory will be created in your project, and your terminal prompt will change to (.venv), indicating that the environment is active.
2. Upgrade pip within the virtual environment:
pip install --upgrade pip
3. Install the MCP Python SDK: Create a file named requirements.txt in your project directory with the following content:
mcp[cli]
Then, install the SDK using pip:
pip install -r requirements.txt
Option 2: Using the install.sh Script
For a more automated setup, you can use the provided install.sh script.
1. Save the script: Ensure the script you provided earlier is saved as install.sh in your project directory.
2. Make the script executable: Open your terminal, navigate to your project directory, and run:
chmod +x install.sh
3. Run the script: Execute the script:
bash install.sh
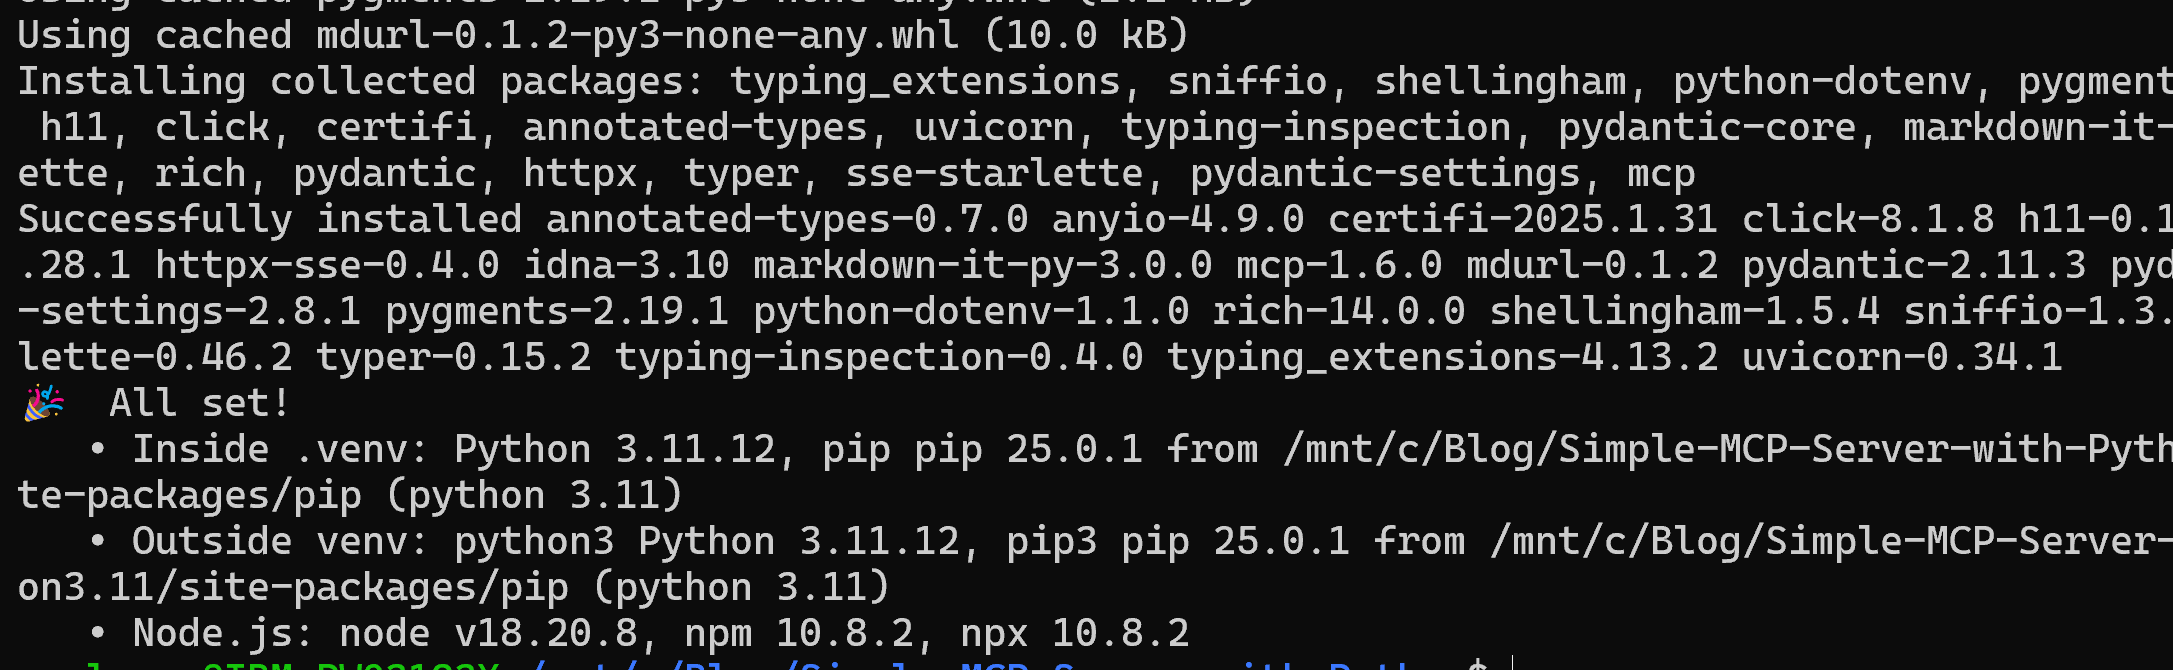
The install.sh script automates the manual installation steps:
Adds the deadsnakes PPA and updates package lists.
Installs Python 3.11 and necessary tools.
Sets Python 3.11 as the default python3.
Installs pip for Python 3.11.
Creates and activates a virtual environment named .venv.
Upgrades pip within the virtual environment.
Install Node.js: node v18.20.8
Installs the MCP Python SDK from requirements.txt (if the file exists).
Important Notes:
Regardless of the method you choose, make sure to activate the virtual environment (source .venv/bin/activate) every time you work on your project in a new terminal session. This ensures you are using the correct Python version and have access to the installed MCP SDK.
The install.sh script is designed for Ubuntu 22.04. If you are using a different operating system or distribution, you might need to adjust the script accordingly.
The requirements.txt file is crucial for managing your project's dependencies. Always keep it updated with the necessary packages.
With your environment set up, you're ready to create your MCP server!
---
First, make sure your Python virtual environment is activated by running:
source .venv/bin/activate
This should be done in the root directory of your project. Then, change into your MCP server folder:
cd mcp-server
With your server defined in server.py, you can now run it. There are several ways to run an MCP server depending on your goals — development, debugging, integration, or deployment.
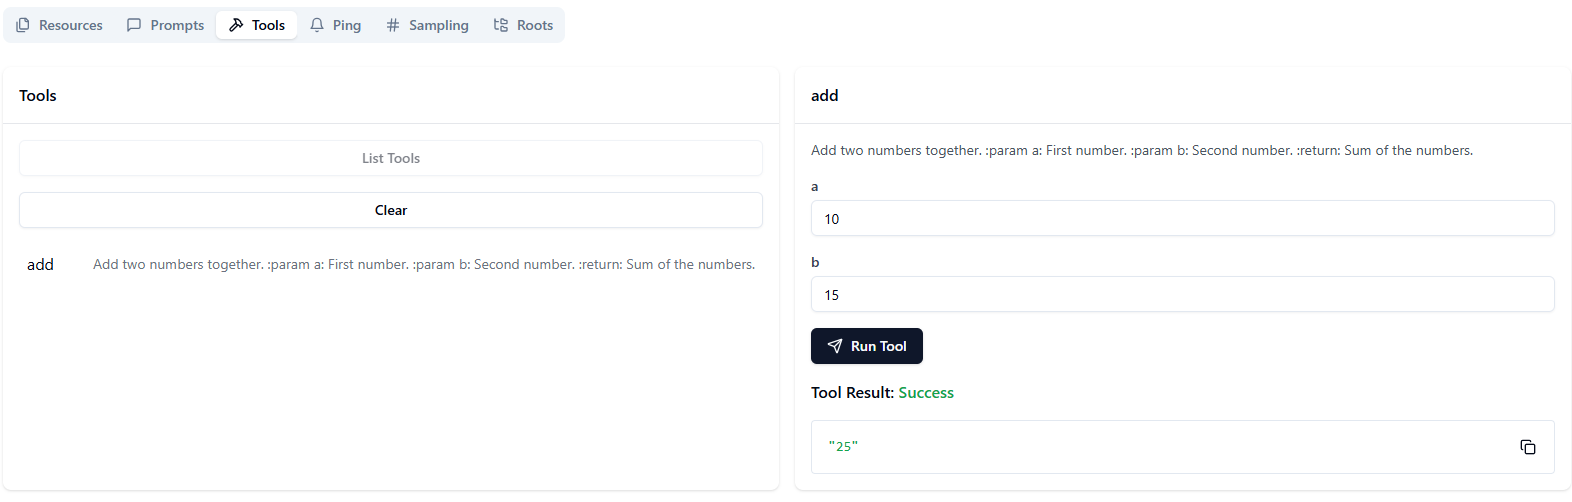
Call a Tool (add): Navigate to the add tool in the Inspector.
Consider the following scenario while working with our example (which registers an addition tool, a greeting resource, and a code review prompt):
1. Accessing the Tools Tab:
With the MCP Inspector loaded, navigate to the Tools tab. Click List Tools. Here, you will see a list of all registered tools from your server. In our case, one of the entries is the add tool.
2. Testing the "Add" Functionality:
Click on the add tool from the list. The Inspector displays the input schema for the tool, prompting you for two numbers (for example, parameters a and b).
- Input Parameters: Enter a = 10 and b = 15.
- Execution: Click the execute button in the Inspector’s execution panel.
3. Reviewing the Output:
Once executed, the Inspector immediately displays the result of the operation. You should see that the sum is returned as 25.
This immediate feedback loop shows how you can quickly verify that your tool’s logic is working as expected without leaving the development interface.
Tools are functions that perform computations or side effects. In this example, we’ll define a simple addition tool.
Open server.py and add the following code:
@mcp.tool()
def add(a: int, b: int) -> int:
"""
Add two numbers together.
:param a: First number.
:param b: Second number.
:return: Sum of the numbers.
"""
return a + b
- Call a Tool (
add): Navigate to theaddtool in the Inspector.
1. Accessing the Tools Tab:
With the MCP Inspector loaded, navigate to the Tools tab. Click List Tools. Here, you will see a list of all registered tools from your server. In our case, one of the entries is the add tool.
2. Testing the "Add" Functionality:
Click on the add tool from the list. The Inspector displays the input schema for the tool, prompting you for two numbers (for example, parameters a and b).
- Input Parameters: Enter a = 10 and b = 15.
- Execution: Click the execute button in the Inspector’s execution panel.
3. Reviewing the Output:
Once executed, the Inspector immediately displays the result of the operation. You should see that the sum is returned as 25.
This immediate feedback loop shows how you can quickly verify that your tool’s logic is working as expected without leaving the development interface.
Claude Desktop / Cursor
Paste into your MCP client config file to install this server.
{
    "mcpServers": {
        "building a simple mcp server in python using the mcp python sdk": {
            "Simple-MCP-Server-with-Python": {
                "command": "uv",
                "args": [
                    "init",
                    "mcp-server"
                ]
            }
        }
    }
}McpServers
{
"Simple-MCP-Server-with-Python": {
"command": "uv",
"args": [
"init",
"mcp-server"
]
}
}The Model Context Protocol (MCP) is a standardized way to supply context to large language models (LLMs). Using the MCP Python SDK, you can build servers that expose data (resources), functionality (tools), and interaction templates (prompts) to LLM applications in a secure and modular fashion. In this tutorial, we’ll build a simple MCP server in Python step by step.
Introduction
The Model Context Protocol (MCP) standardizes the interface between applications and LLMs. With MCP, you can separate the concerns of providing context, executing code, and managing user interactions. The MCP Python SDK implements the full MCP specification, allowing you to:
- Expose Resources: Deliver data to LLMs (similar to GET endpoints).
- Define Tools: Provide functionality that performs actions or computations (like POST endpoints).
- Create Prompts: Offer reusable, templated interactions.
MCP Primitives
Every MCP server can implement three core primitives. These define who controls the invocation and what role each primitive plays:
| Primitive | Control | Description | Example Use |
|-------------|------------------------|------------------------------------------------------|-------------------------------------|
| Prompts | User‑controlled | Interactive templates invoked by user choice | Slash commands, menu options |
| Resources | Application‑controlled | Contextual data managed by the client application | File contents, API responses |
| Tools | Model‑controlled | Functions exposed to the LLM to take actions | API calls, data updates |
- Prompts let you define _structured_ conversation starters.
- Resources are like read‑only data endpoints for the LLM’s context.
- Tools enable the LLM to do things—calculate, fetch, update.
---
Server Capabilities
During initialization, an MCP server advertises which features it supports. Clients (and front‑ends) can adapt dynamically based on these flags:
| Capability | Feature Flag | Description |
|--------------|--------------|---------------------------------------------|
| prompts | listChanged | Prompt template management |
| resources | subscribe<br>listChanged | Resource exposure and live updates |
| tools | listChanged | Tool discovery and execution |
| logging | – | Server logging configuration |
| completion | – | Argument completion suggestions |
- listChanged signals that the set of available prompts/resources/tools can change at runtime.
- subscribe lets clients register for updates when resource data changes.
- logging and completion are simple toggles for debug output and autocomplete help.
This tutorial will guide you through creating a simple MCP server using the MCP Python SDK.
Prerequisites
Before you begin, ensure you have the following installed:
- Python 3.7+ (preferably 3.11 or higher)
- pip – the Python package installer
- Node.js 18.x
You will also need to install the MCP Python SDK. You have two options:
- Using pip directly:
pip install "mcp[cli]"
uv:
If you are managing your project with uv, initialize your project and add MCP as a dependency.
  uv init mcp-server
  cd mcp-server
  uv add "mcp[cli]"
For more detailed installation instructions, please check the MCP Python SDK documentation.
Setting Up Your Environment
This section details how to set up your development environment on Ubuntu 22.04 using Python 3.11, ensuring you have the correct Python version and the MCP Python SDK installed.
Option 1: Manual Installation
If you prefer a step-by-step approach, follow these instructions:
1. Add the deadsnakes PPA: This repository provides more recent Python versions for Ubuntu.
sudo add-apt-repository ppa:deadsnakes/ppa -y
2. Update package lists:
sudo apt update
3. Install Python 3.11 and essential tools:
sudo apt install -y python3.11 python3.11-venv python3.11-distutils python3-apt
python3.11: The Python 3.11 interpreter.
python3.11-venv: The virtual environment module for Python 3.11.
python3.11-distutils: Essential tools for building and installing Python packages.
python3-apt: A Python interface to the APT package management system (helps resolve potential dependency issues).
4. Set Python 3.11 as the default python3 (optional but recommended): This simplifies using Python 3.11 without needing to specify python3.11 every time.
    sudo update-alternatives --install /usr/bin/python3 python3 /usr/bin/python3.10 1
    sudo update-alternatives --install /usr/bin/python3 python3 /usr/bin/python3.11 2
    sudo update-alternatives --config python3
You will be prompted to select the default Python 3 version. Choose Python 3.11.
5. Install pip for Python 3.11: pip is the package installer for Python.
curl -sS https://bootstrap.pypa.io/get-pip.py | sudo python3.11
6. Verify Python and pip versions:
    python3 --version
    python3 -m pip --version
Confirm that the output shows Python 3.11 and a recent version of pip.
8. Setting up NodeSource for Node.js 18.x…
curl -fsSL https://deb.nodesource.com/setup_18.x | sudo -E bash -
sudo apt-get update
sudo apt-get install -y nodejs
9. Create and activate a virtual environment: Using a virtual environment isolates your project's dependencies.
    python3 -m venv .venv
    source .venv/bin/activate
A .venv directory will be created in your project, and your terminal prompt will change to (.venv), indicating that the environment is active.
2. Upgrade pip within the virtual environment:
pip install --upgrade pip
3. Install the MCP Python SDK: Create a file named requirements.txt in your project directory with the following content:
mcp[cli]
Then, install the SDK using pip:
pip install -r requirements.txt
Option 2: Using the install.sh Script
For a more automated setup, you can use the provided install.sh script.
1. Save the script: Ensure the script you provided earlier is saved as install.sh in your project directory.
2. Make the script executable: Open your terminal, navigate to your project directory, and run:
chmod +x install.sh
3. Run the script: Execute the script:
bash install.sh
The install.sh script automates the manual installation steps:
Adds the deadsnakes PPA and updates package lists.
Installs Python 3.11 and necessary tools.
Sets Python 3.11 as the default python3.
Installs pip for Python 3.11.
Creates and activates a virtual environment named .venv.
Upgrades pip within the virtual environment.
Install Node.js: node v18.20.8
Installs the MCP Python SDK from requirements.txt (if the file exists).
Important Notes:
Regardless of the method you choose, make sure to activate the virtual environment (source .venv/bin/activate) every time you work on your project in a new terminal session. This ensures you are using the correct Python version and have access to the installed MCP SDK.
The install.sh script is designed for Ubuntu 22.04. If you are using a different operating system or distribution, you might need to adjust the script accordingly.
- The
requirements.txtfile is crucial for managing your project's dependencies. Always keep it updated with the necessary packages.
With your environment set up, you're ready to create your MCP server!
---
Setting Up Your Project
Create a new directory for your project and navigate into it. Then, create a file called server.py in the root of your project.
Your project structure should look like this:
mcp-server/
├── server.py
└── (other files such as .env, README.md, etc. as needed)
Creating Your MCP Server
In this section, we will create a simple MCP server that exposes a calculator tool and a dynamic greeting resource. You can later extend this to add more functionality using prompts or additional tools.
Defining Tools
Tools are functions that perform computations or side effects. In this example, we’ll define a simple addition tool.
Open server.py and add the following code:
```python
Sign in to leave a review
Use Google, GitHub, or an email account so ratings stay tied to real people.
No reviews posted yet.



