
What?
About
Sample Application showing Agentic AI using MCP servers interacting with REST Services, Database and File Store
Explore
- Sample application for Agentic AI with MCP
- Connects to REST API, PostgreSQL, Document Storage
- Populates financial transaction test data
- Configured for Claude Desktop as MCP client

Setting up with Highlight
This MCP is not yet compatible with Highlight’s one-click setup. However, you can still use it with Highlight by following these steps:
- Download and install Highlight from highlightai.com/download
- Navigate to the plugins tab and select "Add Custom Plugin"
-
Configure the plugin with the settings below
Plugin Name
What?Command (node, npx, python, etc.)Please refer to the README for specific instructions on how to obtain API keys or other required environment variables.
- Enable "Start Automatically" if you want the plugin to start when Highlight launches





From the repository
1. Install UV
To install UV, run the following command:
pip install uv
2. Verify Installation
Confirm that UV is installed by running:
uv --version
1. Create a Virtual Environment
Run the following command to create a virtual environment:
python -m venv venv
2. Activate the Virtual Environment
- On Windows:
venv\Scripts\activate
- On macOS/Linux:
source venv/bin/activate
3. Install Dependencies from pyproject.toml
Use pip to install dependencies specified in the pyproject.toml file:
pip install .
4. Verify Installation
Ensure all dependencies are installed correctly:
pip list
4. Run Test Cases
Ensure all test cases are passed using pytest:
pytest
1. Locate the Sample Configuration File
Use the provided config/sample_claude_desktop_config.json file as a template.
2. Copy the Configuration File
Place the file in the following directory:
~\AppData\Roaming\Claude
3. Rename the File
Rename the file to claude_desktop_config.json.
4. Update Configuration Details
- Open the claude_desktop_config.json file in a text editor.
- Update the Alpha Vantage API Key with your key.
- Update the Database Connection Details with the appropriate credentials and connection string.
Claude Desktop / Cursor
Paste into your MCP client config file to install this server.
{
    "mcpServers": {
        "what?": {
            "agentic-ai-mcp": {
                "command": "python",
                "args": [
                    "-m",
                    "venv",
                    "venv"
                ]
            }
        }
    }
}McpServers
{
    "agentic-ai-mcp": {
        "command": "python",
        "args": [
            "-m",
            "venv",
            "venv"
        ]
    }
}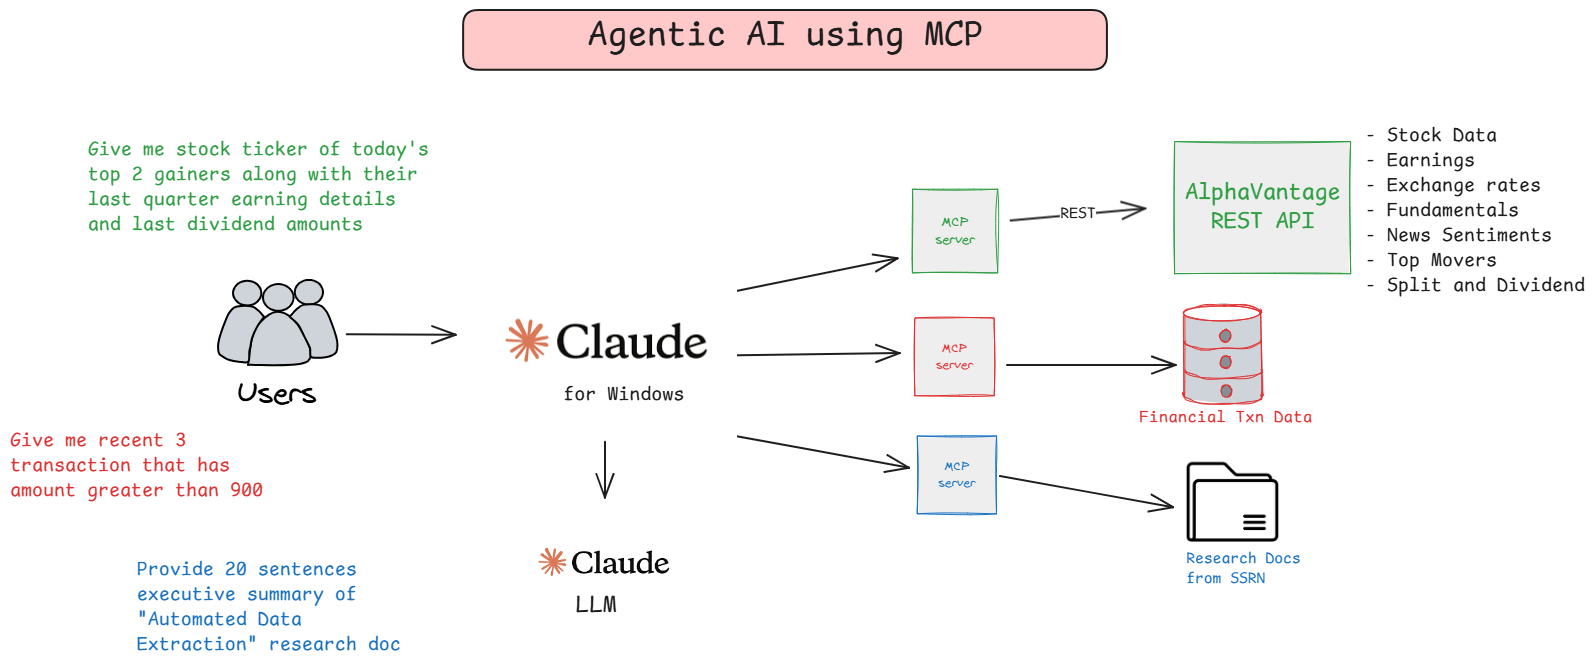
Sample application showing Agentic AI using MCP Server connecting to REST API, PostgreSQL Database and Document Storage
Sign in to leave a review
Use Google, GitHub, or an email account so ratings stay tied to real people.
No reviews posted yet.



