

AIPo Labs
About
Allow dynamic search and execute any tools available on ACI.dev.
Details
- Repository
- aipotheosis-labs/aci-mcp
- License
- MIT
Explore

Setting up with Highlight
This MCP is not yet compatible with Highlight’s one-click setup. However, you can still use it with Highlight by following these steps:
- Download and install Highlight from highlightai.com/download
- Navigate to the plugins tab and select "Add Custom Plugin"
-
Configure the plugin with the settings below
Plugin Name
AIPo LabsCommand (node, npx, python, etc.)uvxArguments-
Argument 1
aci-mcp -
Argument 2
unified-server
Environment-
ACI_API_KEY
<ACI_API_KEY> -
LINKED_ACCOUNT_OWNER_ID
<LINKED_ACCOUNT_OWNER_ID>
Please refer to the README for specific instructions on how to obtain API keys or other required environment variables.
-
Argument 1
- Enable "Start Automatically" if you want the plugin to start when Highlight launches





From the repository
curl -sSf https://install.pypa.io/get-pip.py | python3 -
pip install uv
$ uvx aci-mcp --help
Usage: aci-mcp [OPTIONS] COMMAND [ARGS]...
Main entry point for the package.
Options:
--help Show this message and exit.
Commands:
apps-server Start the apps-specific MCP server to access tools...
unified-server Start the unified MCP server with unlimited tool access.
```
Claude Desktop / Cursor
Paste into your MCP client config file to install this server.
{
    "mcpServers": {
        "aipo labs": {
            "env": {
                "ACI_API_KEY": "<ACI_API_KEY>",
                "LINKED_ACCOUNT_OWNER_ID": "<LINKED_ACCOUNT_OWNER_ID>"
            },
            "args": [
                "aci-mcp",
                "unified-server"
            ],
            "command": "uvx"
        }
    }
}Linux
{
    "env": {
        "ACI_API_KEY": "<ACI_API_KEY>",
        "LINKED_ACCOUNT_OWNER_ID": "<LINKED_ACCOUNT_OWNER_ID>"
    },
    "args": [
        "aci-mcp",
        "unified-server"
    ],
    "command": "uvx"
}
Macos
{
    "env": {
        "ACI_API_KEY": "<ACI_API_KEY>",
        "LINKED_ACCOUNT_OWNER_ID": "<LINKED_ACCOUNT_OWNER_ID>"
    },
    "args": [
        "aci-mcp",
        "unified-server"
    ],
    "command": "uvx"
}
Windows
{
    "env": {
        "ACI_API_KEY": "<ACI_API_KEY>",
        "LINKED_ACCOUNT_OWNER_ID": "<LINKED_ACCOUNT_OWNER_ID>"
    },
    "args": [
        "/c",
        "uvx",
        "aci-mcp",
        "unified-server"
    ],
    "command": "cmd"
}
MCP servers powered by ACI.dev
> [!IMPORTANT]
> This README only covers basic development guide. For full documentation and tutorials on ACI.dev MCP servers please visit aci.dev docs.
Table of Contents
- MCP servers powered by ACI.dev
- Table of Contents
- Overview
- Run MCP Servers Locally
- Integration with MCP Clients
- Docker
- Debugging
Overview
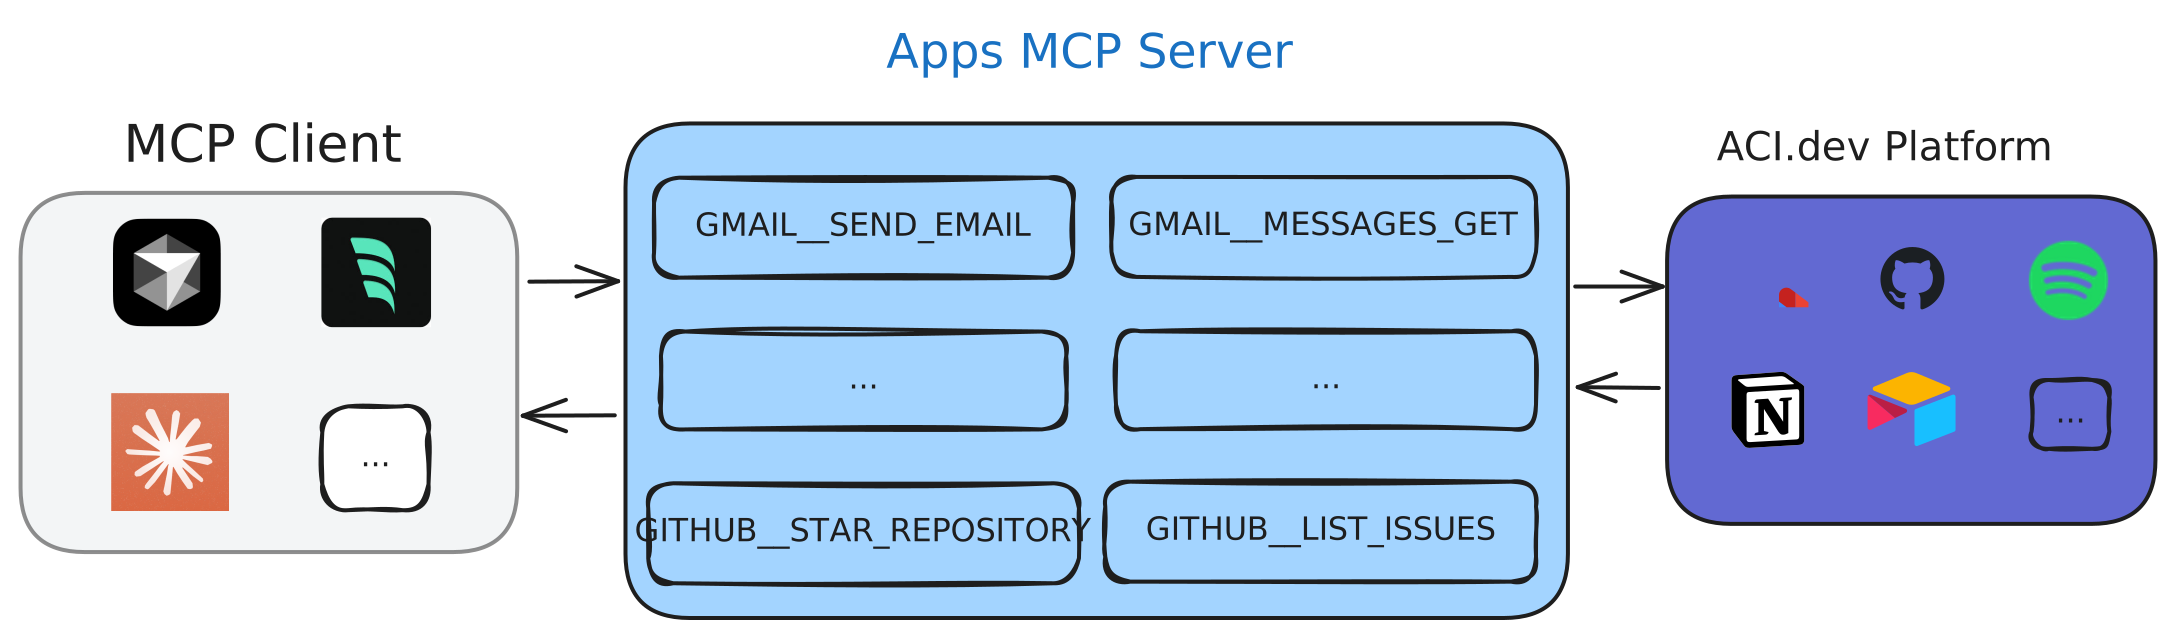
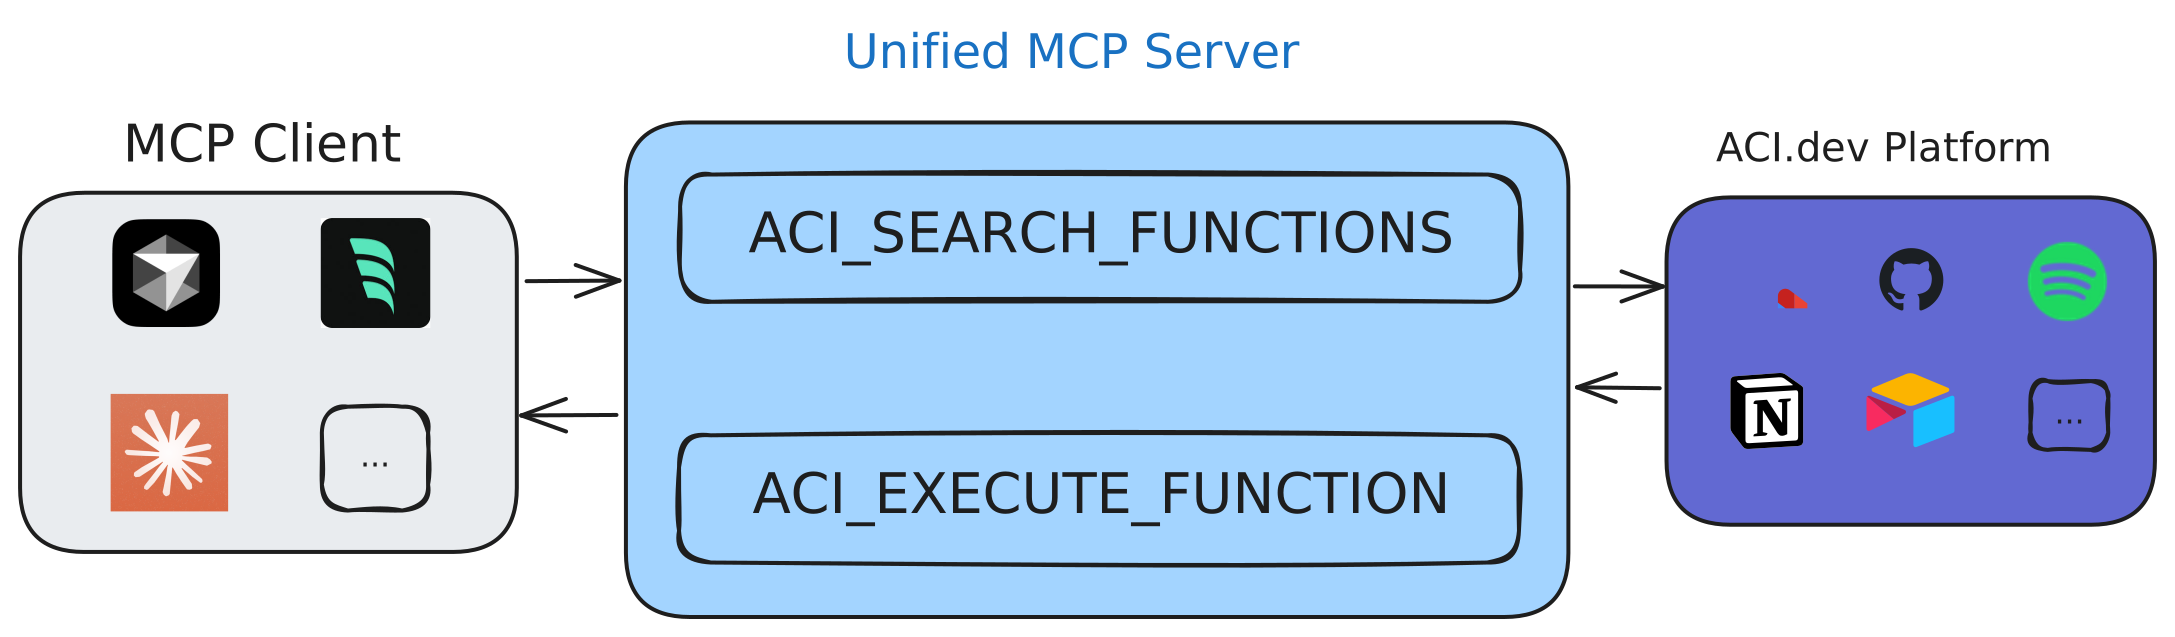
This package provides three Model Context Protocol (MCP) servers for accessing ACI.dev managed functions (tools):
- aci-mcp-apps: An MCP server that provides direct access to functions (tools) from specified apps
- aci-mcp-unified: An MCP server that provides two meta functions (tools) (ACI_SEARCH_FUNCTIONS and ACI_EXECUTE_FUNCTION) to discover and execute ALL functions (tools) available on ACI.dev
> [!IMPORTANT]
> For detailed explanation and tutorials on the MCP servers please visit aci.dev docs.
Run MCP Servers Locally
The package is published to PyPI, so you can run it directly using uvx:
# Install uv if you don't have it already
curl -sSf https://install.pypa.io/get-pip.py | python3 -
pip install uv
$ uvx aci-mcp --help
Usage: aci-mcp [OPTIONS] COMMAND [ARGS]...
Main entry point for the package.
Options:

  --help  Show this message and exit.
Commands:

  apps-server     Start the apps-specific MCP server to access tools...

  unified-server  Start the unified MCP server with unlimited tool access.
Integration with MCP Clients
See the Unified MCP Server and Apps MCP Server sections for more information on how to configure the MCP servers with different MCP clients.
Docker
# Build the image
docker build -t aci-mcp .
Run the unified server
docker run --rm -i -e ACI_API_KEY=<ACI_API_KEY> aci-mcp unified-server --linked-account-owner-id <LINKED_ACCOUNT_OWNER_ID>
Run the apps server
docker run --rm -i -e ACI_API_KEY=<ACI_API_KEY> aci-mcp apps-server --apps <APP1,APP2,...> --linked-account-owner-id <LINKED_ACCOUNT_OWNER_ID>
Debugging
You can use the MCP inspector to debug the server:
# For unified server
npx @modelcontextprotocol/inspector uvx aci-mcp unified-server --linked-account-owner-id <LINKED_ACCOUNT_OWNER_ID>
For apps server
npx @modelcontextprotocol/inspector uvx aci-mcp apps-server --apps "BRAVE_SEARCH,GMAIL" --linked-account-owner-id <LINKED_ACCOUNT_OWNER_ID>
Running tail -n 20 -f ~/Library/Logs/Claude/mcp*.log will show the logs from the server and may help you debug any issues.
Sign in to leave a review
Use Google, GitHub, or an email account so ratings stay tied to real people.
No reviews posted yet.



