
GemFireMCPServer
About
# GemFireMCPServer A Spring Boot–based Model Context Protocol (MCP) server that uses VMware GemFire and Spring AI to enable fast, vector-based search over financial documents. ## Overview This project demonstrates how an MCP client (like Claude Desktop) can interact with a GemFire-backed server to perform semantic…
Details
- License
- Apache-2.0 license
Explore
- 🔗 MCP-compliant endpoints for document ingestion, listing, and querying
- 🧠 Local, ONNX-based embeddings with Spring AI
- 💾 Vector and metadata storage in VMware GemFire
- 🧾 File metadata stored in a dedicated GemFire region
- 🔍 Fast, in-memory semantic search
---
To resolve GemFire dependencies, you’ll need access credentials from Broadcom.
1. Log in to the Broadcom Customer Support Portal with your customer credentials.
2. Go to the VMware Tanzu GemFire downloads page, select VMware Tanzu GemFire, click Show All Releases.
3. Find the release named Click Green Token for Repository Access and click the Token Download icon on the RIGHT. This opens the instructions on how to use the GemFire artifact repository. At the top, the Access Token is provided. Click Copy to Clipboard. You will use this Access Token as the password.
Open the application.properties file and configure the following properties:
spring.main.web-application-type=none — This example uses the STDIO connection with the MCP Client (Claude Desktop), so we must disable the embedded web server as it doesn't require handling HTTP requests.
spring.main.banner-mode=off — Disables the application banner displayed on startup.
logging.pattern.console= — Disables formatted log output to reduce console noise.
spring.ai.mcp.server.stdio=true — Enables the MCP STDIO server.
spring.ai.vectorstore.gemfire.port=7070 — Port used by the GemFire HTTP service; must match the --http-service-port used by your cluster.
spring.ai.vectorstore.gemfire.initialize-schema=true — Automatically creates the vector index and region in GemFire. Set to false if you're managing the index manually.
spring.ai.vectorstore.gemfire.index-name=financialDocuments — Name of the vector index in GemFire.
spring.ai.embedding.transformer.onnx.model-uri=classpath:onnx/model.onnx — Path to the ONNX model file created earlier.
spring.ai.embedding.transformer.tokenizer.uri=classpath:onnx/tokenizer.json — Path to the tokenizer file created earlier.
spring.ai.embedding.transformer.onnx.modelOutputName=token_embeddings — Output node name used for embeddings.
docs.path=/Path/To/FinancialDocs — Directory to load financial documents from.
gemfire.region.docsMetadata= - Region that will store the metatdata about each document stored in the GemFire Vector DB.
Make sure you have downloaded GemFire 10.x or later and the GemFire Vector DB extension from the Broadcom Customer Support Portal
1. Unzip GemFire and open the directory.
2. Locate the GemFire Vector DB .gfm file you downloaded from the Broadcom Support Portal and move it into the extensions directory of your GemFire installation.
_This file is not included in the main GemFire download—you must download it separately._
For example:
vmware-gemfire-10.1.3/extensions/vmware-gemfire-vectordb-1.2.0.gfm
3. Open a terminal, navigate to the
bin folder in the GemFire directory, and start GFSH:
./gfsh
4. In GFSH, confirm that the Vector DB extension is installed:
version --full
You should see output similar to:
``
    gfsh>version --full

    ----------------------------------------

    Tanzu GemFire

    ----------------------------------------

    Build-Java-Vendor: BellSoft

    GemFire-Source-Date: 2025-03-20 13:29:10 -0700

    Build-Platform: Linux 4.18.0-553.el8_10.x86_64 amd64

    Build-Java-Version: 1.8.0_442

    GemFire-Source-Revision: 62f20538984ebd92beee00874104d8706c6e4719

    Build-Id: gemfire 2511

    Product-Name: Tanzu GemFire

    GemFire-Version: 10.1.3

    GemFire-Source-Repository: support/10.1

    ----------------------------------------

    Tanzu GemFire Vector DB

    ----------------------------------------

    GemFire-Vector-DB-Source-Repository: HEAD

    GemFire-Vector-DB-Source-Date: 2025-04-10 09:22:32 -0700

    GemFire-Vector-DB-Version: 1.2.0

    GemFire-Vector-DB-Source-Revision: 9ad01268475449c40fd58491b373b30ce3c91522


5. Start a locator with the HTTP service enabled:
start locator --name locator1 --http-service-port 7070
6. Start a server with a different HTTP service port:
start server --name server1 --http-service-port 7071
gemfire.region.docsMetadata
7. Create a region matching the name used in yourproperty. For example:
create region --name=FinancialDocumentsMetadata --type=PARTITION
jsonClaude -> Settings -> Developer
The GemFire cluster is now ready to accept documents.---
The GemFire MCP Server will appear as a Tool in Claude Desktop once configured.
1.Download Claude Desktop
2. Start Claude Desktop and open the Developer settings:
claude_desktop_config.json
3. Click on Edit Config
4. Open thefile.mcpServers
5. Add or update thesection as follows:
{
"mcpServers": {
"filesystem": {
"command": "npx",
"args": [
"-y",
"@modelcontextprotocol/server-filesystem",
"/Path/To/financialDocs"
]
},
"gemfire-mcp-demo": {
"command": "java",
"args": [
"-jar",
"/Path/To/GEMFIRE/MCP/JAR"
]
}
}
}
`
This registers two MCP servers that will appear as tools in Claude Desktop:
 Filesystem Tool — Enables Claude Desktop to access files in the specified directory. Be sure
/Path/To/financialDocs matches the value of the docs.path= property in your application config.
GemFire MCP Server — Allows Claude Desktop to interact with the GemFire cluster. The JAR path must point to the output of the
./gradlew clean build command mentioned earlier.
6. Restart Claude Desktop.
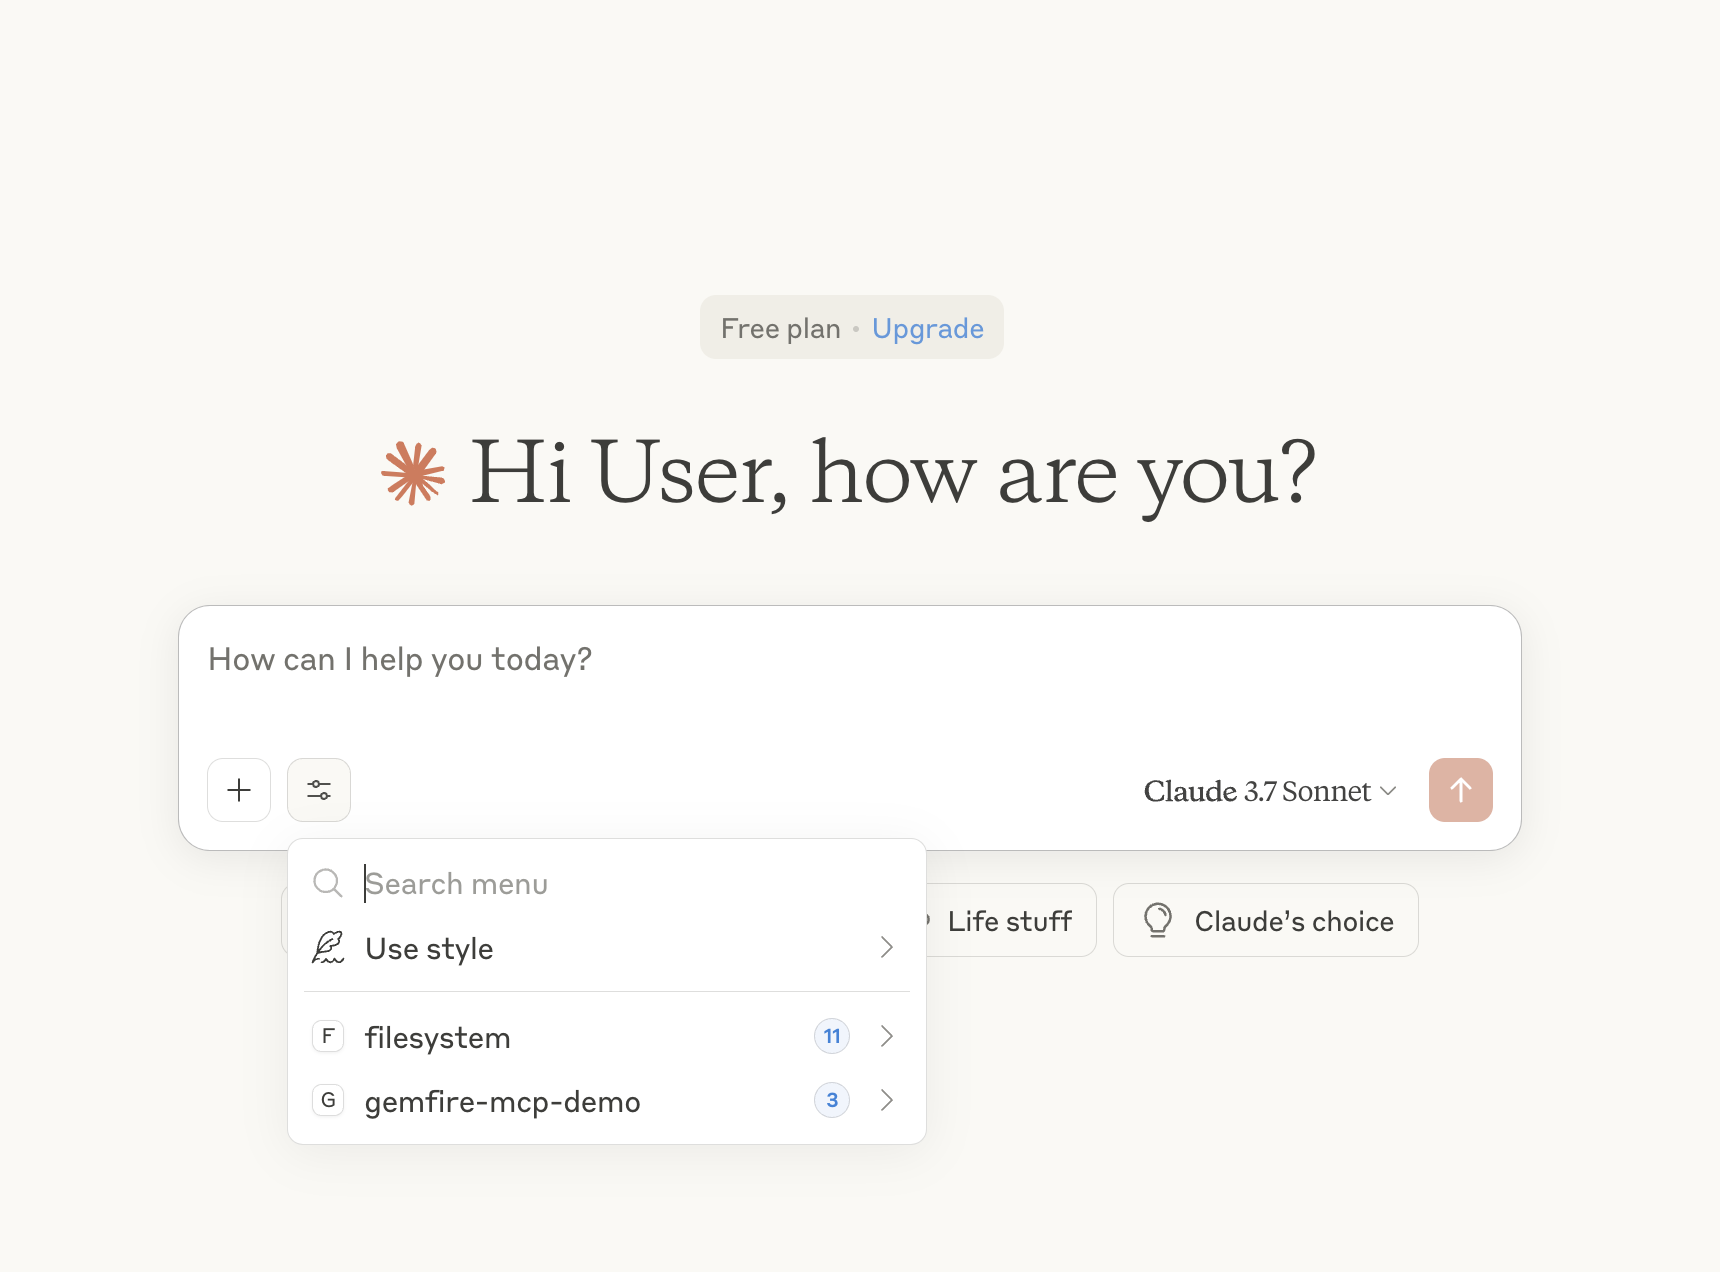
7. When it restarts, click the tool selector button (next to the + button) to confirm that both tools are available (in version 0.9.3).
8. Make sure you have documents in the
financialDocuments directory. This demo used the Eli Lilly 2024 10K and the Eli Lilly May 1, 2025 10Q` documents. ---
Clicking on gemfire-mcp-demo in Claude Desktop will reveal three available tools:
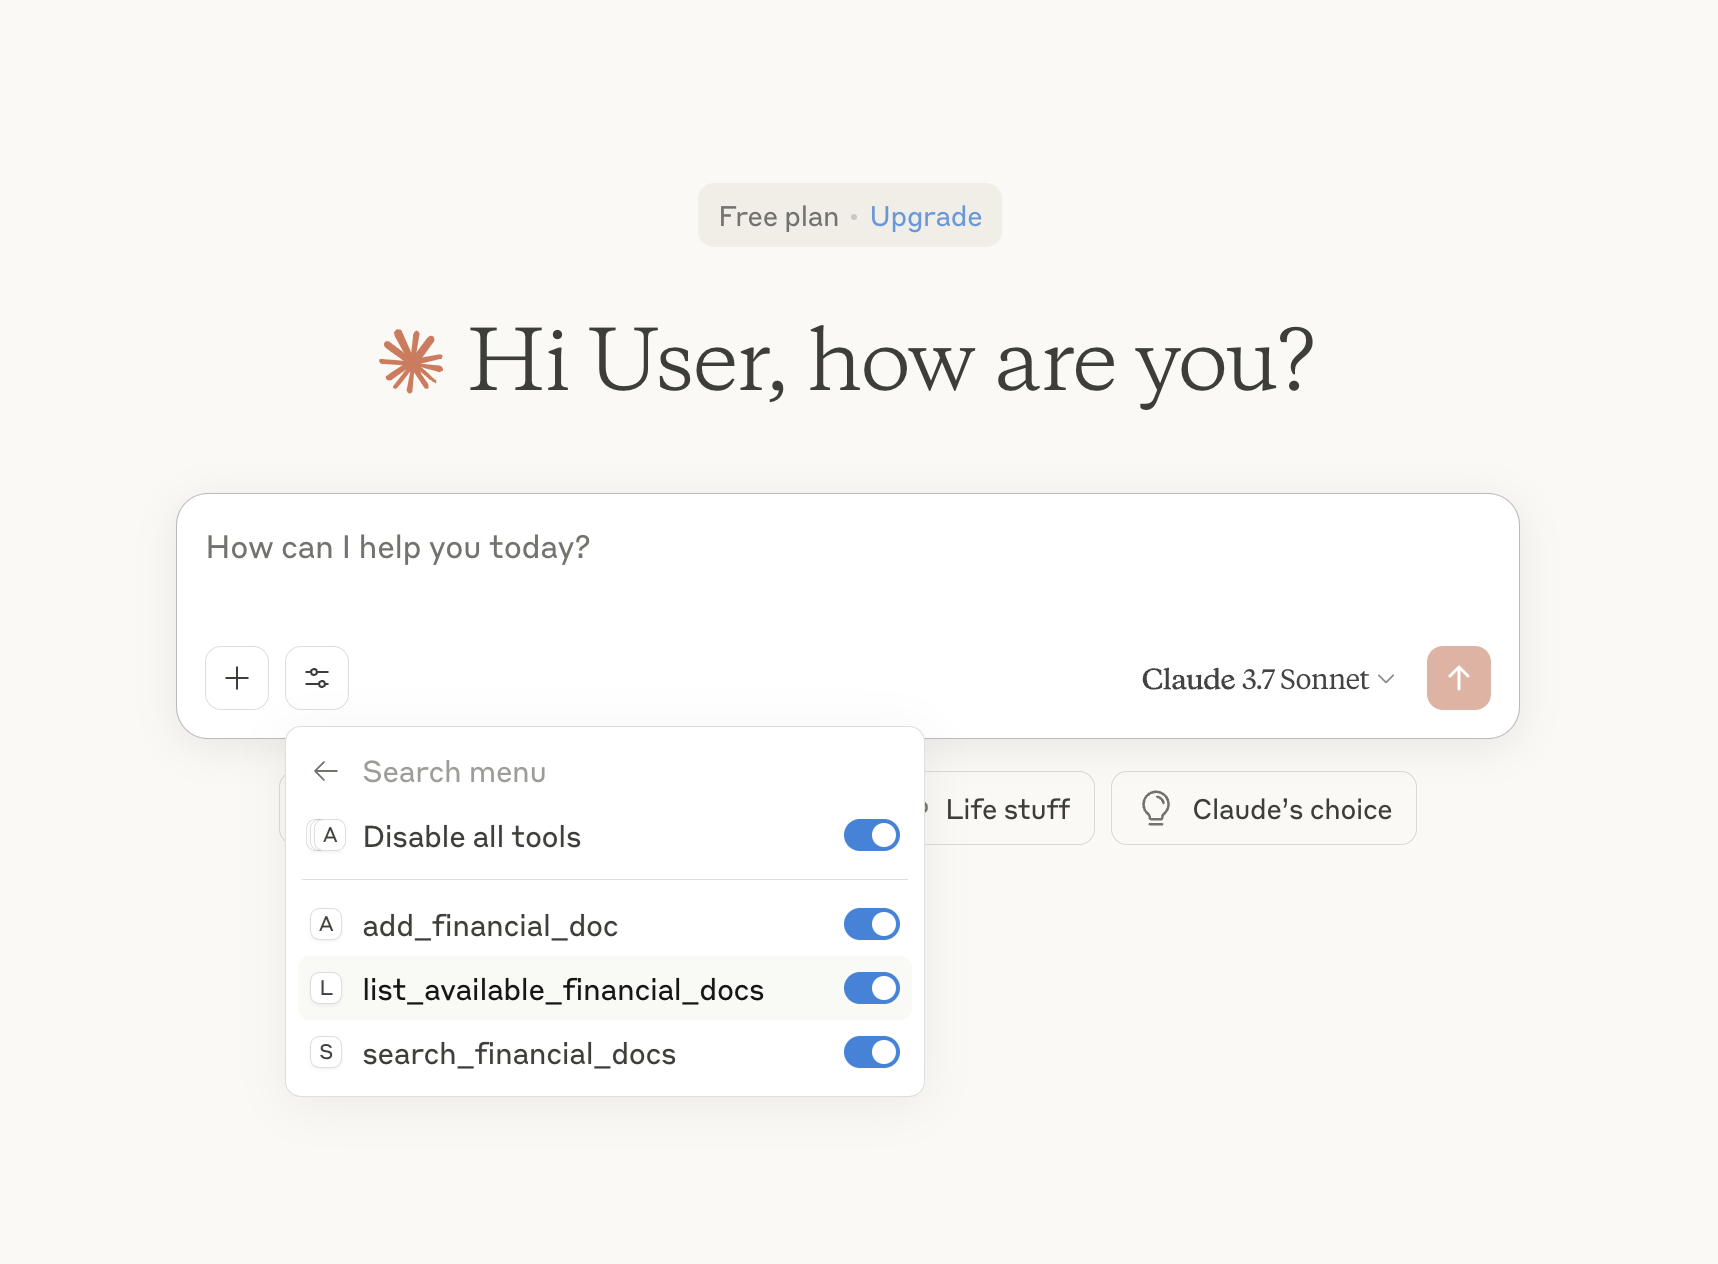
add_financial_doc
Claude will look for a specified document in the financialDocs directory and send it to the MCP server. The server will generate vector embeddings for the document, store them in GemFire Vector DB, and add the associated metadata to the metadata region.
list_available_financial_docs
Claude asks the MCP server for a list of available documents. The server queries the GemFire metadata region and returns the list of documents.
- search_financial_docs
A Spring Boot–based Model Context Protocol (MCP) server that uses VMware GemFire and Spring AI to enable fast, vector-based search over financial documents.
Overview
This project demonstrates how an MCP client (like Claude Desktop) can interact with a GemFire-backed server to perform semantic search over documents. Financial files are chunked, embedded into vector representations, and stored in GemFire to support fast, intelligent querying using a Retrieval-Augmented Generation (RAG) workflow.
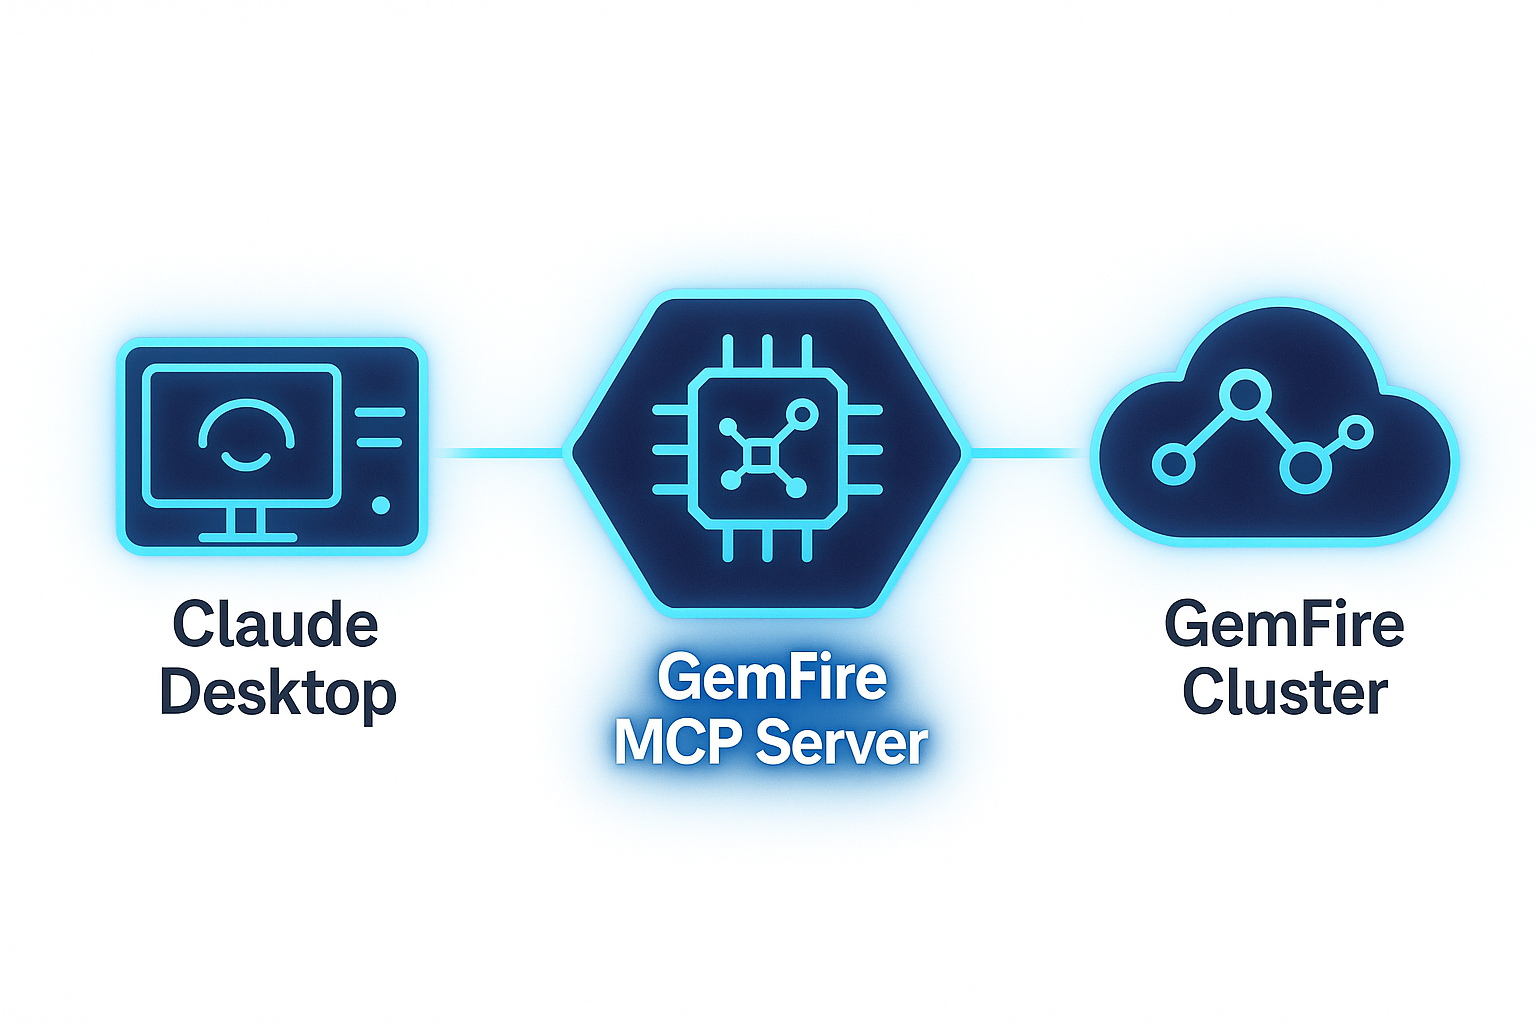
Users can:
- Upload documents — Files are chunked, embedded, and stored as vectors in GemFire. Metadata (such as file name and size) is stored separately in a dedicated GemFire region.
- Browse uploaded content — Retrieve and view metadata for all stored documents.
- Query documents (RAG) — Submit a natural language question from an MCP client. The server performs a vector similarity search and passes the top results to the language model for response generation.
Features
- 🔗 MCP-compliant endpoints for document ingestion, listing, and querying
- 🧠 Local, ONNX-based embeddings with Spring AI
- 💾 Vector and metadata storage in VMware GemFire
- 🧾 File metadata stored in a dedicated GemFire region
- 🔍 Fast, in-memory semantic search
---
What You'll Need
- Java 17+
- Gradle (recommended for this demo) or Maven
- GemFire VectorDB
- VMware GemFire 10.x+
- Claude Desktop (or an MCP client)
---
GemFire MCP Server Setup
Setting Up Embedding with ONNX
To generate embeddings for PDF documents, Spring AI requires an embedding model. This demo uses the ONNX-exported version of
sentence-transformers/all-MiniLM-L6-v2 for local inference.
Refer to Spring AI’s ONNX documentation for details, or follow the local setup below:
Steps
1. Create a virtual environment:
python3 -m venv venv
2. Activate it:
source ./venv/bin/activate
3. Upgrade pip and install build tools:
pip install --upgrade pip setuptools wheel
4. Install required packages:
pip install optimum onnx onnxruntime sentence-transformers
6. Export the model:
optimum-cli export onnx --model sentence-transformers/all-MiniLM-L6-v2 onnx-output-folder
This will generate a model.onnx and tokenizer.json in the onnx-output-folder.
Potential issues
ONNX Export: Missing Dependency
If you see the following error during ONNX export:
Weight deduplication check in the ONNX export requires accelerate. Please install accelerate to run it.
Install the missing dependency:
pip install accelerate
Clone and Build the Project
Clone the Repository
git clone https://github.com/jomartin-999/gemfireMcpServerDemo.git
cd gemfireMcpServerDemo
Configure GemFire Artifact Access
To resolve GemFire dependencies, you’ll need access credentials from Broadcom.1. Log in to the Broadcom Customer Support Portal with your customer credentials.
2. Go to the VMware Tanzu GemFire downloads page, select VMware Tanzu GemFire, click Show All Releases.
3. Find the release named Click Green Token for Repository Access and click the Token Download icon on the RIGHT. This opens the instructions on how to use the GemFire artifact repository. At the top, the Access Token is provided. Click Copy to Clipboard. You will use this Access Token as the password.
If using Gradle
Add credentials to your ~/.gradle/gradle.properties (or project-level gradle.properties):gemfireRepoUsername=EXAMPLE-USERNAME
gemfireRepoPassword=MY-PASSWORD
EXAMPLE-USERNAME is your support.broadcom.com username.
- MY-PASSWORD is the Access Token you copied in step 3.
If using Maven:
Update your~/.m2/settings.xml:
<settings>
  <servers>
    <server>
      <id>gemfire-release-repo</id>
      <username>EXAMPLE-USERNAME</username>
      <password>MY-PASSWORD</password>
    </server>
  </servers>
</settings>
EXAMPLE-USERNAME is your support.broadcom.com username.
- MY-PASSWORD is the Access Token you copied in step 3.
Configure application.properties
Open the application.properties file and configure the following properties:
spring.main.web-application-type=none — This example uses the STDIO connection with the MCP Client (Claude Desktop), so we must disable the embedded web server as it doesn't require handling HTTP requests.
spring.main.banner-mode=off — Disables the application banner displayed on startup.
logging.pattern.console= — Disables formatted log output to reduce console noise.
spring.ai.mcp.server.stdio=true — Enables the MCP STDIO server.
spring.ai.vectorstore.gemfire.port=7070 — Port used by the GemFire HTTP service; must match the --http-service-port used by your cluster.
spring.ai.vectorstore.gemfire.initialize-schema=true — Automatically creates the vector index and region in GemFire. Set to false if you're managing the index manually.
spring.ai.vectorstore.gemfire.index-name=financialDocuments — Name of the vector index in GemFire.
spring.ai.embedding.transformer.onnx.model-uri=classpath:onnx/model.onnx — Path to the ONNX model file created earlier.
spring.ai.embedding.transformer.tokenizer.uri=classpath:onnx/tokenizer.json — Path to the tokenizer file created earlier.
spring.ai.embedding.transformer.onnx.modelOutputName=token_embeddings — Output node name used for embeddings.
docs.path=/Path/To/FinancialDocs — Directory to load financial documents from.
gemfire.region.docsMetadata= - Region that will store the metatdata about each document stored in the GemFire Vector DB.
Build the MCP Server
./gradlew clean build
GemFire Cluster Setup
Make sure you have downloaded GemFire 10.x or later and the GemFire Vector DB extension from the Broadcom Customer Support Portal
1. Unzip GemFire and open the directory.
2. Locate the GemFire Vector DB .gfm file you downloaded from the Broadcom Support Portal and move it into the extensions directory of your GemFire installation.
_This file is not included in the main GemFire download—you must download it separately._
For example:
vmware-gemfire-10.1.3/extensions/vmware-gemfire-vectordb-1.2.0.gfm
3. Open a terminal, navigate to the
bin folder in the GemFire directory, and start GFSH:
./gfsh
4. In GFSH, confirm that the Vector DB extension is installed:
version --full
You should see output similar to:
``
    gfsh>version --full

    ----------------------------------------

    Tanzu GemFire

    ----------------------------------------

    Build-Java-Vendor: BellSoft

    GemFire-Source-Date: 2025-03-20 13:29:10 -0700

    Build-Platform: Linux 4.18.0-553.el8_10.x86_64 amd64

    Build-Java-Version: 1.8.0_442

    GemFire-Source-Revision: 62f20538984ebd92beee00874104d8706c6e4719

    Build-Id: gemfire 2511

    Product-Name: Tanzu GemFire

    GemFire-Version: 10.1.3

    GemFire-Source-Repository: support/10.1

    ----------------------------------------

    Tanzu GemFire Vector DB

    ----------------------------------------

    GemFire-Vector-DB-Source-Repository: HEAD

    GemFire-Vector-DB-Source-Date: 2025-04-10 09:22:32 -0700

    GemFire-Vector-DB-Version: 1.2.0

    GemFire-Vector-DB-Source-Revision: 9ad01268475449c40fd58491b373b30ce3c91522


5. Start a locator with the HTTP service enabled:
start locator --name locator1 --http-service-port 7070
6. Start a server with a different HTTP service port:
start server --name server1 --http-service-port 7071
gemfire.region.docsMetadata
7. Create a region matching the name used in yourproperty. For example:
create region --name=FinancialDocumentsMetadata --type=PARTITION
jsonClaude -> Settings -> Developer
The GemFire cluster is now ready to accept documents.---
Claude Desktop Setup
The GemFire MCP Server will appear as a Tool in Claude Desktop once configured.1.Download Claude Desktop
2. Start Claude Desktop and open the Developer settings:
claude_desktop_config.json
3. Click on Edit Config
4. Open thefile.mcpServers
5. Add or update thesection as follows:
{
"mcpServers": {
"filesystem": {
"command": "npx",
"args": [
"-y",
"@modelcontextprotocol/server-filesystem",
"/Path/To/financialDocs"
]
},
"gemfire-mcp-demo": {
"command": "java",
"args": [
"-jar",
"/Path/To/GEMFIRE/MCP/JAR"
]
}
}
}
`
This registers two MCP servers that will appear as tools in Claude Desktop:
 Filesystem Tool — Enables Claude Desktop to access files in the specified directory. Be sure
/Path/To/financialDocs matches the value of the docs.path= property in your application config.
GemFire MCP Server — Allows Claude Desktop to interact with the GemFire cluster. The JAR path must point to the output of the
./gradlew clean build command mentioned earlier.
6. Restart Claude Desktop.
7. When it restarts, click the tool selector button (next to the + button) to confirm that both tools are available (in version 0.9.3).
8. Make sure you have documents in the
financialDocuments directory. This demo used the Eli Lilly 2024 10K and the Eli Lilly May 1, 2025 10Q documents.
---
Using the Tools
Clicking on
gemfire-mcp-demo` in Claude Desktop will reveal three available tools:
add_financial_doc
Claude will look for a specified document in the financialDocs directory and send it to the MCP server. The server will generate vector embeddings for the document, store them in GemFire Vector DB, and add the associated metadata to the metadata region.
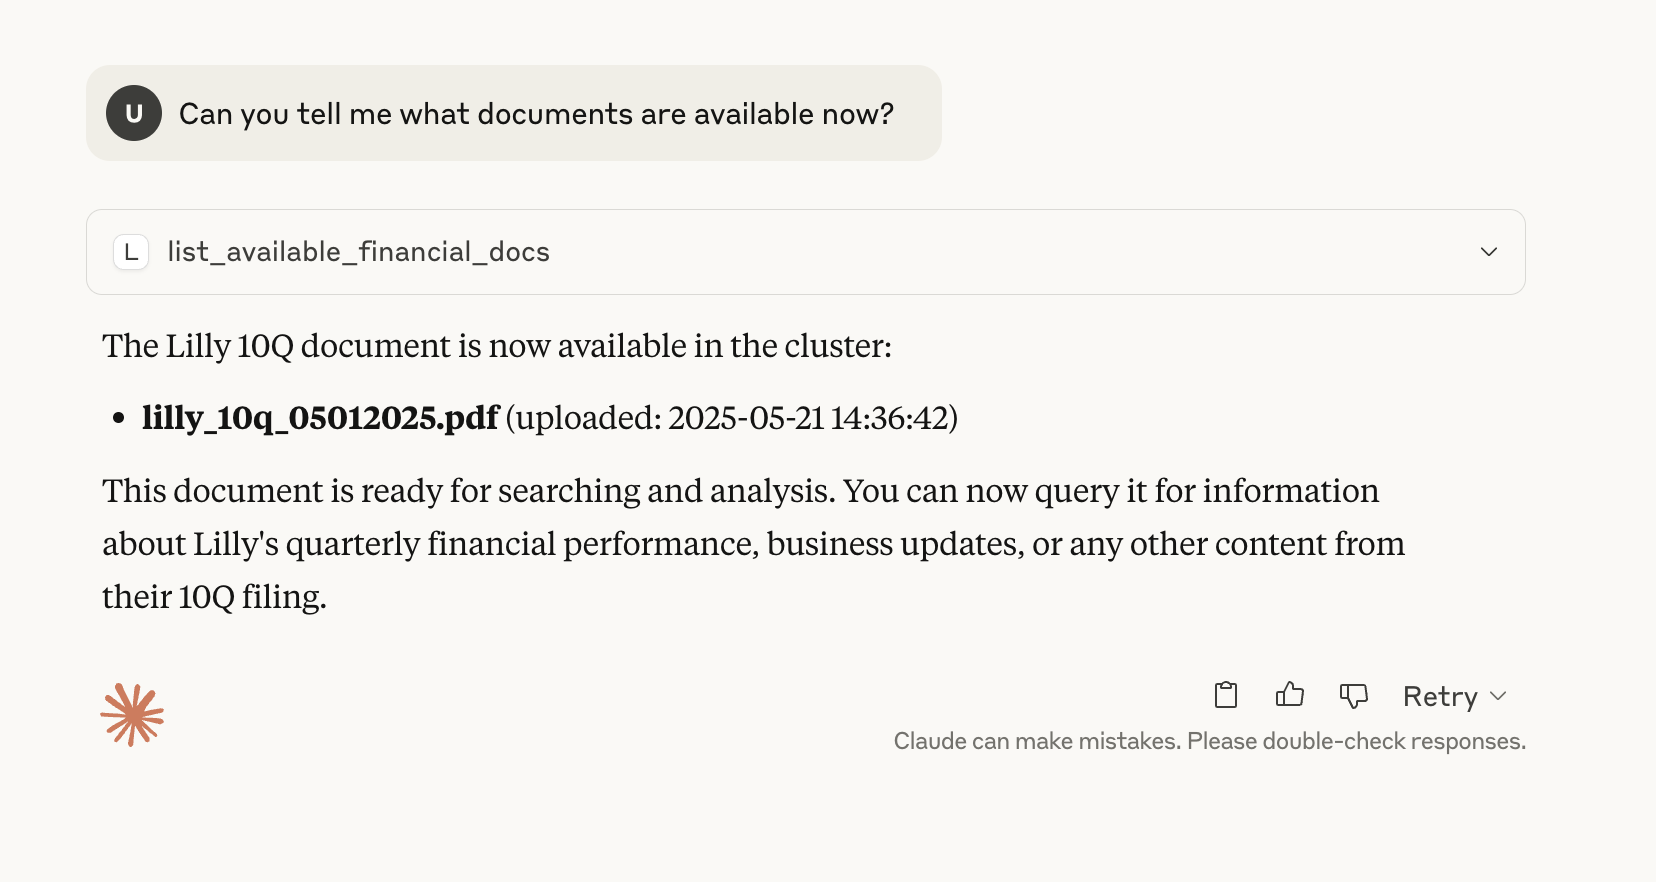
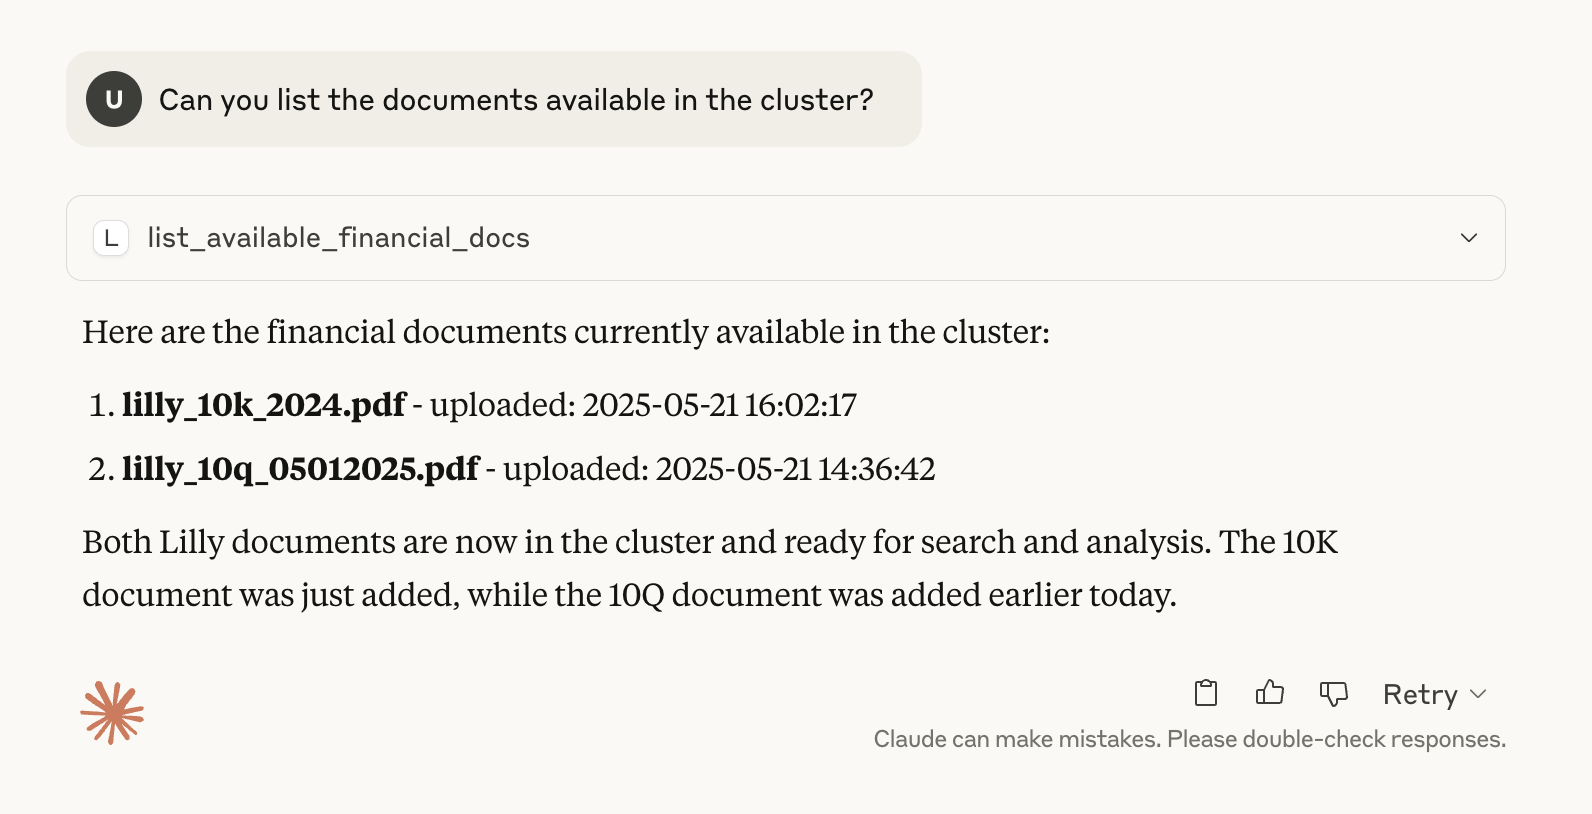
list_available_financial_docs
Claude asks the MCP server for a list of available documents. The server queries the GemFire metadata region and returns the list of documents.
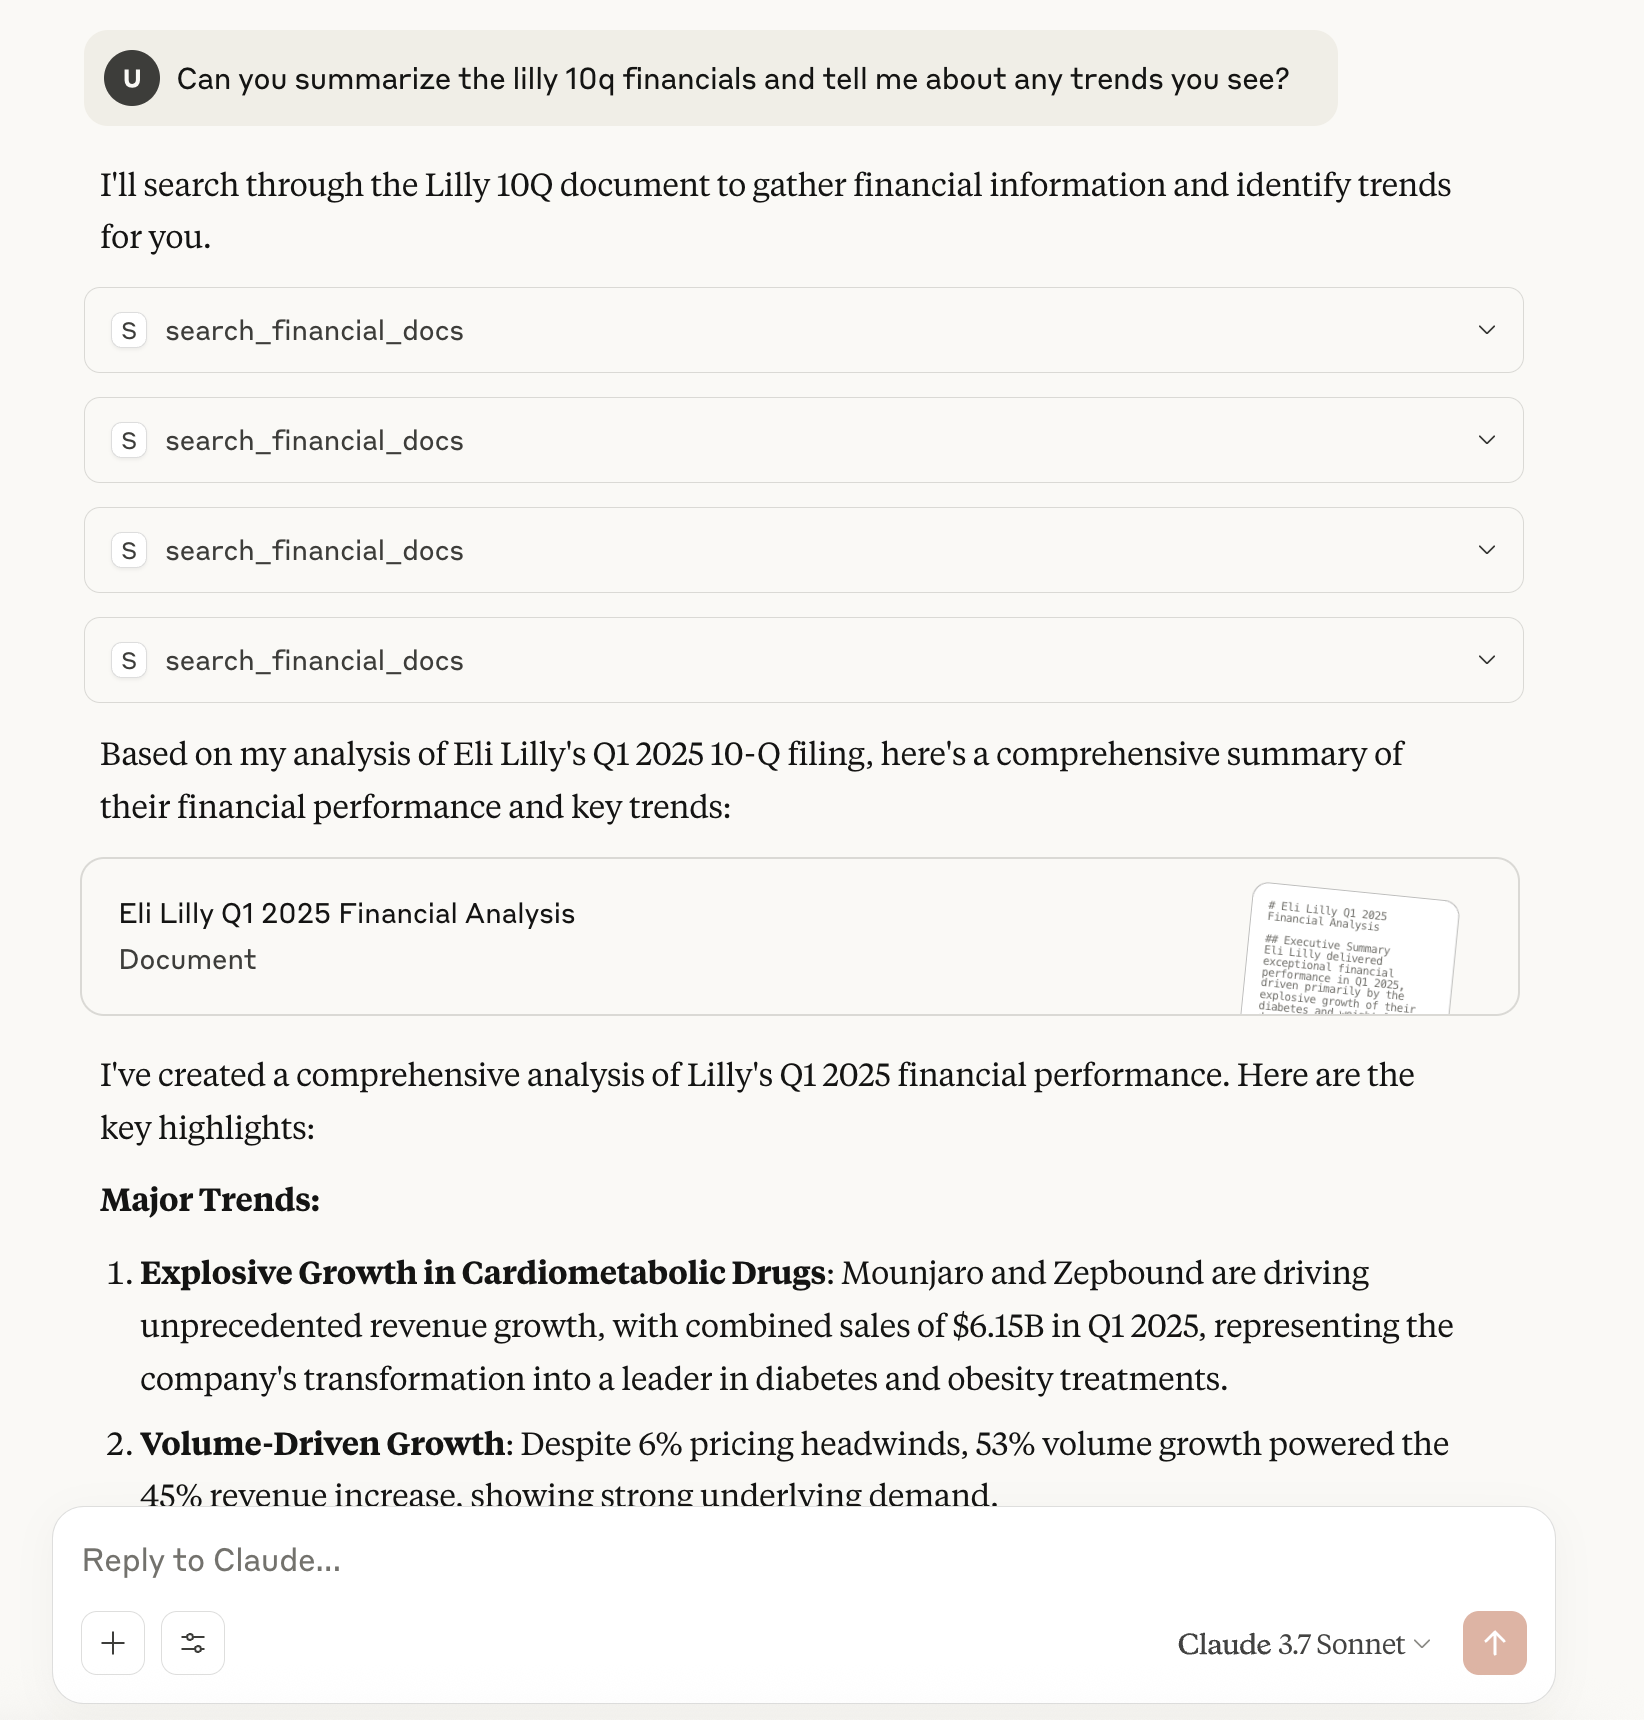
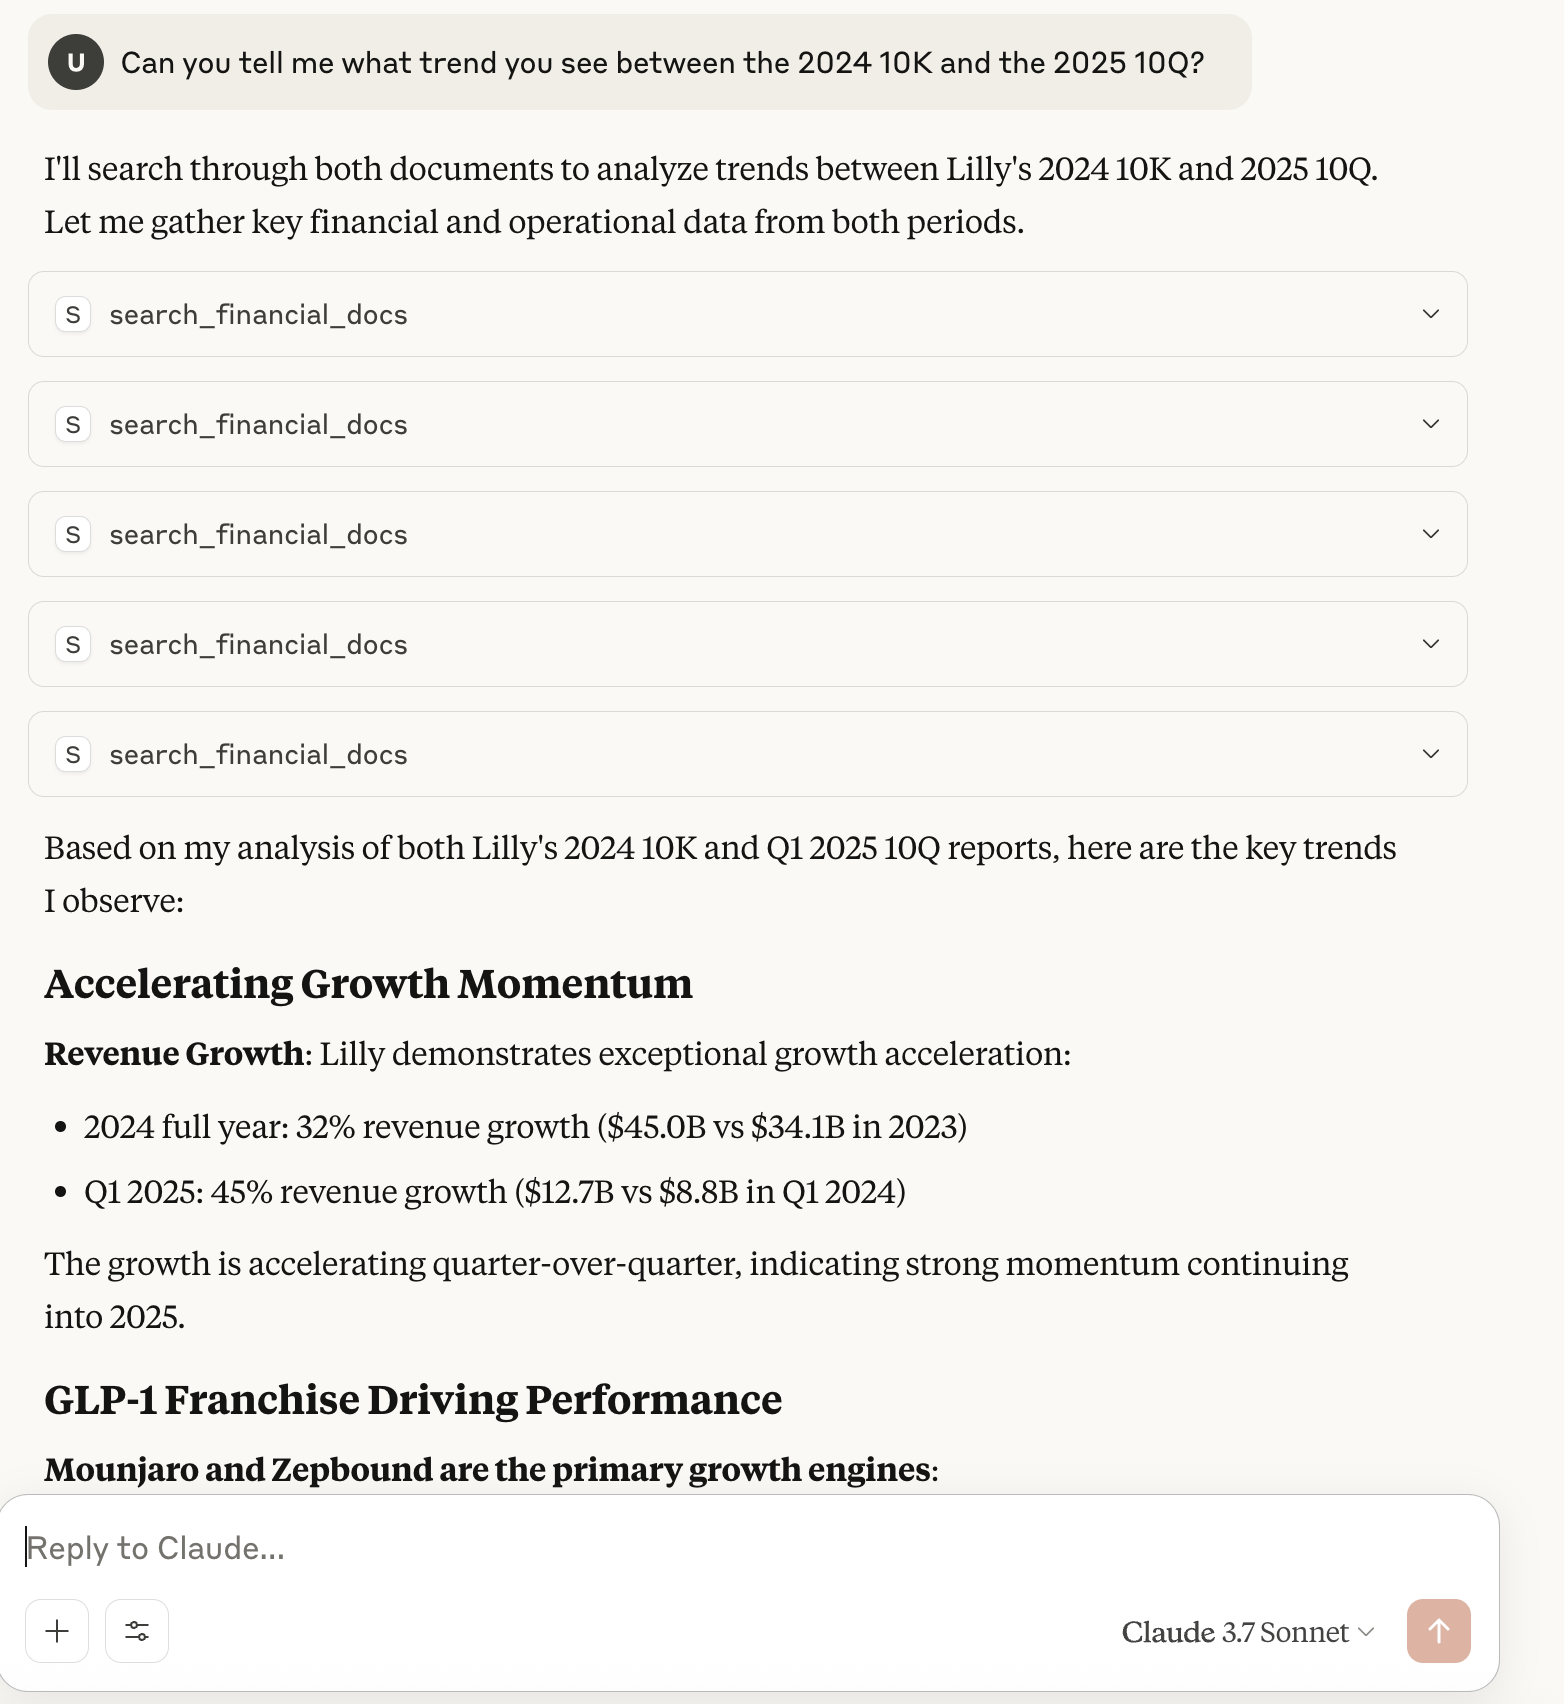
- search_financial_docs
Examples
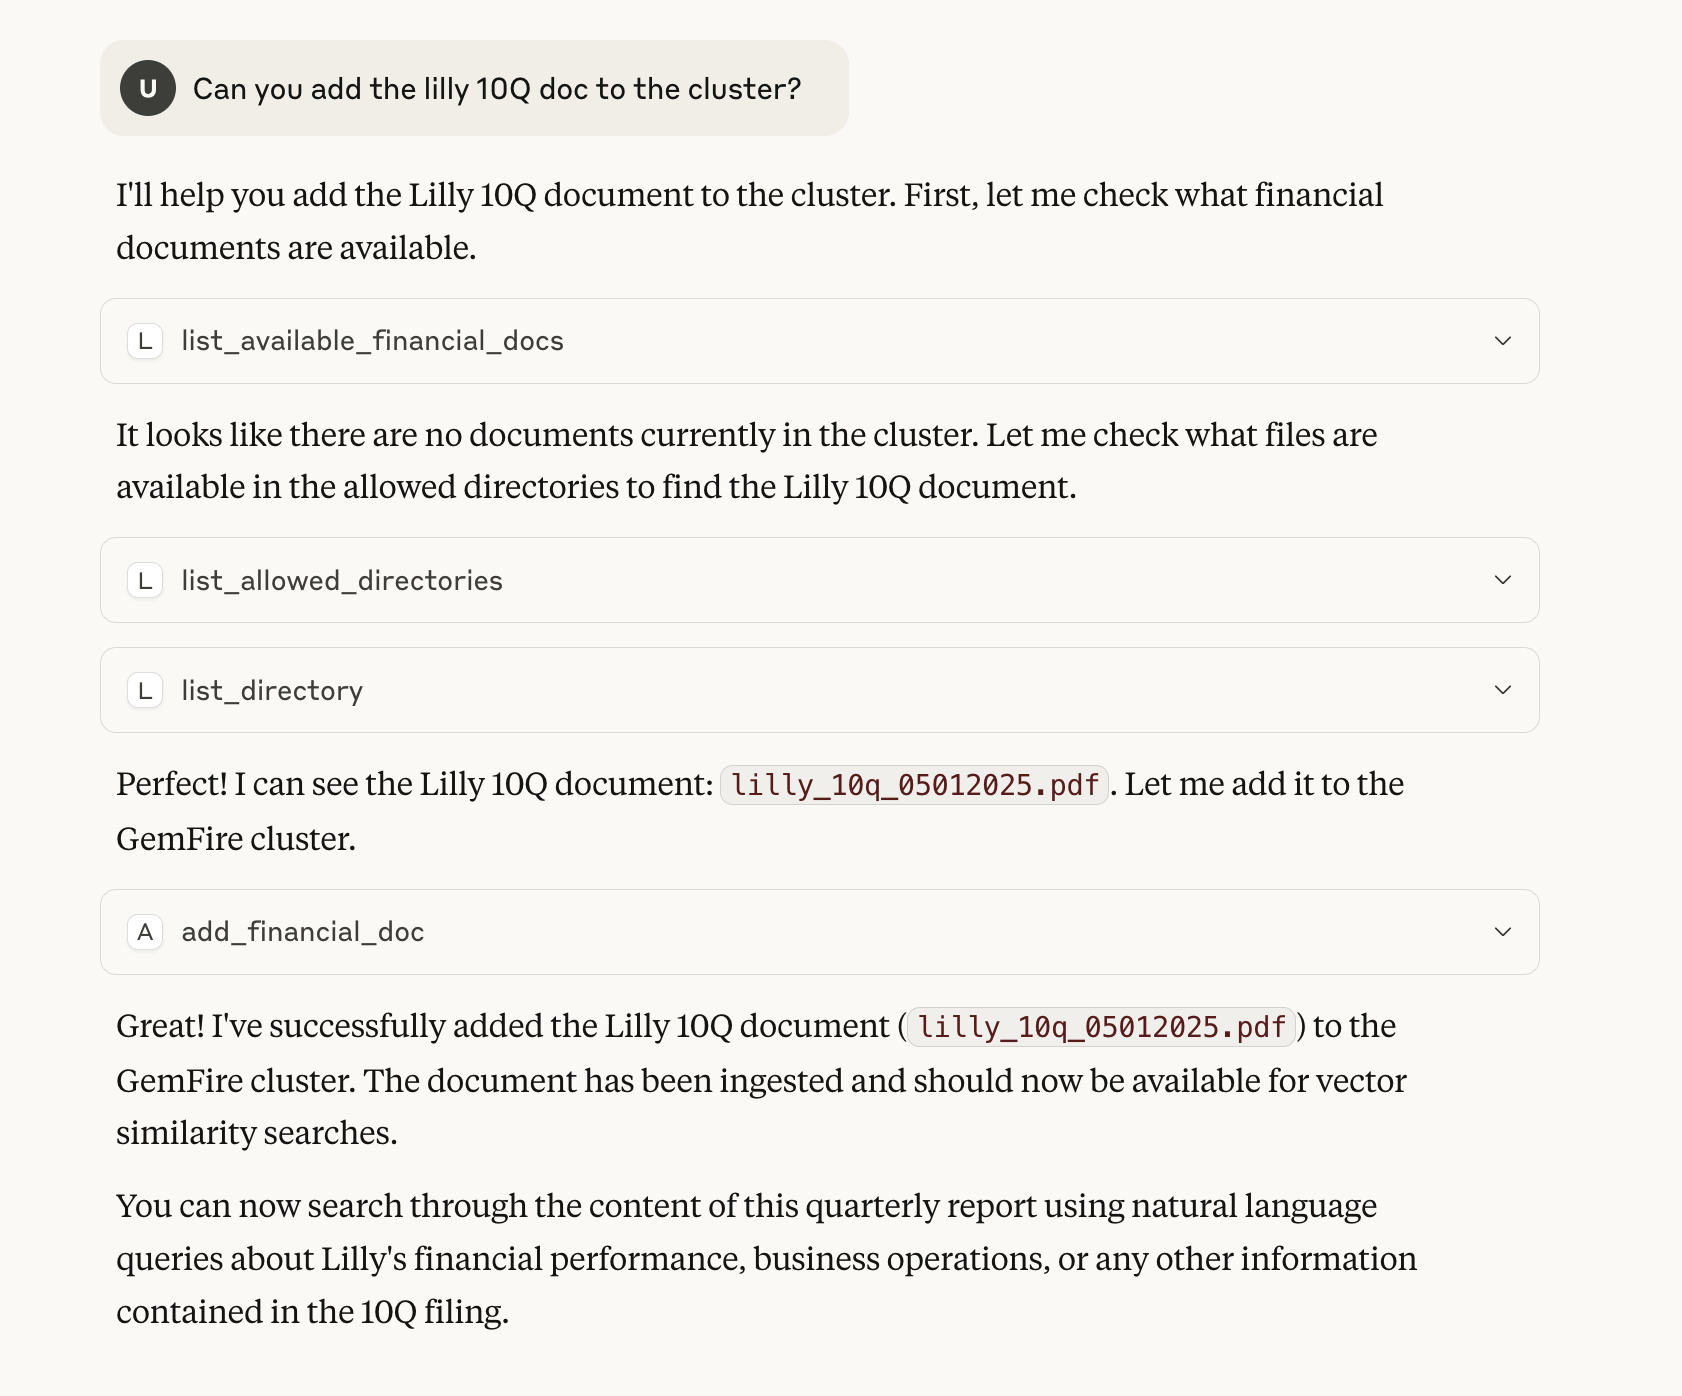
Add a document
List the available documents
Summarize the specified document
List the available documents - more than 1
Summarize across two documents
Sign in to leave a review
Use Google, GitHub, or an email account so ratings stay tied to real people.
No reviews posted yet.



