Identity
About
AGNTCY Identity allows to onboard, create and verify identities for Agents, Model Context Protocol (MCP) Servers and Multi-Agent Systems (MASs).
Details
- Transport
- SSE
- License
- Apache-2.0
Explore
- Identity creation: Generate unique, verifiable identities for agents and MCP servers.
- Existing identity onboarding: Integrate identities from external IdPs.
- Badges creation & verification: Authenticate agents and MCP servers and validate metadata.
To run these steps successfully, you need to have the following installed:
- Docker Desktop, or have both: Docker Engine v27 or higher and Docker Compose v2.35 or higher
Use the following command to install the Issuer CLI:
using curl:
sh -c "$(curl -sSL https://raw.githubusercontent.com/agntcy/identity/refs/heads/main/deployments/scripts/identity/install_issuer.sh)"
or using wget:
sh -c "$(wget -qO- https://raw.githubusercontent.com/agntcy/identity/refs/heads/main/deployments/scripts/identity/install_issuer.sh)"
> [!NOTE]
> You can also download the Issuer CLI binary corresponding to your platform from the latest releases.
>
> On some platforms you might need to add execution permissions and/or approve the binary in System Security Settings.
>
> For easier use, consider moving the binary to your $PATH or to the /usr/local/bin folder.
If you have Golang set up locally, you could also use the go install command:
go install github.com/agntcy/identity/cmd/issuer@latest && \
  ln -s $(go env GOPATH)/bin/issuer $(go env GOPATH)/bin/identity
You can verify the installation by running the command below to see the different commands available:
identity -h
identity_whoami
Get your agent identity info — name, email, DID, and scopes
identity_sign
Sign arbitrary data with this identity's Ed25519 private key. Returns the signature and the identity's DID.
identity_verify
Verify a signature against any did:web identity. Resolves the DID Document and checks the Ed25519 signature.
mail_send
Send an email from your agent's inbox. Supports up to 10 attachments (10 MB each, 25 MB total).
mail_reply
Reply to an existing email in a thread. Supports up to 10 attachments (10 MB each, 25 MB total).
mail_list_messages
List emails in your agent's inbox. Returns newest first.
mail_get_message
Get a specific email by its messageId
mail_get_attachment
Download the contents of an email attachment as base64-encoded data. Use mail.get_message or mail.get_thread first to find attachment IDs and metadata.
mail_list_threads
List email threads in your agent's inbox. Returns newest first.
mail_get_thread
Get a full email thread with messages (newest 200 by default)
mail_update_labels
Add or remove labels on a message
mail_update_thread_labels
Add or remove labels on a thread (e.g. 'starred', 'important', 'archived', or custom labels). Thread labels are separate from message labels. Labels must be 1-100 chars from [a-zA-Z0-9_-:.]. Max 20 labels per call. Removing a label deletes user data — use with care.
mail_delete_message
Delete a single message from the inbox
mail_delete_thread
Delete an entire thread and all its messages
mail_list_rules
List all allow/block rules for this identity
mail_add_rule
Add an allow or block rule. Use type ALLOW or BLOCK, scope RECEIVE/SEND/REPLY, and value as email or *@domain.com.
mail_delete_rule
Delete an email allow/block rule by its ID
vault_list
List all credentials in the vault (metadata only, no secrets)
vault_get
Retrieve a decrypted credential from the vault. For TOTP credentials, use vault.totp instead to get the code.
vault_totp
Generate the current 6-digit TOTP code. Works on any credential that has a TOTP secret (standalone TOTP type or any credential with a 'totp' field). Response also includes backupCodesRemaining — call vault.get to read the actual backup codes if a fallback is needed.
vault_totp_use_backup
Atomically consume one single-use TOTP backup code. Moves the popped code from data.backupCodes into data.usedBackupCodes (kept as an audit trail) and returns it. Use when the live TOTP code is unavailable (clock skew, device lost). Each code can only be used once.
vault_store
Store or update an encrypted credential in the vault
vault_delete
Remove a credential from the vault
calendar_create
Create a new event on this identity's calendar
calendar_update
Update an existing calendar event
calendar_list
List events on this identity's calendar
calendar_get
Get details of a specific calendar event
calendar_delete
Delete a calendar event
calendar_set_public
Make this identity's calendar public or private. Public calendars are viewable at /identities/:id/calendar.json
payments_pay
Pay for an x402-priced URL in USDC under this identity's active mandate. Returns the resource content plus cost, balance, and mandate progress. Use dryRun:true to preview without spending.
payments_mandates_create
Create the spend policy for this identity's wallet. Installs an on-chain session key — first call takes 10–30 seconds. If the returned `installError` is set, the mandate is unusable and creation should be retried.
payments_mandates_list
List spend mandates attached to this identity's wallet — active, expired, revoked, and errored, latest first.
payments_mandates_get
Fetch one mandate by id, with live spend counters.
payments_mandates_revoke
Revoke a mandate. The on-chain session key is not uninstalled (manual via Console if needed); settled payments are unaffected.
payments_activity
Bank-statement-style merged feed of payments sent (direction: 'out') and received (direction: 'in') for this identity, latest first.


<p align="center">
<a href="https://agntcy.org">
<picture>
<source media="(prefers-color-scheme: dark)" srcset="img/[email protected]" width="300">

</picture>
</a>
<br />
<caption>Welcome to the <b>Identity</b> repository</caption>
</p>
---
AGNTCY Identity provides a secure and verifiable method to uniquely identify agents through open and decentralized techniques. Each agent is assigned a universally unique identifier, backed by verifiable credentials (VCs).
AGNTCY Identity enables to bring your own identity using conventions like IDs assigned by Identity Providers (e.g., Okta) or Agent Cards (e.g., Google’s A2A), or be assigned an ID following standards (e.g., W3C DIDs).
This component ensures that every agent in the AGNTCY ecosystem has a verifiable, universally unique identity, enabling secure authentication, trusted communication, and interoperability across diverse multi-agent systems, regardless of the identity assignment method.
<p align="center">
<picture>
<source media="(prefers-color-scheme: dark)" srcset="img/agent-badge-dark.png" width="100%">
</picture>
</p>
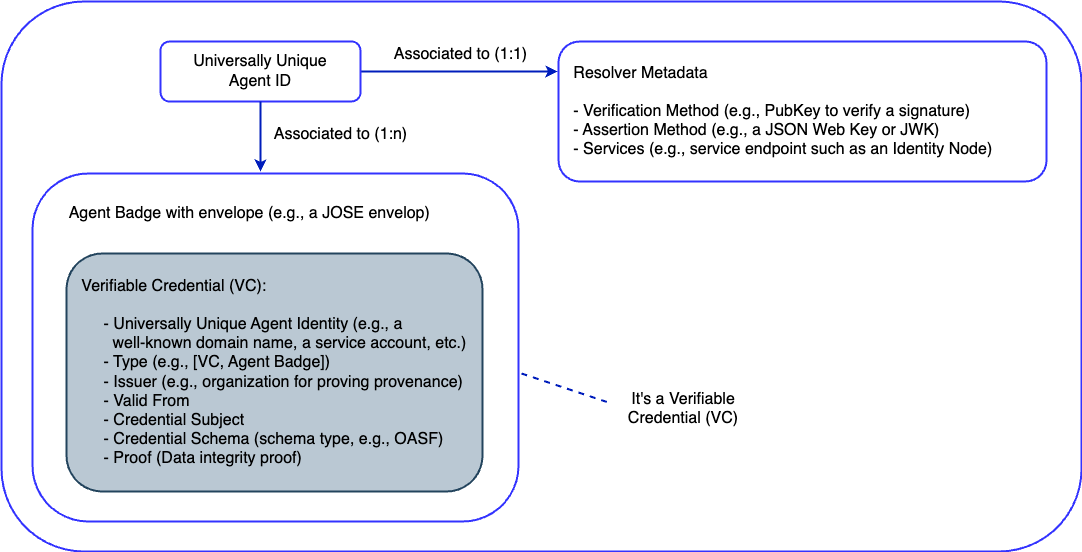
- The ID is linked to a ResolverMetadata object for secure and automated verification.
- The ID can be linked to one or more Agent Badges. Why? Multiple badges can provide nuanced, task-specific access to different systems without over-privileging the agent. Agent Badges contain Verifiable Credentials (VCs), which include:
- The Agent's ID
- Schema definition (e.g., OASF)
- Metadata for authentication and other security needs.
> [!NOTE]
> This same structure applies to MCP Servers and MASs, ensuring consistency across all identity-bearing entities in the IoA.
📚 Table of Contents
- 🚀 Architecting Agentic Trust
- 🌟 Features & Main Components
- ⚡️ Get Started in 5 Minutes
- 📜 See the core commands of the CLI
- 🧪 Run the Demo
You can also:
- 📖 See the full CLI and Node docs
- 📦 Check-out the Sample Agents and MCP servers
- 📘 Explore our full Documentation to understand our platform's capabilities
- 📝 Dive into our API Specs for detailed API documentation
🚀 Architecting Agentic Trust
- Core Principle: Trust is foundational for the Internet of Agents.
- Identity as the Root: AGNTCY Identity ensures Agents and Tools (MCP Servers) are verifiably authentic.
- Flexible & Interoperable: BYOID (Bring Your Own ID), integrates with existing Identity Providers (IdPs).
Secure and reliable communication between software agents is a cornerstone of the Internet of Agents (IoA) vision.
Without proper identity management, malicious or unverified agents can infiltrate Multi-Agent Systems (MASs), leading to misinformation, fraud, or security breaches.
To mitigate these risks, the AGNTCY provides a standardized and consistent framework for authenticating agents and validating associated metadata.
This applies equally to:
- Agents
- Model Context Protocol (MCP) Servers
- MASs (Multi-Agent Systems)
> [!TIP]
> This repository includes an AI Agent and MCP Server to showcase the AGNTCY Identity components in action!
🌟 Features & Main Components
Features
- Identity creation: Generate unique, verifiable identities for agents and MCP servers.
- Existing identity onboarding: Integrate identities from external IdPs.
- Badges creation & verification: Authenticate agents and MCP servers and validate metadata.
Main Components
- Issuer CLI: Manage identities, vaults and credentials via command-line interface.
- Node Backend: Backend server for identity management and metadata.
⚡️ Get Started in 5 Minutes
This short guide allows you to setup the Identity Issuer CLI as well as the Identity Node Backend.
The Issuer CLI allows to generate, register, search for, and verify badges for Agents and MCP Servers. The CLI includes a library enabling storage and retrieval of the keys required to sign the badges, both on local storage or using a 3rd party wallet or vault.
The Node Backend comprises the APIs and the backend core. It stores, maintains, and binds org:sub-org IDs, PubKeys, Subject IDs and metadata, including badges, ResolverMetadata and Verifiable Credentials (VCs).
Prerequisites
To run these steps successfully, you need to have the following installed:
- Docker Desktop, or have both: Docker Engine v27 or higher and Docker Compose v2.35 or higher
Step 1: Install the Issuer CLI
Use the following command to install the Issuer CLI:
using curl:
sh -c "$(curl -sSL https://raw.githubusercontent.com/agntcy/identity/refs/heads/main/deployments/scripts/identity/install_issuer.sh)"
or using wget:
sh -c "$(wget -qO- https://raw.githubusercontent.com/agntcy/identity/refs/heads/main/deployments/scripts/identity/install_issuer.sh)"
> [!NOTE]
> You can also download the Issuer CLI binary corresponding to your platform from the latest releases.
>
> On some platforms you might need to add execution permissions and/or approve the binary in System Security Settings.
>
> For easier use, consider moving the binary to your $PATH or to the /usr/local/bin folder.
If you have Golang set up locally, you could also use the go install command:
go install github.com/agntcy/identity/cmd/issuer@latest && \
  ln -s $(go env GOPATH)/bin/issuer $(go env GOPATH)/bin/identity
Step 2: Start the Node Backend with Docker
1. Clone the repository and navigate to the identity directory:
git clone https://github.com/agntcy/identity.git && cd identity
2. Start the Node Backend with Docker:
./deployments/scripts/identity/launch_node.sh
Or use make if available locally:
make start_node
> [!NOTE]
> You can also install the Node Backend using our helm chart, for which instructions are available in the chart's directory.
Step 3: Verify the Installation
You can verify the installation by running the command below to see the different commands available:
identity -h
📜 Core commands to use the CLI
Here are the core commands you can use with the CLI
- vault: Manage cryptographic vaults and keys
- issuer: Register and manage issuer configurations
- metadata: Generate and manage metadata for identities
- badge: Issue and publish badges for identities
- verify: Verify identity badges
- config: Display the current configuration context
🧪 Run the demo
This demo scenario will allow you to see how to use the AGNTCY Identity components can be used in a real environment.
You will be able to perform the following:
- Register as an Issuer
- Generate metadata for an MCP Server
- Issue and publish a badge for the MCP Server
- Verify the published badge
Prerequisites
First, follow the steps in the Get Started in 5 minutes section above to install the Issuer CLI and run the Node Backend, and generate a local vault and keys.
To run this demo setup locally, you need to have the following installed:
- Docker Desktop, or have both: Docker Engine v27 or higher and Docker Compose v2.35 or higher
- Ollama CLI
- Okta CLI
Step 1: Run the Samples with Ollama and Docker
The agents in the samples rely on a local instance of the Llama 3.2 LLM to power the agent's capabilities.
With Ollama installed, you can download and run the model (which is approximately 2GB, so ensure you have enough disk space) using the following command:
1. Run the Llama 3.2 model:
ollama run llama3.2
2. From the root of the repository, navigate to the samples directory and run the following command to deploy the Currency Exchange A2A Agent leveraging the Currency Exchange MCP Server:
cd samples && docker compose up -d
3. [Optional] Test the samples using the provided test clients.
Step 2: Use the CLI to create a local Vault and generate keys
1. Create a local vault to store generated cryptographic keys:
identity vault connect file -f ~/.identity/vault.json -v "My Vault"
2. Generate a new key pair and store it in the vault:
identity vault key generate
Step 3: Register as an Issuer
For this demo we will use Okta as an IdP to create an application for the Issuer.
To quickly create a trial account and application, we have provided a script to automate the process using the Okta CLI.
> [!IMPORTANT]
> If you already have an Okta account, you can use the okta login command to log in to your existing organization.
>
> If registering a new Okta developer account fails, proceed with manual trial signup and then use the okta login command,
> as instructed by the Okta CLI.
1. Run the following command from the root repository to create a new Okta application:
. ./demo/scripts/create_okta_app
2. In the interactive prompt, choose the following options:
> 4: Service (Machine-to-Machine), > 5: Other
3. Register the Issuer using the Issuer CLI and the environment variables from the previous step:
   identity issuer register -o "My Organization" \
       -c "$OKTA_OAUTH2_CLIENT_ID" -s "$OKTA_OAUTH2_CLIENT_SECRET" -u "$OKTA_OAUTH2_ISSUER"
> [!NOTE]
> You can now access the Issuer's Well-Known Public Key at http://localhost:4000/v1alpha1/issuer/{common_name}/.well-known/jwks.json,
> where {common_name} is the common name you provided during registration.
Step 4: Generate metadata for an MCP Server
Create a second application for the MCP Server metadata using Okta, similar to the previous step:
1. Run the following command from the root repository to create a new Okta application:
. ./demo/scripts/create_okta_app
2. In the interactive prompt, choose the following options:
> 4: Service (Machine-to-Machine), > 5: Other
3. Generate metadata for the MCP Server using the Issuer CLI and the environment variables from the previous step:
   identity metadata generate -c "$OKTA_OAUTH2_CLIENT_ID" \
       -s "$OKTA_OAUTH2_CLIENT_SECRET" -u "$OKTA_OAUTH2_ISSUER"
> [!NOTE]
> When successful, this command will print the metadata ID, which you will need in the next step to view published badges that are linked to this metadata.
Step 5: Issue and Publish a Badge for the MCP Server
1. Issue a badge for the MCP Server:
identity badge issue mcp -u http://localhost:9090 -n "My MCP Server"
2. Publish the badge:
identity badge publish
> [!NOTE]
> You can now access the VCs as a Well-Known at http://localhost:4000/v1alpha1/vc/{metadata_id}/.well-known/vcs.json,
> where {metadata_id} is the metadata ID you generated in the previous step.
(Optional) Step 6: Verify a Published Badge
You can use the Issuer CLI to verify a published badge any published badge, not just those that you issued yourself.
This allows others to verify the Agent and MCP badges you publish.
1. Download the badge that you created in the previous step, replacing {metadata_id} with the metadata ID from step 4:
curl -o vcs.json http://localhost:4000/v1alpha1/vc/{metadata_id}/.well-known/vcs.json
2. Verify the badges using the Issuer CLI:
identity verify -f vcs.json
> [!NOTE]
> You can also use our Python SDK to verify the badge programmatically. See the Python SDK for more details.
Development
For more detailed development instructions please refer to the following sections:
- Node Backend
- Issuer CLI
- Samples
- Api Spec
- Node Client SDK
Roadmap
See the open issues for a list
of proposed features (and known issues).
Contributing
Contributions are what make the open source community such an amazing place to
learn, inspire, and create. Any contributions you make are greatly
appreciated. For detailed contributing guidelines, please see
CONTRIBUTING.md.
Copyright Notice
Distributed under Apache 2.0 License. See LICENSE for more information.
Copyright AGNTCY Contributors.
Sign in to leave a review
Use Google, GitHub, or an email account so ratings stay tied to real people.
No reviews posted yet.