
Odoo
About
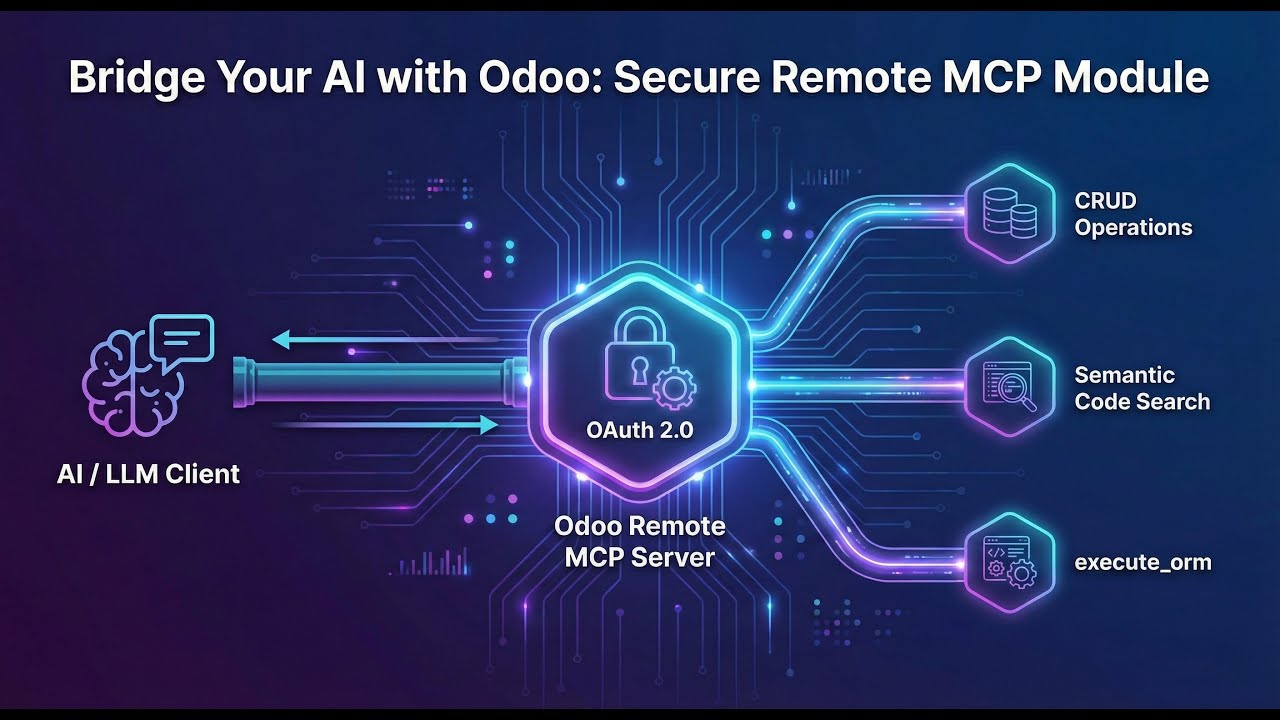
Interact with Odoo ERP systems, allowing AI assistants to access and manage business data like contacts, sales, and projects.
Details
- License
- MPL-2.0
Explore
- 🔍 Search and retrieve any Odoo record (customers, products, invoices, etc.)
- ✨ Create new records with field validation and permission checks
- ✏️ Update existing data with smart field handling
- 🗑️ Delete records respecting model-level permissions
- 🔢 Count records matching specific criteria
- 📋 Inspect model fields to understand data structure
- 📊 Server-side aggregation — group, sum, and count without pulling raw rows
- ⚡ Workflow actions — invoke any public Odoo method (post invoice, confirm SO, etc.) via an opt-in escape hatch
- 🔐 Secure access with API key or username/password authentication
- 🎯 Smart pagination for large datasets
- 🧠 Smart field selection — automatically picks the most relevant fields per model
- 💬 LLM-optimized output with hierarchical text formatting
- 🌍 Multi-language support — get responses in your preferred language
- 🚀 YOLO Mode for quick access with any Odoo instance (no module required)

Setting up with Highlight
This MCP is not yet compatible with Highlight’s one-click setup. However, you can still use it with Highlight by following these steps:
- Download and install Highlight from highlightai.com/download
- Navigate to the plugins tab and select "Add Custom Plugin"
-
Configure the plugin with the settings below
Plugin Name
OdooCommand (node, npx, python, etc.)Please refer to the README for specific instructions on how to obtain API keys or other required environment variables.
- Enable "Start Automatically" if you want the plugin to start when Highlight launches





From the repository
Prerequisites
- Python 3.10 or higher
- Access to an Odoo instance:
- Standard mode (production): Version 16.0+ with the Odoo MCP module installed
- YOLO mode (testing/demos): Any Odoo version with XML-RPC enabled (no module required)
Install UV First
The MCP server runs on your local computer (where Claude Desktop is installed), not on your Odoo server. You need to install UV on your local machine:
<details>
<summary>macOS/Linux</summary>
curl -LsSf https://astral.sh/uv/install.sh | sh
<details>
<summary>Windows</summary>
powershell -c "irm https://astral.sh/uv/install.ps1 | iex"
After installation, restart your terminal to ensure UV is in your PATH.
Claude Desktop / Cursor
Paste into your MCP client config file to install this server.
{
    "mcpServers": {
        "odoo": {
            "mcp-server-odoo": {
                "command": "docker",
                "args": [
                    "run",
                    "--rm",
                    "-p",
                    "8000:8000",
                    "\\"
                ]
            }
        }
    }
}McpServers
{
    "mcp-server-odoo": {
        "command": "docker",
        "args": [
            "run",
            "--rm",
            "-p",
            "8000:8000",
            "\\"
        ]
    }
}
MCP Server for Odoo





An MCP server that enables AI assistants like Claude to interact with Odoo ERP systems. Access business data, search records, create new entries, update existing data, and manage your Odoo instance through natural language.
Works with any Odoo instance! Use YOLO mode for quick testing and demos with any standard Odoo installation. For enterprise security, access controls, and production use, install the Odoo MCP module.
Features
- 🔍 Search and retrieve any Odoo record (customers, products, invoices, etc.)
- ✨ Create new records with field validation and permission checks
- ✏️ Update existing data with smart field handling
- 🗑️ Delete records respecting model-level permissions
- 🔢 Count records matching specific criteria
- 📋 Inspect model fields to understand data structure
- 📊 Server-side aggregation — group, sum, and count without pulling raw rows
- ⚡ Workflow actions — invoke any public Odoo method (post invoice, confirm SO, etc.) via an opt-in escape hatch
- 🔐 Secure access with API key or username/password authentication
- 🎯 Smart pagination for large datasets
- 🧠 Smart field selection — automatically picks the most relevant fields per model
- 💬 LLM-optimized output with hierarchical text formatting
- 🌍 Multi-language support — get responses in your preferred language
- 🚀 YOLO Mode for quick access with any Odoo instance (no module required)
Installation
Prerequisites
- Python 3.10 or higher
- Access to an Odoo instance:
- Standard mode (production): Version 16.0+ with the Odoo MCP module installed
- YOLO mode (testing/demos): Any Odoo version with XML-RPC enabled (no module required)
Install UV First
The MCP server runs on your local computer (where Claude Desktop is installed), not on your Odoo server. You need to install UV on your local machine:
<details>
<summary>macOS/Linux</summary>
curl -LsSf https://astral.sh/uv/install.sh | sh
<details>
<summary>Windows</summary>
powershell -c "irm https://astral.sh/uv/install.ps1 | iex"
After installation, restart your terminal to ensure UV is in your PATH.
Installing via MCP Settings (Recommended)
Add this configuration to your MCP settings:
{
  "mcpServers": {
    "odoo": {
      "command": "uvx",
      "args": ["mcp-server-odoo"],
      "env": {
        "ODOO_URL": "https://your-odoo-instance.com",
        "ODOO_API_KEY": "your-api-key-here"
      }
    }
  }
}
<details>
<summary>Claude Desktop</summary>
Add to ~/Library/Application Support/Claude/claude_desktop_config.json:
{
  "mcpServers": {
    "odoo": {
      "command": "uvx",
      "args": ["mcp-server-odoo"],
      "env": {
        "ODOO_URL": "https://your-odoo-instance.com",
        "ODOO_API_KEY": "your-api-key-here",
        "ODOO_DB": "your-database-name"
      }
    }
  }
}
<details>
<summary>Claude Code</summary>
Add to .mcp.json in your project root:
{
  "mcpServers": {
    "odoo": {
      "command": "uvx",
      "args": ["mcp-server-odoo"],
      "env": {
        "ODOO_URL": "https://your-odoo-instance.com",
        "ODOO_API_KEY": "your-api-key-here",
        "ODOO_DB": "your-database-name"
      }
    }
  }
}
Or use the CLI:
claude mcp add odoo \
  --env ODOO_URL=https://your-odoo-instance.com \
  --env ODOO_API_KEY=your-api-key-here \
  --env ODOO_DB=your-database-name \
  -- uvx mcp-server-odoo
<details>
<summary>Cursor</summary>
Add to ~/.cursor/mcp.json:
{
  "mcpServers": {
    "odoo": {
      "command": "uvx",
      "args": ["mcp-server-odoo"],
      "env": {
        "ODOO_URL": "https://your-odoo-instance.com",
        "ODOO_API_KEY": "your-api-key-here",
        "ODOO_DB": "your-database-name"
      }
    }
  }
}
<details>
<summary>VS Code (with GitHub Copilot)</summary>
Add to .vscode/mcp.json in your workspace:
{
  "servers": {
    "odoo": {
      "type": "stdio",
      "command": "uvx",
      "args": ["mcp-server-odoo"],
      "env": {
        "ODOO_URL": "https://your-odoo-instance.com",
        "ODOO_API_KEY": "your-api-key-here",
        "ODOO_DB": "your-database-name"
      }
    }
  }
}
> Note: VS Code uses "servers" as the root key, not "mcpServers".
</details>
<details>
<summary>Windsurf</summary>
Add to ~/.codeium/windsurf/mcp_config.json:
{
  "mcpServers": {
    "odoo": {
      "command": "uvx",
      "args": ["mcp-server-odoo"],
      "env": {
        "ODOO_URL": "https://your-odoo-instance.com",
        "ODOO_API_KEY": "your-api-key-here",
        "ODOO_DB": "your-database-name"
      }
    }
  }
}
<details>
<summary>Zed</summary>
Add to ~/.config/zed/settings.json:
{
  "context_servers": {
    "odoo": {
      "command": {
        "path": "uvx",
        "args": ["mcp-server-odoo"],
        "env": {
          "ODOO_URL": "https://your-odoo-instance.com",
          "ODOO_API_KEY": "your-api-key-here",
          "ODOO_DB": "your-database-name"
        }
      }
    }
  }
}
Alternative Installation Methods
<details>
<summary>Using Docker</summary>
Run with Docker — no Python installation required:
{
  "mcpServers": {
    "odoo": {
      "command": "docker",
      "args": [
        "run", "-i", "--rm",
        "-e", "ODOO_URL=http://host.docker.internal:8069",
        "-e", "ODOO_API_KEY=your-api-key-here",
        "ivnvxd/mcp-server-odoo"
      ]
    }
  }
}
> Note: Use host.docker.internal instead of localhost to connect to Odoo running on the host machine.
For HTTP transport:
docker run --rm -p 8000:8000 \
  -e ODOO_URL=http://host.docker.internal:8069 \
  -e ODOO_API_KEY=your-api-key-here \
  ivnvxd/mcp-server-odoo --transport streamable-http --host 0.0.0.0
> ⚠️ Security: the HTTP transport has no built-in authentication — anyone who can reach the port gets Odoo access through the server's credentials. Publish the port only on trusted networks, or front it with an authenticating reverse proxy. See Transport Options.
The image is also available on GHCR: ghcr.io/ivnvxd/mcp-server-odoo
</details>
<details>
<summary>Using pip</summary>
```bash
Sign in to leave a review
Use Google, GitHub, or an email account so ratings stay tied to real people.
No reviews posted yet.