Kubernetes AI Ops Agent
About
AI-powered assistant that enables natural language interactions with Kubernetes clusters. Simplifies DevOps workflows using Model Context Protocol (MCP) servers for executing K8s operations through conversational interfaces.
Details
- License
- MIT
Explore
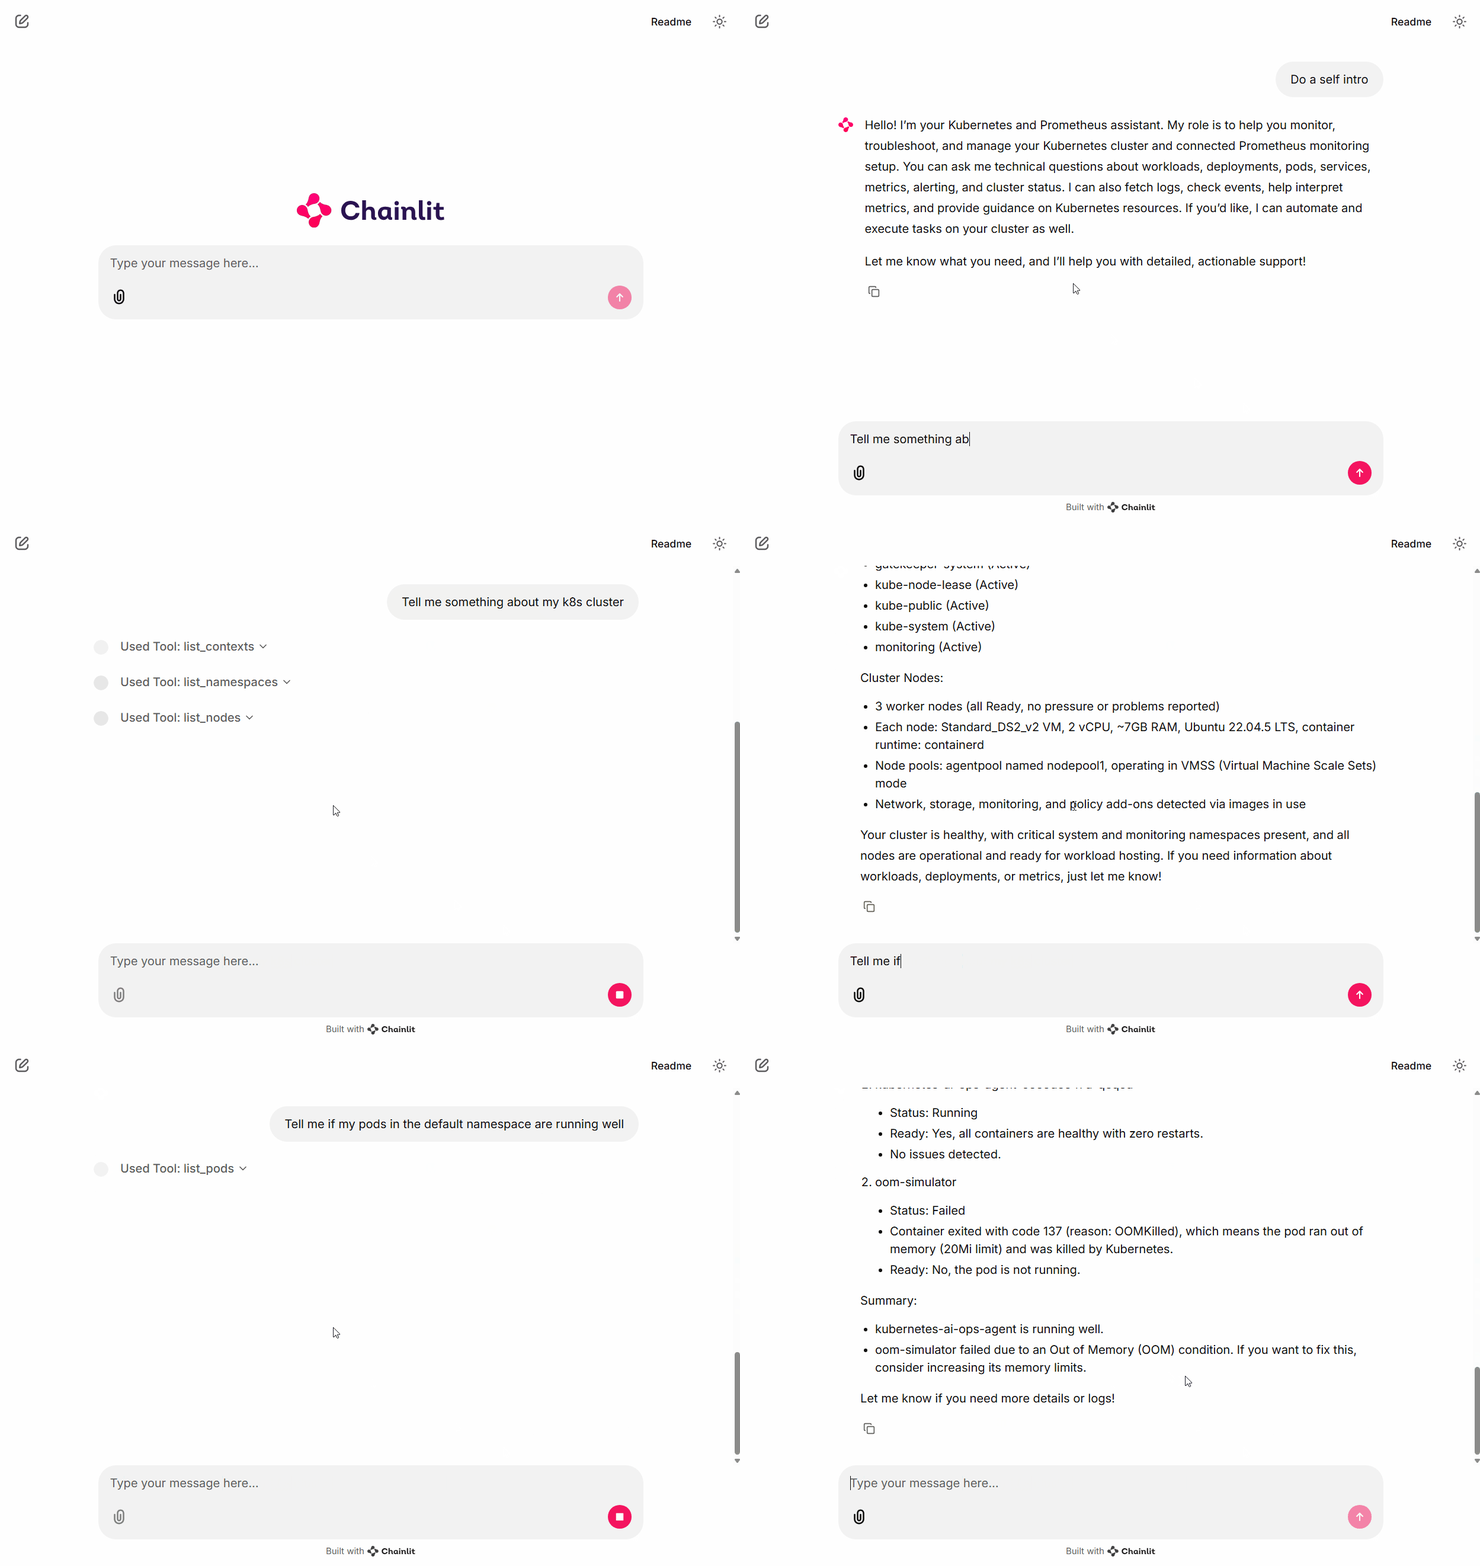
- 🤖 AI-Powered Assistance: Interact with your Kubernetes clusters using natural language
- 🧰 Tool Integration: Execute Kubernetes operations through specialized tools
- 🚀 Deployment Ready: Packaged with Docker and Helm charts for easy deployment
- 📊 Web Interface: Built with Chainlit for an interactive chat experience

Setting up with Highlight
This MCP is not yet compatible with Highlight’s one-click setup. However, you can still use it with Highlight by following these steps:
- Download and install Highlight from highlightai.com/download
- Navigate to the plugins tab and select "Add Custom Plugin"
-
Configure the plugin with the settings below
Plugin Name
Kubernetes AI Ops AgentCommand (node, npx, python, etc.)Please refer to the README for specific instructions on how to obtain API keys or other required environment variables.
- Enable "Start Automatically" if you want the plugin to start when Highlight launches





From the repository
- Python 3.10+
- Docker
- Kubernetes cluster access
- Helm (for deployment)
npm install -g @kubernetes-ai/mcp-server-kubernetes
pip install prometheus-mcp-server
> Note: Do not use the MCP servers located in the deps/ directory for local development. These are customized versions:
> - The Kubernetes MCP server in deps/ is modified to use loadFromCluster for proper initialization in a Pod environment.
> - The MCP servers in deps/ are included to be packaged directly into the container image rather than downloaded at runtime.
4. Configure your Kubernetes access:
- Ensure your kubeconfig is properly set up
- The agent will use your current kubectl context
5. Start the application:
chainlit run src/main.py
1. Build and push the Docker image:
secrets:
data:
AZURE_OPENAI_ENDPOINT: "https://<YOUR_OPENAI_SERVICE>.openai.azure.com/"
AZURE_OPENAI_API_KEY: "<YOUR_AZURE_OPENAI_API_KEY>"
AZURE_OPENAI_MODEL: "<YOUR_DEPLOYMENT_NAME>"
OPENAI_API_VERSION: "<API_VERSION>"
PROMETHEUS_URL: "http://<YOUR_PROMETHEUS_SERVICE>.<NAMESPACE>:9090"
3. Install the chart using your customized values:
cd deploy/helm
helm install kubernetes-ai-ops ./kubernetes-ai-ops-agent -f customized.values.yaml
4. Access the application using port-forward:
kubectl port-forward svc/kubernetes-ai-ops-agent 9000:9000 -n <NAMESPACE>
Claude Desktop / Cursor
Paste into your MCP client config file to install this server.
{
    "mcpServers": {
        "kubernetes ai ops agent": {
            "kubernetes-ai-ops-agent": {
                "command": "docker",
                "args": [
                    "build",
                    "-t",
                    "<YOUR_CONTAINER_REGISTRY>/kubernetes-ai-ops-agent:<TAG>",
                    "."
                ]
            }
        }
    }
}McpServers
{
"kubernetes-ai-ops-agent": {
"command": "docker",
"args": [
"build",
"-t",
"<YOUR_CONTAINER_REGISTRY>/kubernetes-ai-ops-agent:<TAG>",
"."
]
}
}An AI-powered assistant for Kubernetes operations and management through natural language interactions.
Overview
Kubernetes AI Ops Agent is an intelligent agent that helps DevOps engineers and Kubernetes administrators manage Kubernetes clusters through conversational interfaces. The project leverages Large Language Models (LLMs) to interpret user intents and execute Kubernetes operations using specialized MCP (Model Context Protocol) servers.
Project Status
Note: This project is currently in an experimental stage. It serves primarily as a proof of concept to validate the capabilities and potential benefits of integrating Large Language Models (LLMs) with Kubernetes, Prometheus, and other MCP (Model Context Protocol) servers. Features and functionality may change significantly as the project evolves.
Features
- 🤖 AI-Powered Assistance: Interact with your Kubernetes clusters using natural language
- 🧰 Tool Integration: Execute Kubernetes operations through specialized tools
- 🚀 Deployment Ready: Packaged with Docker and Helm charts for easy deployment
- 📊 Web Interface: Built with Chainlit for an interactive chat experience
Prerequisites
- Python 3.10+
- Docker
- Kubernetes cluster access
- Helm (for deployment)
Installation
Local Development
1. Clone the repository:
git clone https://github.com/yourusername/kubernetes-ai-ops-agent.git
cd kubernetes-ai-ops-agent
2. Install the dependencies:
pip install -r requirements.txt
3. Install the required MCP servers:
# Install the Kubernetes MCP server
npm install -g @kubernetes-ai/mcp-server-kubernetes
# Install the Prometheus MCP server
pip install prometheus-mcp-server
   > Note: Do not use the MCP servers located in the deps/ directory for local development. These are customized versions:

   > - The Kubernetes MCP server in deps/ is modified to use loadFromCluster for proper initialization in a Pod environment.

   > - The MCP servers in deps/ are included to be packaged directly into the container image rather than downloaded at runtime.
4. Configure your Kubernetes access:

   - Ensure your kubeconfig is properly set up

   - The agent will use your current kubectl context
5. Start the application:
chainlit run src/main.py
Helm Chart Deployment
1. Build and push the Docker image:
```bash
Sign in to leave a review
Use Google, GitHub, or an email account so ratings stay tied to real people.
No reviews posted yet.