
Mcp Seal Generator Server
About
基于 Spring AI 的印章生成的 MCP Server 服务,快速让 AI 生成公章、私章。
Explore
- Generate official seals from a text description
- Generate personal seals from a text description
- Supports SSE and stdio transport modes
- Stores images in MinIO object storage
- Integrates with any MCP-compatible AI assistant

Setting up with Highlight
This MCP is not yet compatible with Highlight’s one-click setup. However, you can still use it with Highlight by following these steps:
- Download and install Highlight from highlightai.com/download
- Navigate to the plugins tab and select "Add Custom Plugin"
-
Configure the plugin with the settings below
Plugin Name
Mcp Seal Generator ServerCommand (node, npx, python, etc.)Please refer to the README for specific instructions on how to obtain API keys or other required environment variables.
- Enable "Start Automatically" if you want the plugin to start when Highlight launches





From the repository
Run the server with Java 17+, configure MinIO and MCP transport mode (SSE or stdio) in application.yml, then deploy the jar. AI assistants call the two tools (generateOfficialSeal, generatePersonalSeal) by providing a seal description; the server returns a URL to the generated image.
Claude Desktop / Cursor
Paste into your MCP client config file to install this server.
{
    "mcpServers": {
        "mcp seal generator server": {
            "mcp-seal-generate-server": {
                "command": "java",
                "args": [
                    "-Dspring.ai.mcp.server.stdio=true",
                    "-Dspring.main.web-application-type=none",
                    "-Dlogging.pattern.console=",
                    "-jar",
                    "/yours_path/mcp-seal-generate-server-0.0.1-SNAPSHOT.jar"
                ],
                "env": []
            }
        }
    }
}McpServers
{
    "mcp-seal-generate-server": {
        "command": "java",
        "args": [
            "-Dspring.ai.mcp.server.stdio=true",
            "-Dspring.main.web-application-type=none",
            "-Dlogging.pattern.console=",
            "-jar",
            "/yours_path/mcp-seal-generate-server-0.0.1-SNAPSHOT.jar"
        ],
        "env": []
    }
}
公章、私章生成 MCP Server
简介
MCP公章、私章生成服务是一款基于Spring Boot开发的服务,支持通过MCP协议生成公章和私章图片。服务提供以下主要功能: 关于MCP协议,详见MCP官方文档。依赖MCP Java SDK开发,任意支持MCP协议的智能体助手(如Claude、Cursor以及千帆AppBuilder等)都可以快速接入。
以下会给更出详细的适配说明。
工具列表
公章生成 generateOfficialSeal
- 根据公章描述生成公章图片返回URL
- 输入: 公章描述
- 输出: 链接+提示
私章生成 generatePersonalSeal
- 根据公章描述生成公章图片返回URL
- 输入: 私章描述
- 输出: 链接+提示
快速开始
使用公/私章生成MCP Server可以通过Java SDK 和 SSE 的形式
Mcp Server java 开发
Java 版本
> java 17 及以上版本核心依赖
<!-- MCP Server 核心依赖 -->
<dependencies>
   <dependency>
      <groupId>org.springframework.ai</groupId>
      <artifactId>spring-ai-mcp-server-webflux-spring-boot-starter</artifactId>
      <version>1.0.0-M6</version>
   </dependency>
   <!-- minio本地存储服务依赖 -->
   <dependency>
      <groupId>io.minio</groupId>
      <artifactId>minio</artifactId>
      <version>8.5.12</version>
   </dependency>
</dependencies>
配置文件
在application.yml中配置MCP Server的相关参数:可选择使用SSE模式或stdio模式。
spring:
  application:
    name: mcp-seal-generate-server
  profiles:
    active: sse # 使用 SSE 模式
server:

  port: 8888
minio:

  endpoint: http://127.0.0.1:9000 #Minio服务所在地址

  bucketName: seal-down #存储桶名称

  accessKey: adminadmin #访问的key

  secretKey: adminadmin #访问的秘钥
SSE模式
application-sse.yml配置示例:
spring:
  ai:
    mcp:
      server:
        enabled: true                # 启用/禁用 MCP 服务
        stdio: false                 # 启用/禁用 stdio 传输
        name: my-mcp-server          # 服务名称
        version: 0.0.1               # 服务版本
        type: SYNC                   # 服务类型(SYNC/ASYNC)
        sse: true                   # 启用 SSE 传输
        resource-change-notification: true  # 启用资源变更通知
        prompt-change-notification: true    # 启用提示词变更通知
        tool-change-notification: true      # 启用工具变更通知
       sse-endpoint: /sse              # SSE 端点路径
本地stdio标准输入输出模式
application-stdio.yml配置示例:spring:
ai:
mcp:
server:
name: mcp-seal-generate-server
version: 0.0.1
type: SYNC
# stdio
stdio: true
# stdio
main:
web-application-type: none # 禁用Web应用类型
banner-mode: off # 禁用Banner
定义工具
@Service
public class SealGenerationService {
@McpTool(name = "generateOfficialSeal", description = "生成公章")

    public String generateOfficialSeal(@ToolParam(description = "参数详细描述", required = false) String param) {

        // 调用生成公章逻辑

        return "url";

    }
@McpTool(name = "generatePersonalSeal", description = "生成私章")

    public Mono<McpToolResponse> generatePersonalSeal(@ToolParam(description = "参数详细描述", required = true) String param) {

        // 调用生成私章逻辑

        return "url";

    }

}
- required: 表示该参数是否必须, true:表示必须,false:表示可选。
配置工具回调
@Configuration
public class McpServerConfig {
   @Bean
   public ToolCallbackProvider sealGenerationTool(SealGenerationService sealGenerationService) {
      // 返回一个 ToolCallbackProvider 实例,用于处理印章生成工具的回调
      return MethodToolCallbackProvider.builder()
              .toolObjects(sealGenerationService)
              .build();
   }
}
MinIO 配置
Minio是一个开源的对象存储服务,可以用于存储生成的公章和私章图片。本项目中用于上传生成的印章图片。 通过docker快速部署MinIO服务,docker-compose.yml配置示例:services:
minio:
image: bitnami/minio:latest
ports:
- 9000:9000 # api 端口
- 9001:9001 # 服务器 端口
environment:
- MINIO_ROOT_USER=adminadmin
- MINIO_ROOT_PASSWORD=adminadmin # 管理后台密码,最小8个字符
docker-compose up -d- 在idea中执行
Mcp客户端调用 - SSE模式接入
代码接入
1) 配置
>需要java 17及以上版本
> 首先需要引入客户端依赖:
xml
<dependency>
<groupId>org.springframework.ai</groupId>
<artifactId>spring-ai-mcp-client-spring-boot-starter</artifactId>
<version>1.0.0-M6</version>
</dependency>
>其次配置文件需要配置MCP服务器的一些参数:sse模式配置如下:
yaml
spring:
ai:
mcp:
client:
enabled: true
name: my-mcp-client
version: 0.0.1
request-timeout: 60000
type: SYNC # or ASYNC for reactive applications
sse:
connections:
server1:
url: http://localhost:8888
2) 使用
>需要在代码中配置MCP服务器的工具回调提供者,会根据工具的定义自动生成对应的回调提供者。
java
public class ModelService {
@Resource
ToolCallbackProvider toolCallbackProvider;
// ...
}
>注入后,ai模型会根据对话情况考虑收调用工具服务
java
public class ModelService {
private SelfModelChatClient selfModelChatClient;
public String doChatWithMcp(String message, String chatId) {
ChatResponse chatResponse = selfModelChatClient.prompt().user("请帮我生成一枚公章,内容是: " + message)
// 使用 MCP 工具
.tools(toolCallbackProvider)
.call()
.chatResponse();
String text = chatResponse.getResult().getOutput().getText();
log.info("Chat response with MCP: {}", text);
return text;
}
}
#### Cherry Studio 接入
使用
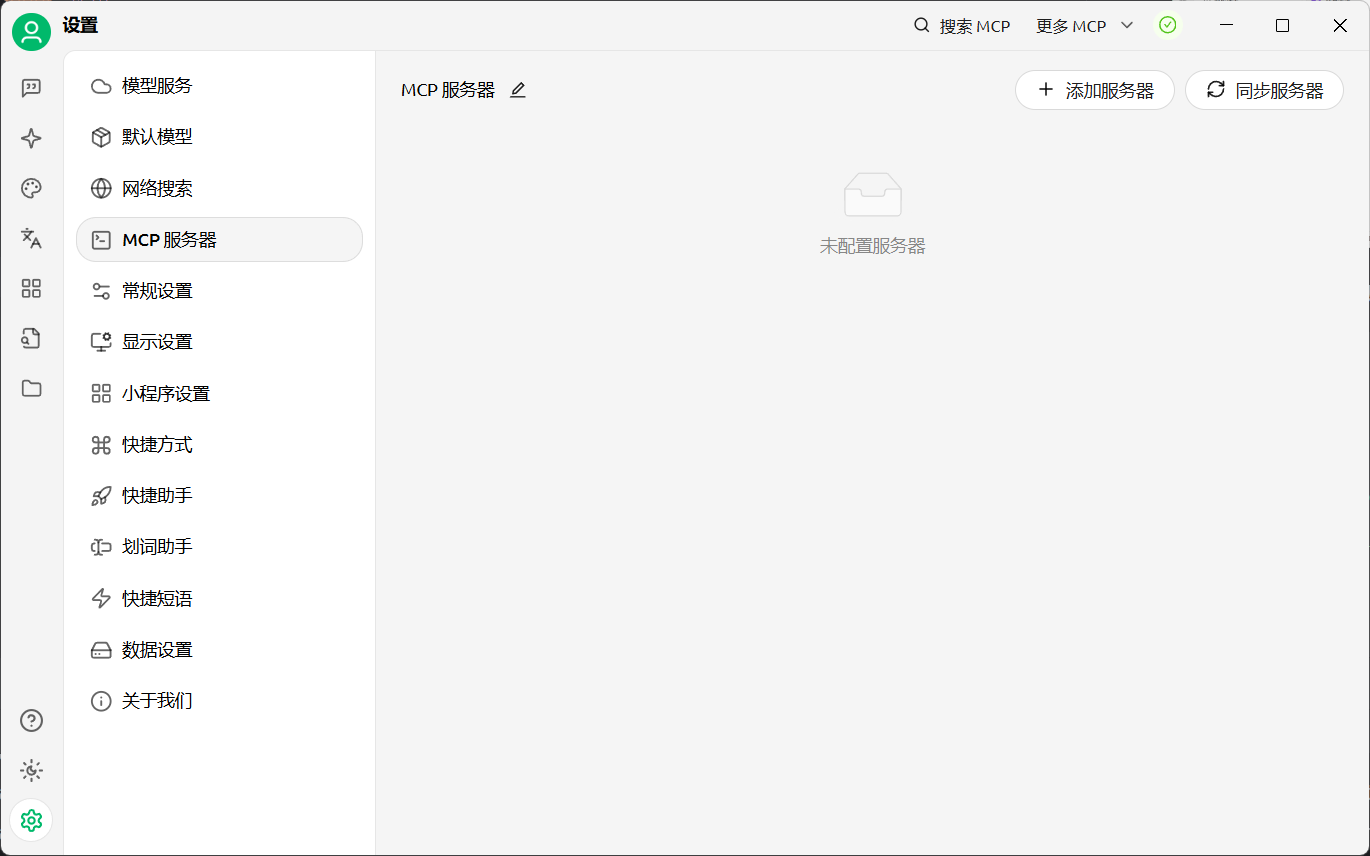
1) 打开
Cherry Studio的设置,点击MCP 服务器。
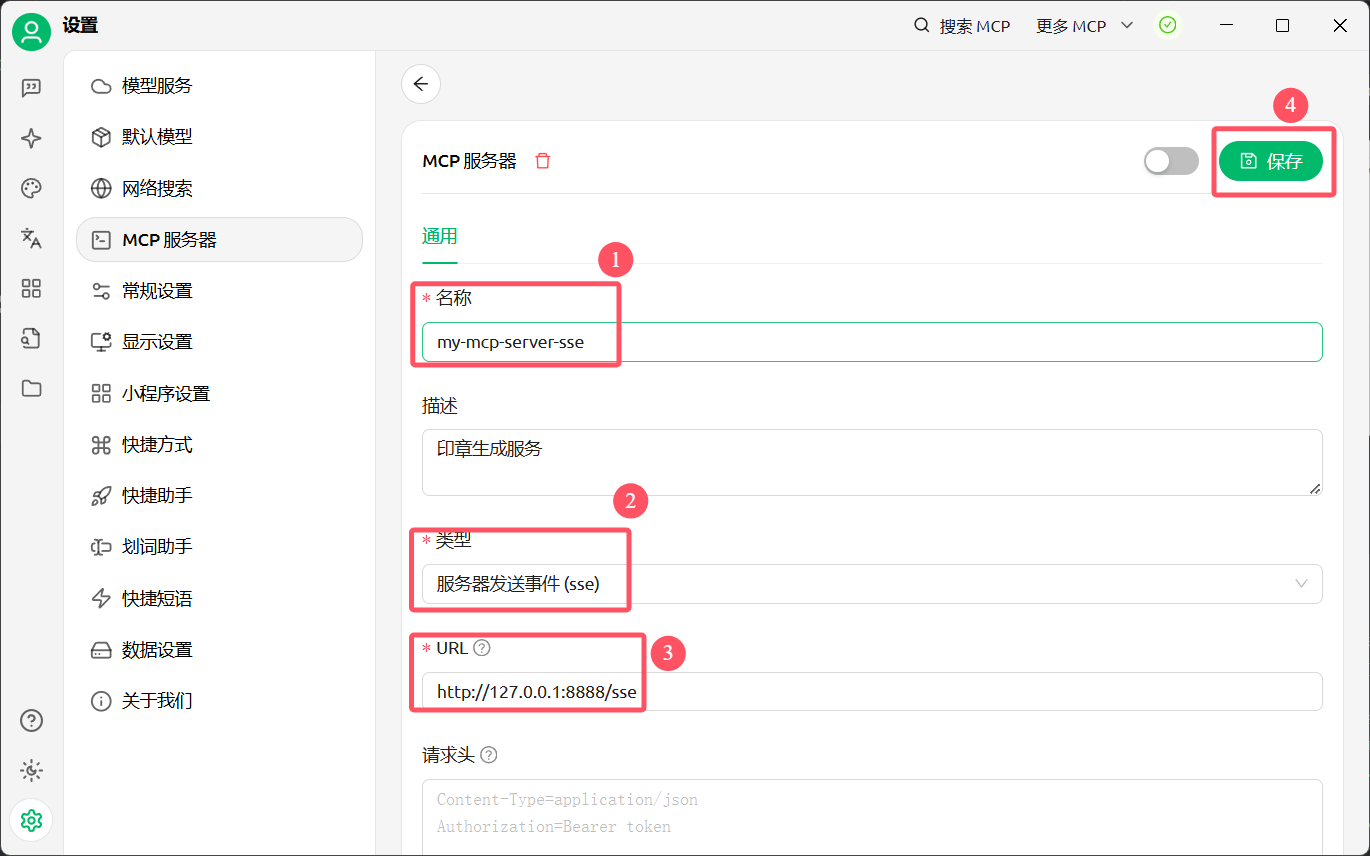
2) 点击添加服务器,选择快速创建按下列顺序进行配置。
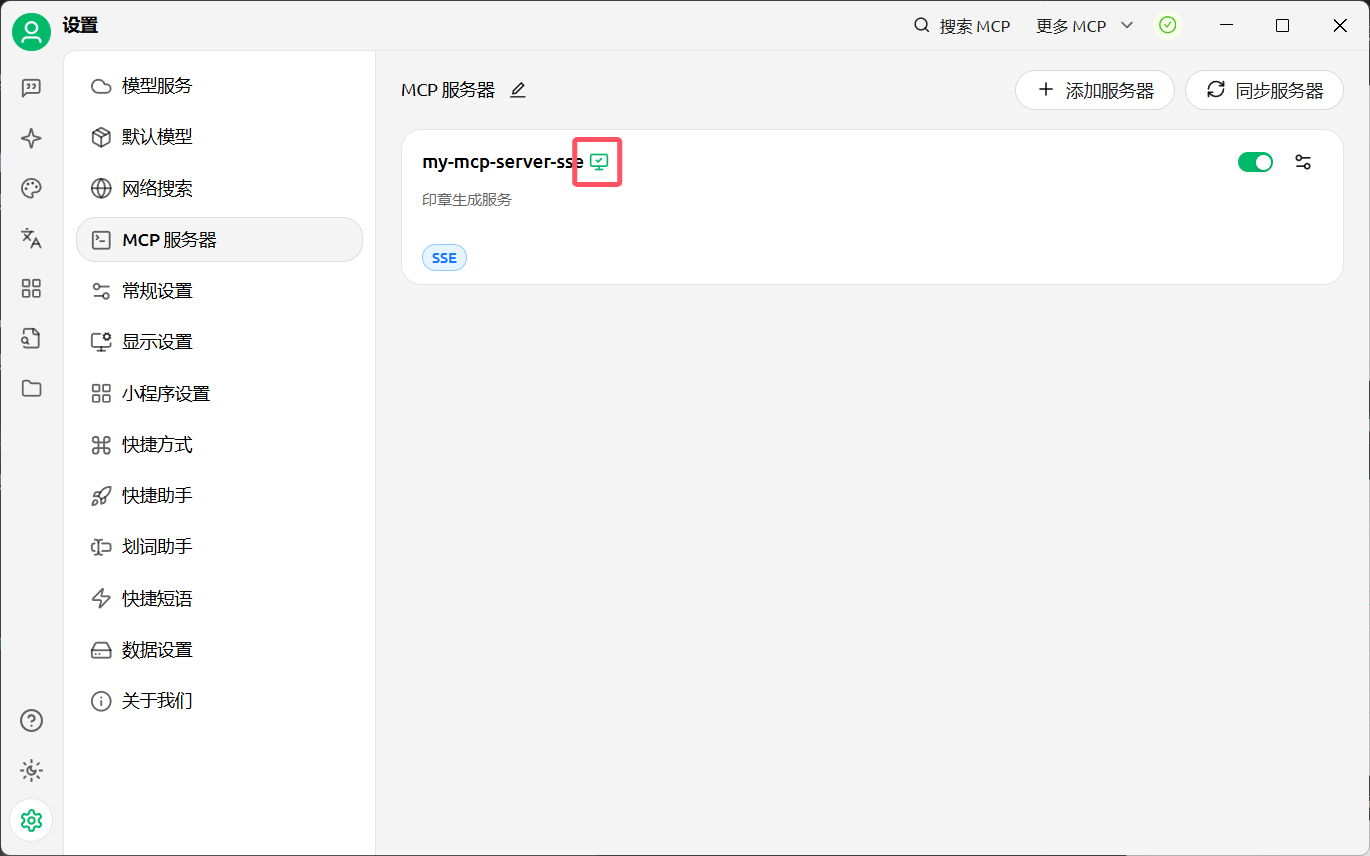
3) 图中标注为绿则表示配置成功。
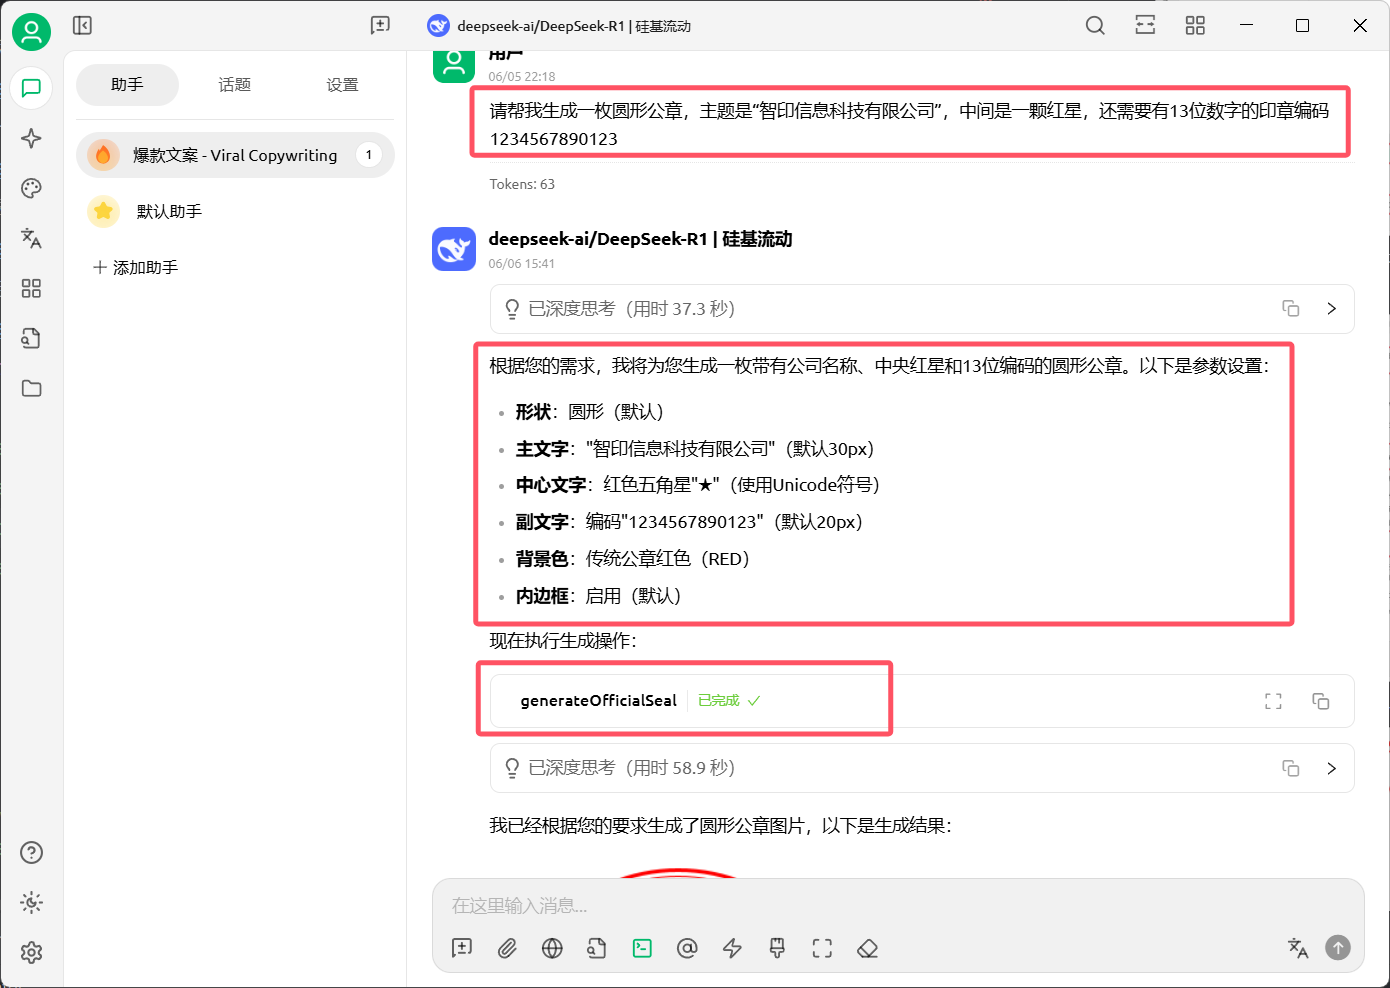
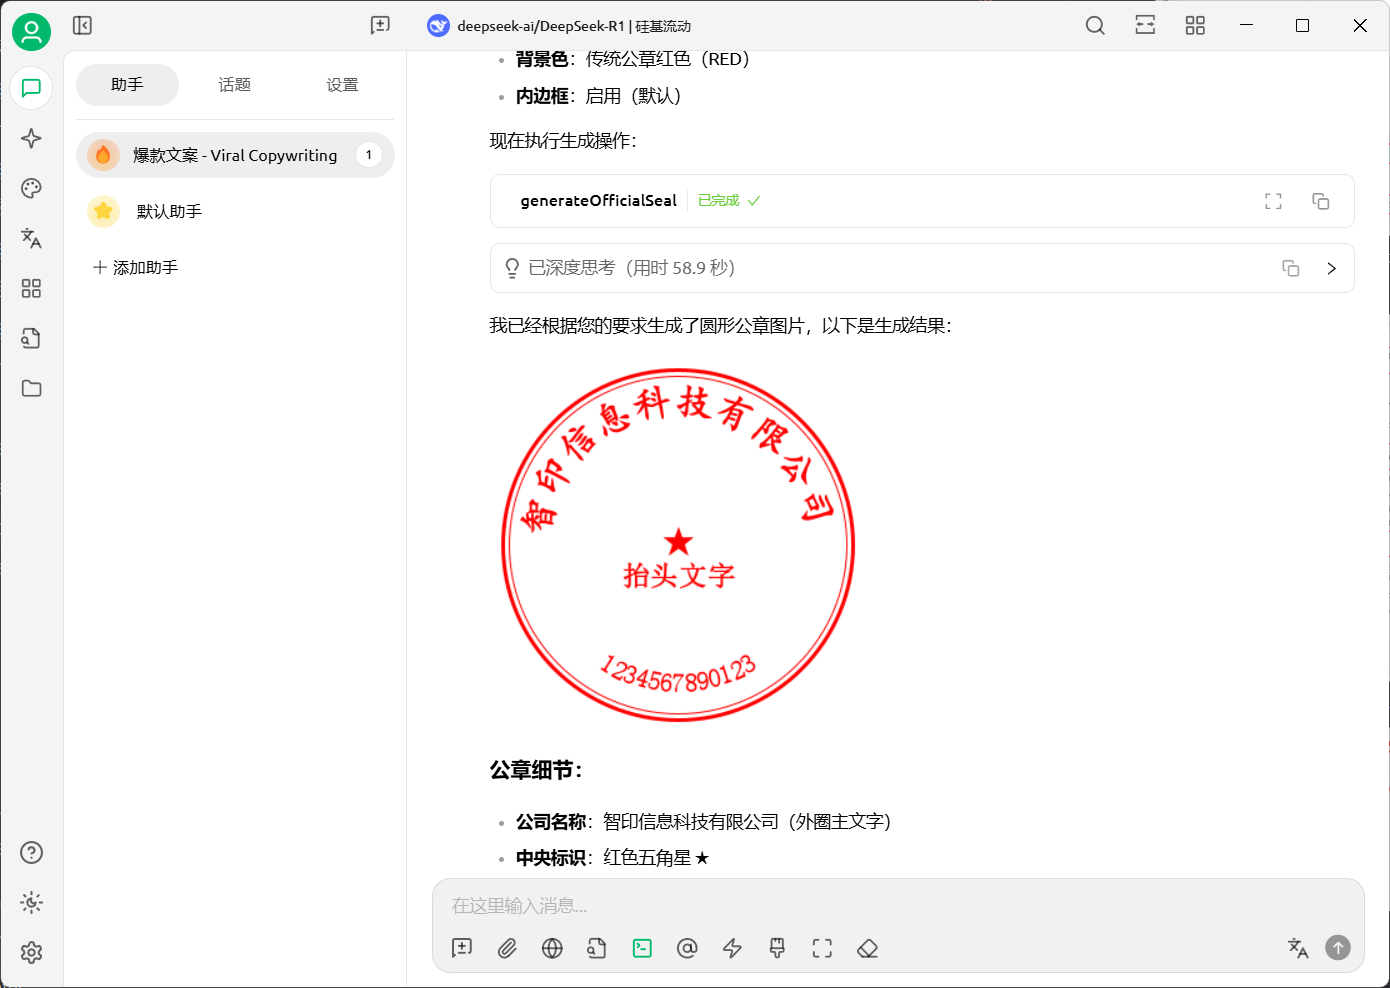
4) 选择一个模型,选择配置的印章MCP服务,输入语句 “请帮我生成一枚圆形公章,主题是“智印信息科技有限公司”,中间是一颗红星,还需要有13位数字的印章编码”。和AI进行对话。
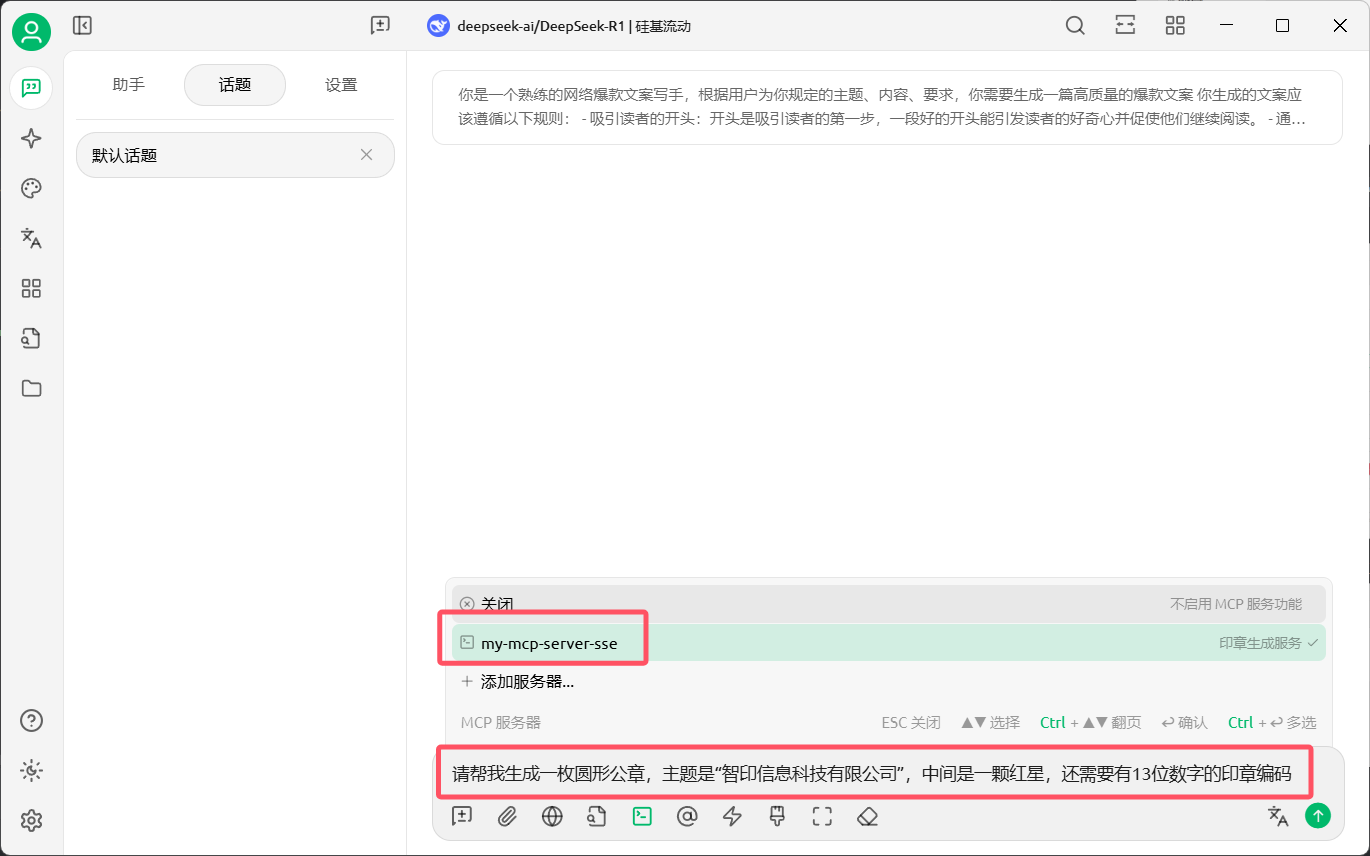
5) AI会根据输入语句选择是否调用MCP服务,生成公章图片,并返回图片链接。
6) 点击链接可以查看生成的公章图片。
Mcp客户端调用 - stdio模式接入
代码接入
其余配置和使用方式和SSE模式相同,只需修改配置文件即可,配置文件如下:
yaml
spring:
ai:
mcp:
client:
enabled: true
name: my-mcp-client
version: 0.0.1
request-timeout: 60000
type: SYNC # or ASYNC for reactive applications
stdio:
servers-configuration: classpath:mcp-server.json # MCP服务器配置文件路径
>注意:使用stdio方式时,需要在classpath下创建一个mcp-server.json文件(名称可自定义),内容如下:
json
{
"mcpServers": {
"mcp-seal-generate-server": {
"command": "java",
"args": [
"-Dspring.ai.mcp.server.stdio=true",
"-Dspring.main.web-application-type=none",
"-Dlogging.pattern.console=",
"-jar",
"/yours_path/mcp-server-0.0.1-SNAPSHOT.jar"
],
"env": {}
}
}
}
`
>其中/yours_path/mcp-server-0.0.1-SNAPSHOT.jar需要替换为实际的MCP Server的jar包路径。
Cherry Studio 接入
使用
1) 打开
Cherry Studio的设置,点击MCP 服务器。
2) 点击添加服务器,选择从JSON导入粘贴上述mcp-server.json`中的内容。3) 图中标注为绿则表示配置成功。
注意:在软件客户端通过stdio模式配置时相当于是在本地启动一个MCP Server,使用标准输入输出方式与客户端进行交互,用的是本地java环境。所以
如果Mcp Server开发环境是Java 17,那么需要确保本地环境也是Java 17及以上版本。如果开发时用的Java 21,那么本地环境也需要是Java 21。
Sign in to leave a review
Use Google, GitHub, or an email account so ratings stay tied to real people.
No reviews posted yet.



