
Nginx UI
About
Nginx UI is a web-based interface for managing Nginx servers. It provides online statistics, configuration editing, certificate management, and cluster support, developed by 0xJacky, Hintay, and Akino.
Details
- License
- AGPL-3.0
Explore
- Online statistics for server indicators such as CPU usage, memory usage, load average, and disk usage.
- Automatic configuration backup after changes, with version comparison and restore capabilities
- Cluster management supporting mirroring operations to multiple nodes, making multi-server environments easy to manage
- Export encrypted Nginx / Nginx UI configurations for quick deployment and recovery to new environments
- Enhanced online ChatGPT assistant supporting multiple models, including Deepseek-R1's chain-of-thought display to help you better understand and optimize configurations
- MCP (Model Context Protocol) provides special interfaces for AI agents to interact with Nginx UI, enabling automated configuration management and service control.
- One-click deployment and automatic renewal Let's Encrypt certificates.
- Online editing websites configurations with our self-designed NgxConfigEditor which is a user-friendly block editor for nginx configurations or Ace Code Editor which supports LLM Code Completion and highlighting nginx configuration syntax.
- Online view Nginx logs
- Written in Go and Vue, distribution is a single executable binary.
- Automatically test configuration file and reload nginx after saving configuration.
- Web Terminal
- Dark Mode
- Responsive Web Design

Setting up with Highlight
This MCP is not yet compatible with Highlight’s one-click setup. However, you can still use it with Highlight by following these steps:
- Download and install Highlight from highlightai.com/download
- Navigate to the plugins tab and select "Add Custom Plugin"
-
Configure the plugin with the settings below
Plugin Name
Nginx UICommand (node, npx, python, etc.)Please refer to the README for specific instructions on how to obtain API keys or other required environment variables.
- Enable "Start Automatically" if you want the plugin to start when Highlight launches





From the repository
Nginx UI is available on the following platforms:
- macOS 11 Big Sur and later (amd64 / arm64)
- Windows 10 and later (amd64 / arm64)
- Linux 2.6.23 and later (x86 / amd64 / arm64 / armv5 / armv6 / armv7 / mips32 / mips64 / riscv64 / loongarch64)
- Including but not limited to Debian 7 / 8, Ubuntu 12.04 / 14.04 and later, CentOS 6 / 7, Arch Linux
- FreeBSD
- OpenBSD
- Dragonfly BSD
- Openwrt
You can visit latest release to download the latest distribution, or just use installation scripts for Linux.
Install and Upgrade
bash -c "$(curl -L https://cloud.nginxui.com/install.sh)" @ install
9000, and the default HTTP Challenge port is 9180.
If there is a port conflict, please modify /usr/local/etc/nginx-ui/app.ini manually,
then use systemctl restart nginx-ui to reload the Nginx UI service.
Remove Nginx UI, except configuration and database files
bash -c "$(curl -L https://cloud.nginxui.com/install.sh)" @ remove
bash -c "$(curl -L https://cloud.nginxui.com/install.sh)" @ help
server {
listen 80;
listen [::]:80;
server_name <your_server_name>;
rewrite ^(.*)$ https://$host$1 permanent;
}
map $http_upgrade $connection_upgrade {
default upgrade;
'' close;
}
server {
listen 443 ssl;
listen [::]:443 ssl;
http2 on;
server_name <your_server_name>;
ssl_certificate /path/to/ssl_cert;
ssl_certificate_key /path/to/ssl_cert_key;
location / {
proxy_set_header Host $host;
proxy_set_header X-Real-IP $remote_addr;
proxy_set_header X-Forwarded-For $proxy_add_x_forwarded_for;
proxy_set_header X-Forwarded-Proto $scheme;
proxy_http_version 1.1;
proxy_set_header Upgrade $http_upgrade;
proxy_set_header Connection $connection_upgrade;
proxy_pass http://127.0.0.1:9000/;
}
}
<a href="https://www.jetbrains.com/?from=nginx-ui" target="_blank">

</a>
Thanks to JetBrains for supporting us with free open source licenses.
Claude Desktop / Cursor
Paste into your MCP client config file to install this server.
{
    "mcpServers": {
        "nginx ui": {
            "nginx-ui": {
                "command": "docker",
                "args": [
                    "run",
                    "-dit",
                    "\\"
                ]
            }
        }
    }
}McpServers
{
"nginx-ui": {
"command": "docker",
"args": [
"run",
"-dit",
"\\"
]
}
}Yet another Nginx Web UI, developed by 0xJacky, Hintay and Akino.



<p>
<a href="https://atomgit.com/uozi/nginx-ui" target="_blank" title="This project is part of the AtomGit G-Star program">

</a>
Proudly hosted on <a href="https://atomgit.com/uozi/nginx-ui">AtomGit</a> — a part of the <b>G-Star</b> program.
</p>













Documentation
To check out docs, visit nginxui.com.Sponsor
If you find this project helpful, please consider sponsoring us to support ongoing development and maintenance.


Official Community Group
Join the official Nginx UI WeChat community group to discuss usage, deployment ideas, and troubleshooting with other community members.
Scan the QR code below to add us on WeChat, and include Nginx UI Community Group in your request. The administrator will invite you to the official community group.
<p align="center">

</p>
Your support helps us:
- 🚀 Accelerate the development of new features
- 🐛 Fix bugs and improve stability
- 📚 Enhance documentation and tutorials
- 🌐 Provide better community support
- 💻 Maintain infrastructure and demo servers
Tooling Support
<a href="https://www.jetbrains.com/?from=nginx-ui" target="_blank">
</a>
Thanks to JetBrains for supporting us with free open source licenses.
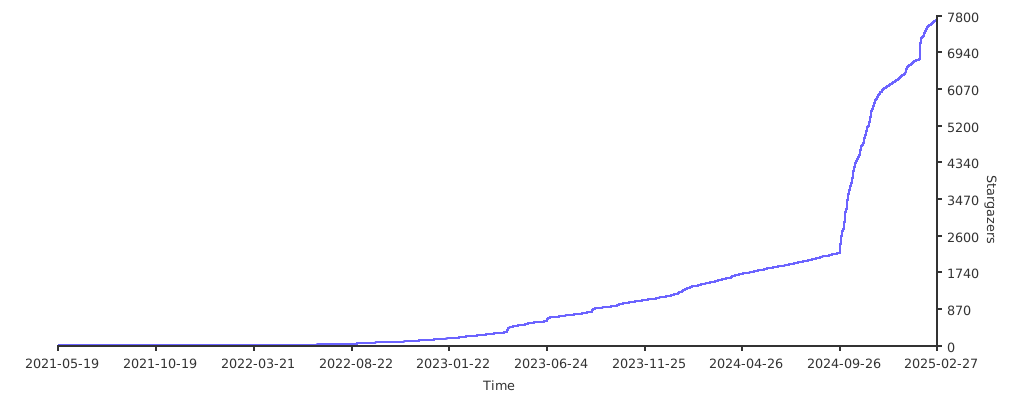
Stargazers over time
English | Español | 简体中文 | 繁體中文 | Tiếng Việt | 日本語
<details>
<summary>Table of Contents</summary>
<ol>
<li>
<a href="#about-the-project">About The Project</a>
<ul>
<li><a href="#demo">Demo</a></li>
<li><a href="#features">Features</a></li>
<li><a href="#internationalization">Internationalization</a></li>
</ul>
</li>
<li>
<a href="#getting-started">Getting Started</a>
<ul>
<li><a href="#before-use">Before Use</a></li>
<li><a href="#installation">Installation</a></li>
<li>
<a href="#usage">Usage</a>
<ul>
<li><a href="#from-executable">From Executable</a></li>
<li><a href="#with-systemd">With Systemd</a></li>
<li><a href="#with-docker">With Docker</a></li>
</ul>
</li>
</ul>
</li>
<li>
<a href="#manual-build">Manual Build</a>
<ul>
<li><a href="#prerequisites">Prerequisites</a></li>
<li><a href="#build-app">Build Frontend</a></li>
<li><a href="#build-backend">Build Backend</a></li>
</ul>
</li>
<li>
<a href="#script-for-linux">Script for Linux</a>
<ul>
<li><a href="#basic-usage">Basic Usage</a></li>
<li><a href="#more-usage">More Usage</a></li>
</ul>
</li>
<li><a href="#example-of-nginx-reverse-proxy-configuration">Example of Nginx Reverse Proxy Configuration</a></li>
<li><a href="#contributing">Contributing</a></li>
<li><a href="#license">License</a></li>
</ol>
</details>
About The Project
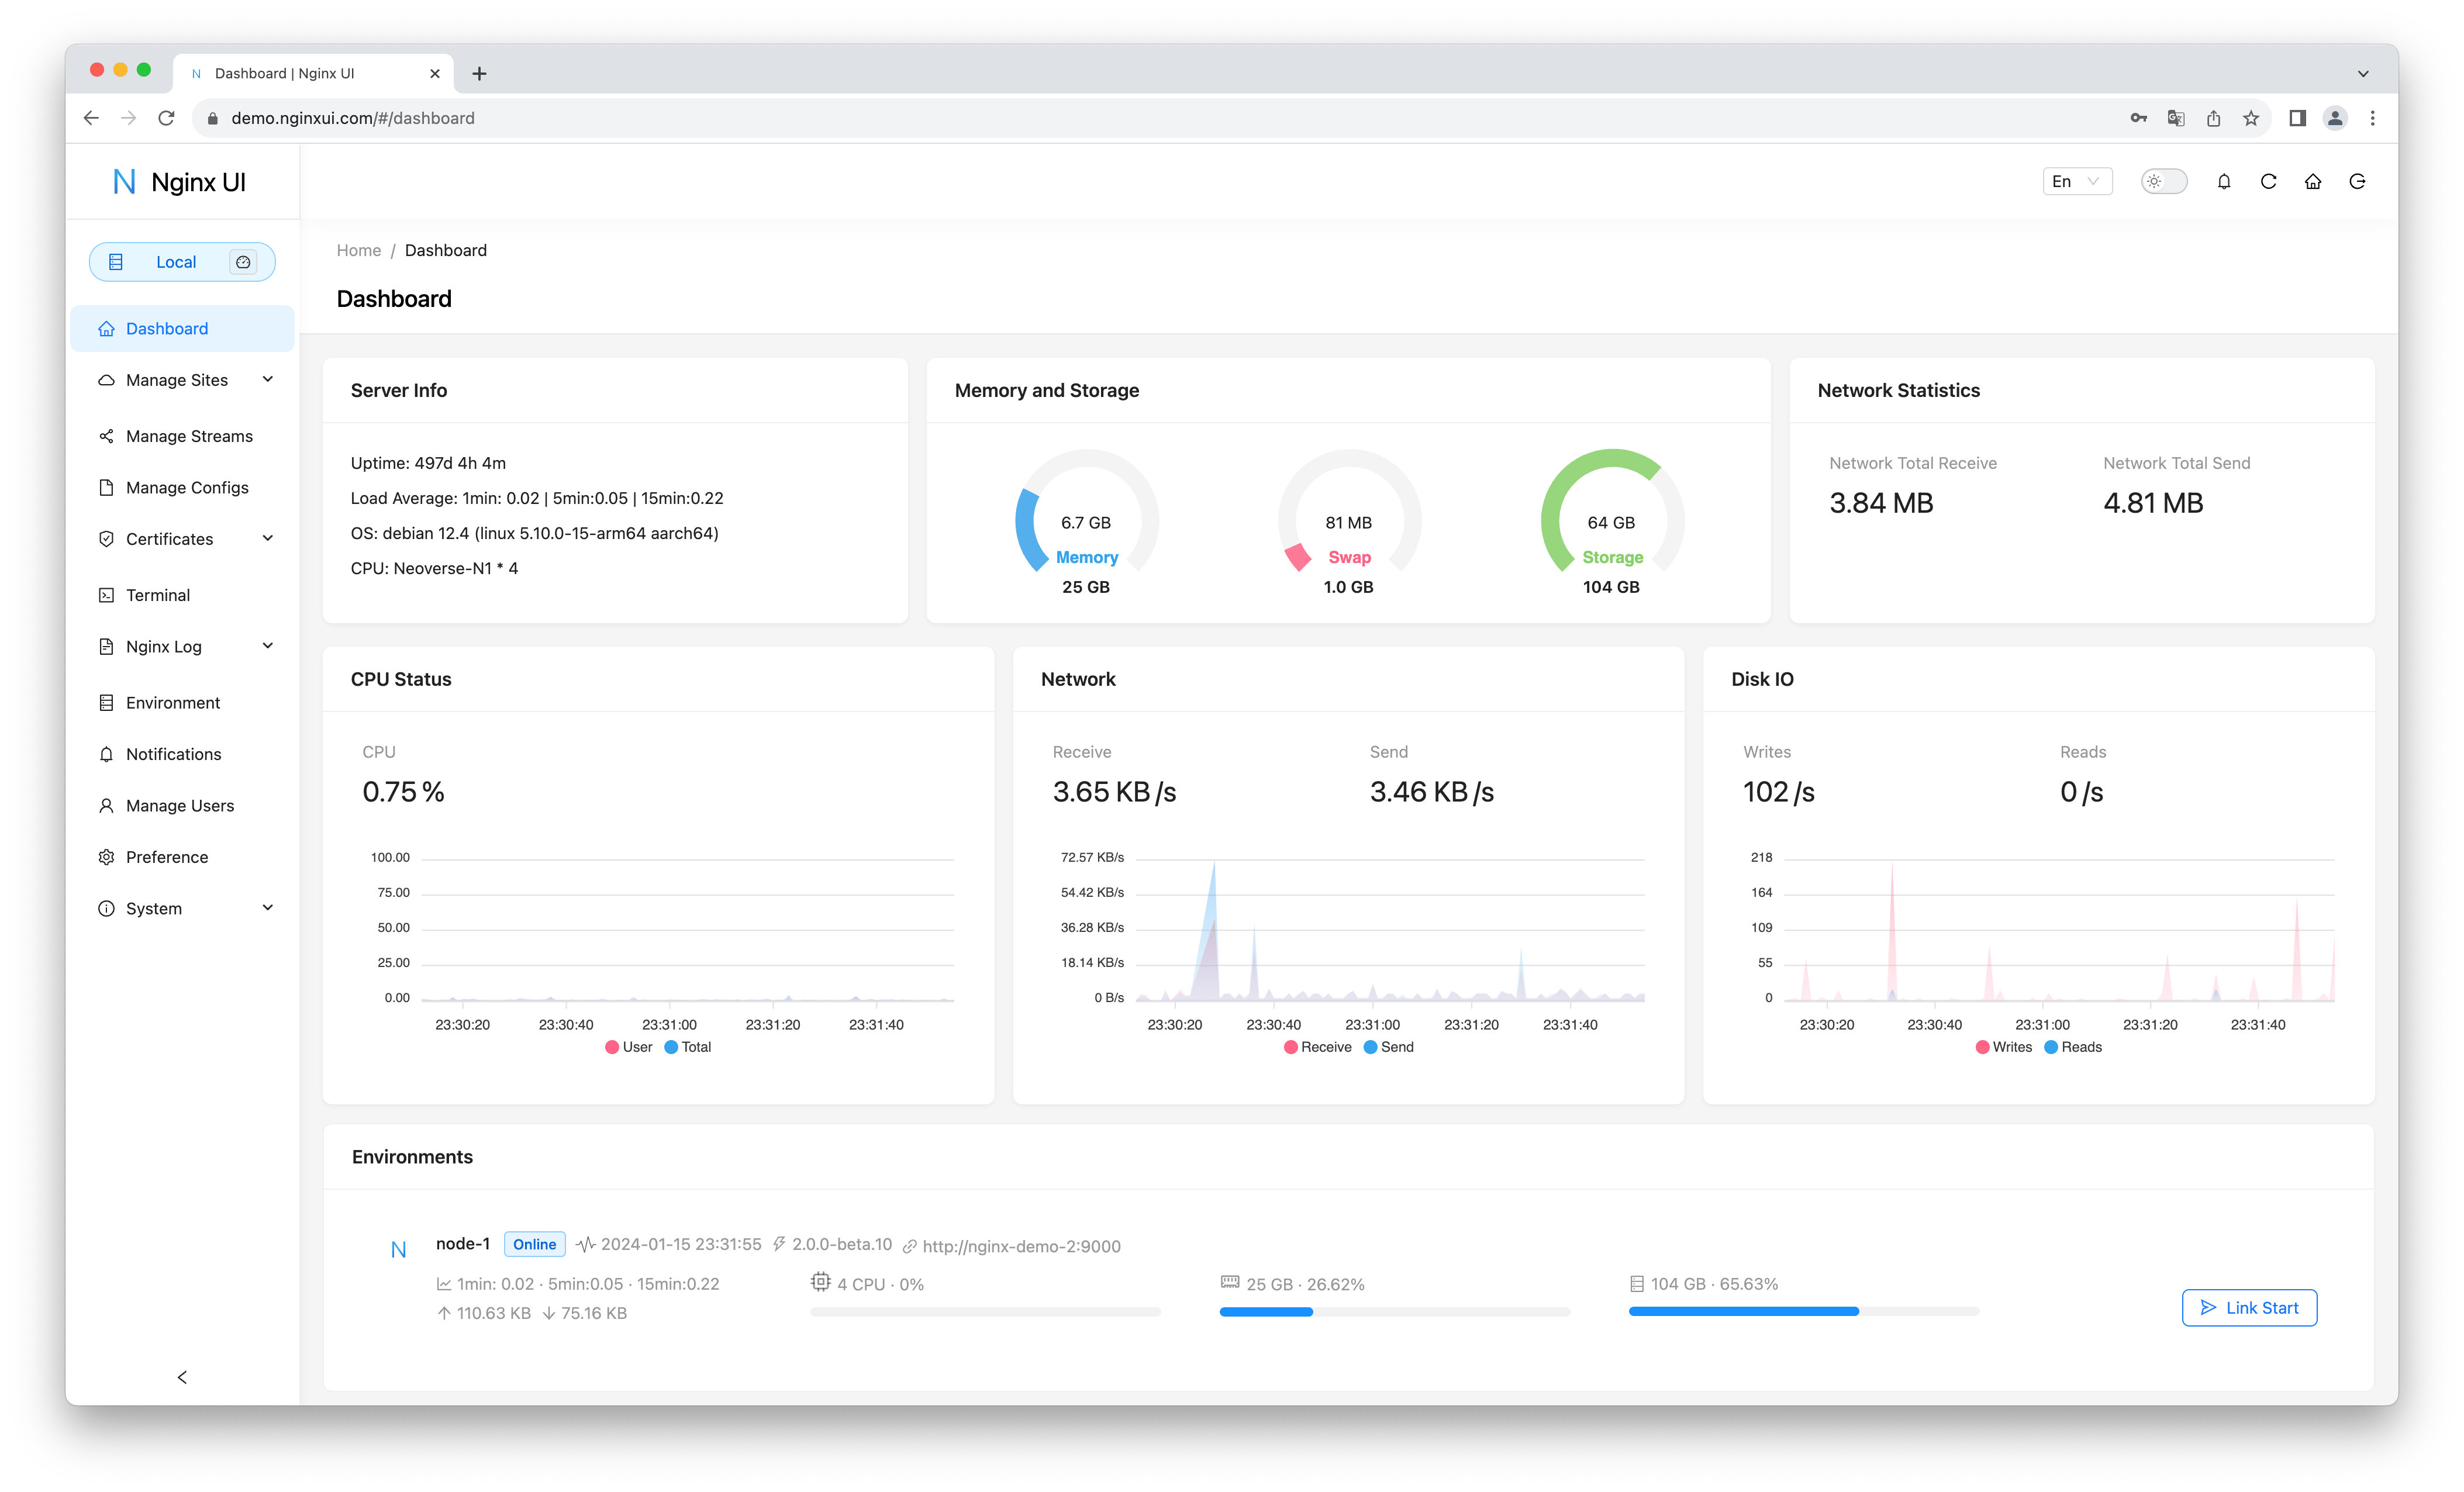
Demo
URL:https://demo.nginxui.com - Username:admin - Password:adminFeatures
- Online statistics for server indicators such as CPU usage, memory usage, load average, and disk usage.
- Automatic configuration backup after changes, with version comparison and restore capabilities
- Cluster management supporting mirroring operations to multiple nodes, making multi-server environments easy to manage
- Export encrypted Nginx / Nginx UI configurations for quick deployment and recovery to new environments
- Enhanced online ChatGPT assistant supporting multiple models, including Deepseek-R1's chain-of-thought display to help you better understand and optimize configurations
- MCP (Model Context Protocol) provides special interfaces for AI agents to interact with Nginx UI, enabling automated configuration management and service control.
- One-click deployment and automatic renewal Let's Encrypt certificates.
- Online editing websites configurations with our self-designed NgxConfigEditor which is a user-friendly block editor for nginx configurations or Ace Code Editor which supports LLM Code Completion and highlighting nginx configuration syntax.
- Online view Nginx logs
- Written in Go and Vue, distribution is a single executable binary.
- Automatically test configuration file and reload nginx after saving configuration.
- Web Terminal
- Dark Mode
- Responsive Web Design
Internationalization
We proudly offer official support for:
- English
- Simplified Chinese
- Traditional Chinese
As non-native English speakers, we strive for accuracy, but we know there's always room for improvement. If you spot any issues, we'd love your feedback!
Thanks to our amazing community, additional languages are also available! Explore and contribute to translations on Weblate.
Getting Started
Before Use
The Nginx UI follows the Debian web server configuration file standard. Created site configuration files will be placed in the sites-available folder that under the Nginx configuration folder (auto-detected). The configuration files for an enabled site will create a soft link to the sites-enabled folder. You may need to adjust the way the configuration files are organised.
For non-Debian (and Ubuntu) systems, you may need to change the contents of the nginx.conf configuration file to the Debian style as shown below.
http {
# ...
include /etc/nginx/conf.d/.conf;
include /etc/nginx/sites-enabled/;
}
For more information: debian/conf/nginx.conf
Installation
Nginx UI is available on the following platforms:
- macOS 11 Big Sur and later (amd64 / arm64)
- Windows 10 and later (amd64 / arm64)
- Linux 2.6.23 and later (x86 / amd64 / arm64 / armv5 / armv6 / armv7 / mips32 / mips64 / riscv64 / loongarch64)
- Including but not limited to Debian 7 / 8, Ubuntu 12.04 / 14.04 and later, CentOS 6 / 7, Arch Linux
- FreeBSD
- OpenBSD
- Dragonfly BSD
- Openwrt
You can visit latest release to download the latest distribution, or just use installation scripts for Linux.
Usage
In the first runtime of Nginx UI, please visit http://<your_server_ip>:<listen_port>
in your browser to complete the follow-up configurations.
From Executable
Run Nginx UI in Terminalnginx-ui -config app.ini
Control+C in the terminal to exit Nginx UI.
Run Nginx UI in Background
nohup ./nginx-ui -config app.ini &
kill -9 $(ps -aux | grep nginx-ui | grep -v grep | awk '{print $2}')
With Systemd
If you are using the installation script for Linux, the Nginx UI will be installed asnginx-ui service in systemd. Please use the systemctl command to control it.
Start Nginx UI
systemctl start nginx-ui
systemctl stop nginx-ui
systemctl restart nginx-ui
With Docker
Our docker image uozi/nginx-ui:latest is based on the latest nginx image and can be used to replace the Nginx on the host. By publishing the container's port 80 and 443 to the host, you can easily make the switch.Note
1. When using this container for the first time, ensure that the volume mapped to /etc/nginx is empty. 2. If you want to host static files, you can map directories to container. 3. If you are upgrading from an older image, see the Docker WebSocket fix guide for requiredconf.d/nginx-ui.conf updates.
<details>
<summary><b>Deploy with Docker</b></summary>
2. Then deploy nginx-ui like this:
docker run -dit \
--name=nginx-ui \
--restart=always \
-e TZ=Asia/Shanghai \
-v /mnt/user/appdata/nginx:/etc/nginx \
-v /mnt/user/appdata/nginx-ui:/etc/nginx-ui \
-v /var/run/docker.sock:/var/run/docker.sock \
-p 8080:80 -p 8443:443 \
uozi/nginx-ui:latest
3. When your docker container is running, Log in to nginx-ui panel with http://<your_server_ip>:8080/install.
If you change the port mapping, access Nginx UI through the host port mapped to container port 80 instead.
</details>
<details>
<summary><b>Deploy with Docker-Compose</b></summary>
2. Create a docker-compose.yml file like this:
services:
nginx-ui:
stdin_open: true
tty: true
container_name: nginx-ui
restart: always
environment:
- TZ=Asia/Shanghai
volumes:
- '/mnt/user/appdata/nginx:/etc/nginx'
- '/mnt/user/appdata/nginx-ui:/etc/nginx-ui'
- '/var/www:/var/www'
- '/var/run/docker.sock:/var/run/docker.sock'
ports:
- 8080:80
- 8443:443
image: 'uozi/nginx-ui:latest'
3. Then creat your container by:
docker compose up -d
4. When your docker container is running, Log in to nginx-ui panel with http://<your_server_ip>:8080/install.
If you change the port mapping, access Nginx UI through the host port mapped to container port 80 instead.
</details>
Manual Build
On platforms that do not have an official build version, they can be built manually.
Prerequisites
- Make
- Golang 1.23+
- node.js 21+
npx browserslist@latest --update-db
Build Frontend
Please execute the following command in app directory.
pnpm install
pnpm build
Build Backend
Please build the app first, and then execute the following command in the project root directory.
go generate
go build -tags=jsoniter -ldflags "$LD_FLAGS -X 'github.com/0xJacky/Nginx-UI/settings.buildTime=$(date +%s)'" -o nginx-ui -v main.go
Script for Linux
Basic Usage
Install and Upgrade
bash -c "$(curl -L https://cloud.nginxui.com/install.sh)" @ install
9000, and the default HTTP Challenge port is 9180.
If there is a port conflict, please modify /usr/local/etc/nginx-ui/app.ini manually,
then use systemctl restart nginx-ui to reload the Nginx UI service.
Remove Nginx UI, except configuration and database files
bash -c "$(curl -L https://cloud.nginxui.com/install.sh)" @ remove
More Usage
bash -c "$(curl -L https://cloud.nginxui.com/install.sh)" @ help
Example of Nginx Reverse Proxy Configuration
server {
    listen          80;
    listen          [::]:80;
server_name     <your_server_name>;

    rewrite ^(.*)$  https://$host$1 permanent;

}
map $http_upgrade $connection_upgrade {

    default upgrade;

    ''      close;

}
server {

    listen  443       ssl;

    listen  [::]:443  ssl;

    http2   on;
server_name         <your_server_name>;
ssl_certificate     /path/to/ssl_cert;

    ssl_certificate_key /path/to/ssl_cert_key;
location / {

        proxy_set_header    Host                $host;

        proxy_set_header    X-Real-IP           $remote_addr;

        proxy_set_header    X-Forwarded-For     $proxy_add_x_forwarded_for;

        proxy_set_header    X-Forwarded-Proto   $scheme;

        proxy_http_version  1.1;

        proxy_set_header    Upgrade             $http_upgrade;

        proxy_set_header    Connection          $connection_upgrade;

        proxy_pass          http://127.0.0.1:9000/;

    }

}
Contributing
Contributions are what make the open source community such an amazing place to learn, inspire, and create. Any contributions you make are greatly appreciated.
If you have a suggestion that would make this better, please fork the repo and create a pull request. You can also simply open an issue with the tag "enhancement". Don't forget to give the project a star! Thanks again!
1. Fork the Project
2. Create your Feature Branch (git checkout -b feature/AmazingFeature)
3. Commit your Changes (git commit -m 'Add some AmazingFeature')
4. Push to the Branch (git push origin feature/AmazingFeature)
5. Open a Pull Request
License
This project is provided under a GNU Affero General Public License v3.0 license that can be found in the LICENSE file. By using, distributing, or contributing to this project, you agree to the terms and conditions of this license.
Sign in to leave a review
Use Google, GitHub, or an email account so ratings stay tied to real people.
No reviews posted yet.