
OpenAPI MCP Server
About
OpenAPI MCP Server is a Model Context Protocol server that exposes configured REST APIs as context tools for large language models (LLMs). It enables LLMs to interact with REST APIs via natural language prompts, supporting GET, PUT, POST, and PATCH methods.
Details
- License
- Apache-2.0
Explore
- Integrates REST APIs as context for LLMs.
- Supports GET, PUT, POST, and PATCH HTTP methods.
- Configured via environment variables (OPENAPI_SPEC_PATH, API_BASE_URL).
- Optional API headers, operation ID whitelist/blacklist.
- Optional HTTP/HTTPS proxy support.
- Debug logging available (DEBUG environment variable).

Setting up with Highlight
This MCP is not yet compatible with Highlight’s one-click setup. However, you can still use it with Highlight by following these steps:
- Download and install Highlight from highlightai.com/download
- Navigate to the plugins tab and select "Add Custom Plugin"
-
Configure the plugin with the settings below
Plugin Name
OpenAPI MCP ServerCommand (node, npx, python, etc.)Please refer to the README for specific instructions on how to obtain API keys or other required environment variables.
- Enable "Start Automatically" if you want the plugin to start when Highlight launches





From the repository
- Install package
``bash`
pip install openapi_mcp_server
- Create .env in a folder with minimum values for & API_BASE_URL. Sample file available hereopenapi_mcp_server
- Test server using uv run openapi_mcp_server` from the above folder.
Claude Desktop / Cursor
Paste into your MCP client config file to install this server.
{
    "mcpServers": {
        "openapi mcp server": {
            "openapi_mcp_server": {
                "command": "uv",
                "args": [
                    "init"
                ]
            }
        }
    }
}McpServers
{
    "openapi_mcp_server": {
        "command": "uv",
        "args": [
            "init"
        ]
    }
}
Overview
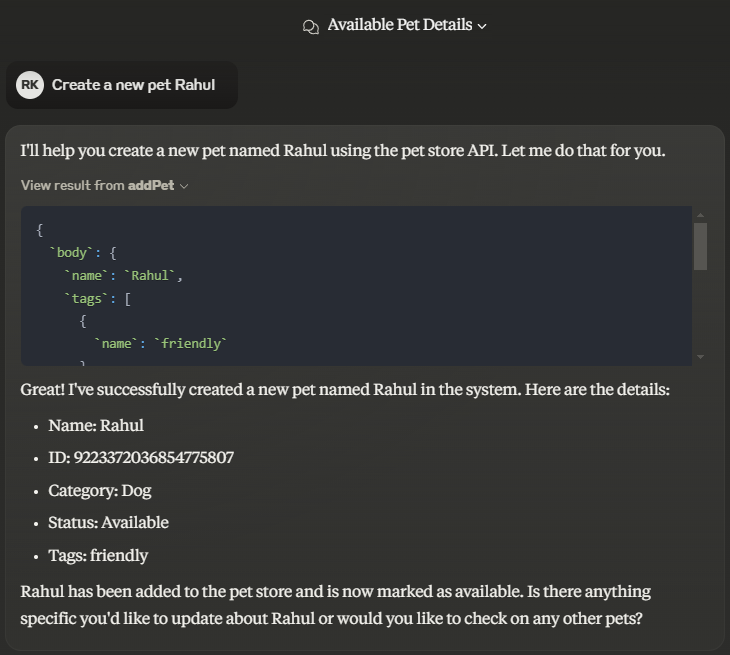
- This project will installMCP - Model Context Protocol Server, that provides configured REST API's as context to LLM's.
- Using this we can enable LLMs to interact with RestAPI's and perform REST API call's using LLM prompts.
- Currently we support HTTP API Call's GET/PUT/POST/PATCH.
Installation
- Install package ``bash
pip install openapi_mcp_server
`
- Create .env in a folder with minimum values for OPENAPI_SPEC_PATH & API_BASE_URL. Sample file available here
- Test openapi_mcp_server server using uv run openapi_mcp_server from the above folder.
Claud Desktop
- Configuration details for Claud Desktop
`json
{
"mcpServers": {
"openapi_mcp_server":{
"command": "uv",
"args": ["run","openapi_mcp_server"]
"env": {
"DEBUG":"1",
"API_BASE_URL":"https://petstore.swagger.io/v2",
"OPENAPI_SPEC_PATH":"https://petstore.swagger.io/v2/swagger.json",
"API_HEADERS":"Accept:application/json",
"API_WHITE_LIST":"addPet,updatePet,findPetsByStatus"
}
}
}
}
`
Configuration

- List of available environment variables
- DEBUG: Enable debug logging (optional default is False)
- OPENAPI_SPEC_PATH: Path to the OpenAPI document. (required)
- API_BASE_URL: Base URL for the API requests. (required)
- API_HEADERS: Headers to include in the API requests (optional)
- API_WHITE_LIST: White Listed operationId in list format ["operationId1", "operationId2"] (optional)
- API_BLACK_LIST: Black Listed operationId in list format ["operationId3", "operationId4"] (optional)
- HTTP_PROXY: HTTP Proxy details (optional)
- HTTPS_PROXY: HTTPS Proxy details (optional)
- NO_PROXY: No Proxy details (optional)
Contributing
Contributions are welcome.
Please feel free to submit a Pull Request.
License
This project is licensed under the terms of the MIT license.
Github Stars
Appendix
UV
`bash
mkdir -m777 openapi_mcp_server
cd openapi_mcp_server
uv init
uv add mcp[cli] pydantic python-dotenv requests
uv add --dev twine setuptools
uv sync
uv run openapi_mcp_server
uv build
pip install --force-reinstall --no-deps .\dist\openapi_mcp_server-fileversion.whl
export TWINE_USERNAME="rahgadda"
export TWINE_USERNAME="<<API Key>>"
uv run twine upload --verbose dist/*
``
Reference
- UV OverviewSign in to leave a review
Use Google, GitHub, or an email account so ratings stay tied to real people.
No reviews posted yet.



