
Ui Annotator Mcp
About
MCP server that annotates any web page with hover labels for AI assistants. Reverse proxy injection — zero browser extensions, works in any browser. 5 tools: annotate, get_elements, highlight_element, rescan_elements, inspect_mode.
Explore
| Feature | UI Annotator | MCP Pointer | Agentation | Cursor | Chrome DevTools MCP |
|---|---|---|---|---|---|
| Visual hover annotation | Yes | No | Partial | Yes (IDE only) | No |
| Shows element names | Yes | Yes | Yes | No (high-level) | Programmatic |
| Shows dimensions | Yes | Yes | Yes (Detailed) | Yes | Programmatic |
| MCP server | Yes | Yes | Yes | No | Yes |
| Zero browser extensions | Yes | No | Yes | N/A | No |
| Zero code changes | Yes | Yes | No | N/A | Yes |
| Any browser | Yes | Chrome only | Desktop only | Cursor only | Chrome only |
| Zero dependencies | Yes | Chrome ext | React 18+ | Cursor | Chrome |
| Click to copy element name | Yes | No | No | No | No |

Setting up with Highlight
This MCP is not yet compatible with Highlight’s one-click setup. However, you can still use it with Highlight by following these steps:
- Download and install Highlight from highlightai.com/download
- Navigate to the plugins tab and select "Add Custom Plugin"
-
Configure the plugin with the settings below
Plugin Name
Ui Annotator McpCommand (node, npx, python, etc.)Please refer to the README for specific instructions on how to obtain API keys or other required environment variables.
- Enable "Start Automatically" if you want the plugin to start when Highlight launches





From the repository
| Variable | Default | Description |
|---|---|---|
| UI_ANNOTATOR_PORT | 7077 | Port for the proxy server |
annotate
Open a web page with hover annotations. Returns a proxy URL that adds interactive element labels to any page. User opens this URL in any browser to see annotations on hover.
get_elements
Get all UI elements detected on the currently annotated page. Returns element names, CSS selectors, positions, and sizes. Use this to understand what the user is referring to when they describe a UI element.
highlight_element
Briefly flash-highlight a specific element on the page so the user can see which element you are referring to. Useful for confirming "do you mean this element?"
rescan_elements
Force the annotated page to rescan all UI elements. Use this after the page content has changed (e.g. after navigation, DOM updates, or user interaction).
inspect_mode
Toggle inspect mode on the annotated page. When ON, the user can click any element to copy its name. When OFF, the page behaves normally. Use this to help the user copy element names for communicating design changes.
The toolbar sits at the top center of the page showing:
- Inspect toggle button
- Element count
- Helpful subtitle explaining what to do
- Collapse button (▲) to minimize when not needed
| Tool | What it does |
|---|---|
| annotate(url) | Returns proxy URL for user to open in any browser |
| get_elements() | Returns all detected UI elements with names, selectors, positions |
| highlight_element(name) | Flash-highlights a specific element so user can confirm |
| rescan_elements() | Force DOM rescan after page changes |
| inspect_mode(enabled) | Toggle inspect mode remotely |
| | Browser DevTools | UI Annotator |
|---|---|---|
| Target user | Frontend developers who know the DOM | Anyone — QA, PM, designer, junior dev |
| Learning curve | Need to understand DOM tree, CSS selectors, box model | Hover and read — zero learning |
| Communication | "The div.flex.gap-4 inside the second child of..." | "The sidebar" |
| Language | CSS/HTML technical terms | Human-readable names |
| Setup | Teach people to open DevTools + navigate the DOM | Open a URL |
| AI integration | None — AI can't see what you're inspecting | MCP — AI sees the same element names you do |
DevTools is for debugging. UI Annotator is for communication — giving humans and AI a shared vocabulary for UI elements.
| Tool | Approach | Why we're different |
|---|---|---|
| MCP Pointer | Chrome extension + MCP server | Requires Chrome extension. Click-to-inspect, no hover overlay. |
| Agentation | npm package embedded in your app | Requires code changes. React 18+ dependency. Not zero-config. |
| Cursor Visual Editor | Built-in IDE browser | Only works inside Cursor IDE. |
| Windsurf Previews | Built-in IDE browser | Only works inside Windsurf IDE. |
| Chrome DevTools MCP | Programmatic DOM access for AI | AI can inspect, but humans don't see visual annotations. |
| VisBug | Chrome extension for visual editing | No MCP integration. No AI connection. Chrome only. |
| Marker.io / BugHerd | SaaS visual feedback widgets | Not MCP. Paid. For bug reporting, not AI-assisted development. |
Claude Desktop / Cursor
Paste into your MCP client config file to install this server.
{
    "mcpServers": {
        "ui annotator mcp": {
            "ui-annotator": {
                "command": "npx",
                "args": [
                    "-y",
                    "@mcpware/ui-annotator"
                ]
            }
        }
    }
}McpServers
{
    "ui-annotator": {
        "command": "npx",
        "args": [
            "-y",
            "@mcpware/ui-annotator"
        ]
    }
}




English | 廣東話
See what every UI element is called — in any browser, zero extensions.
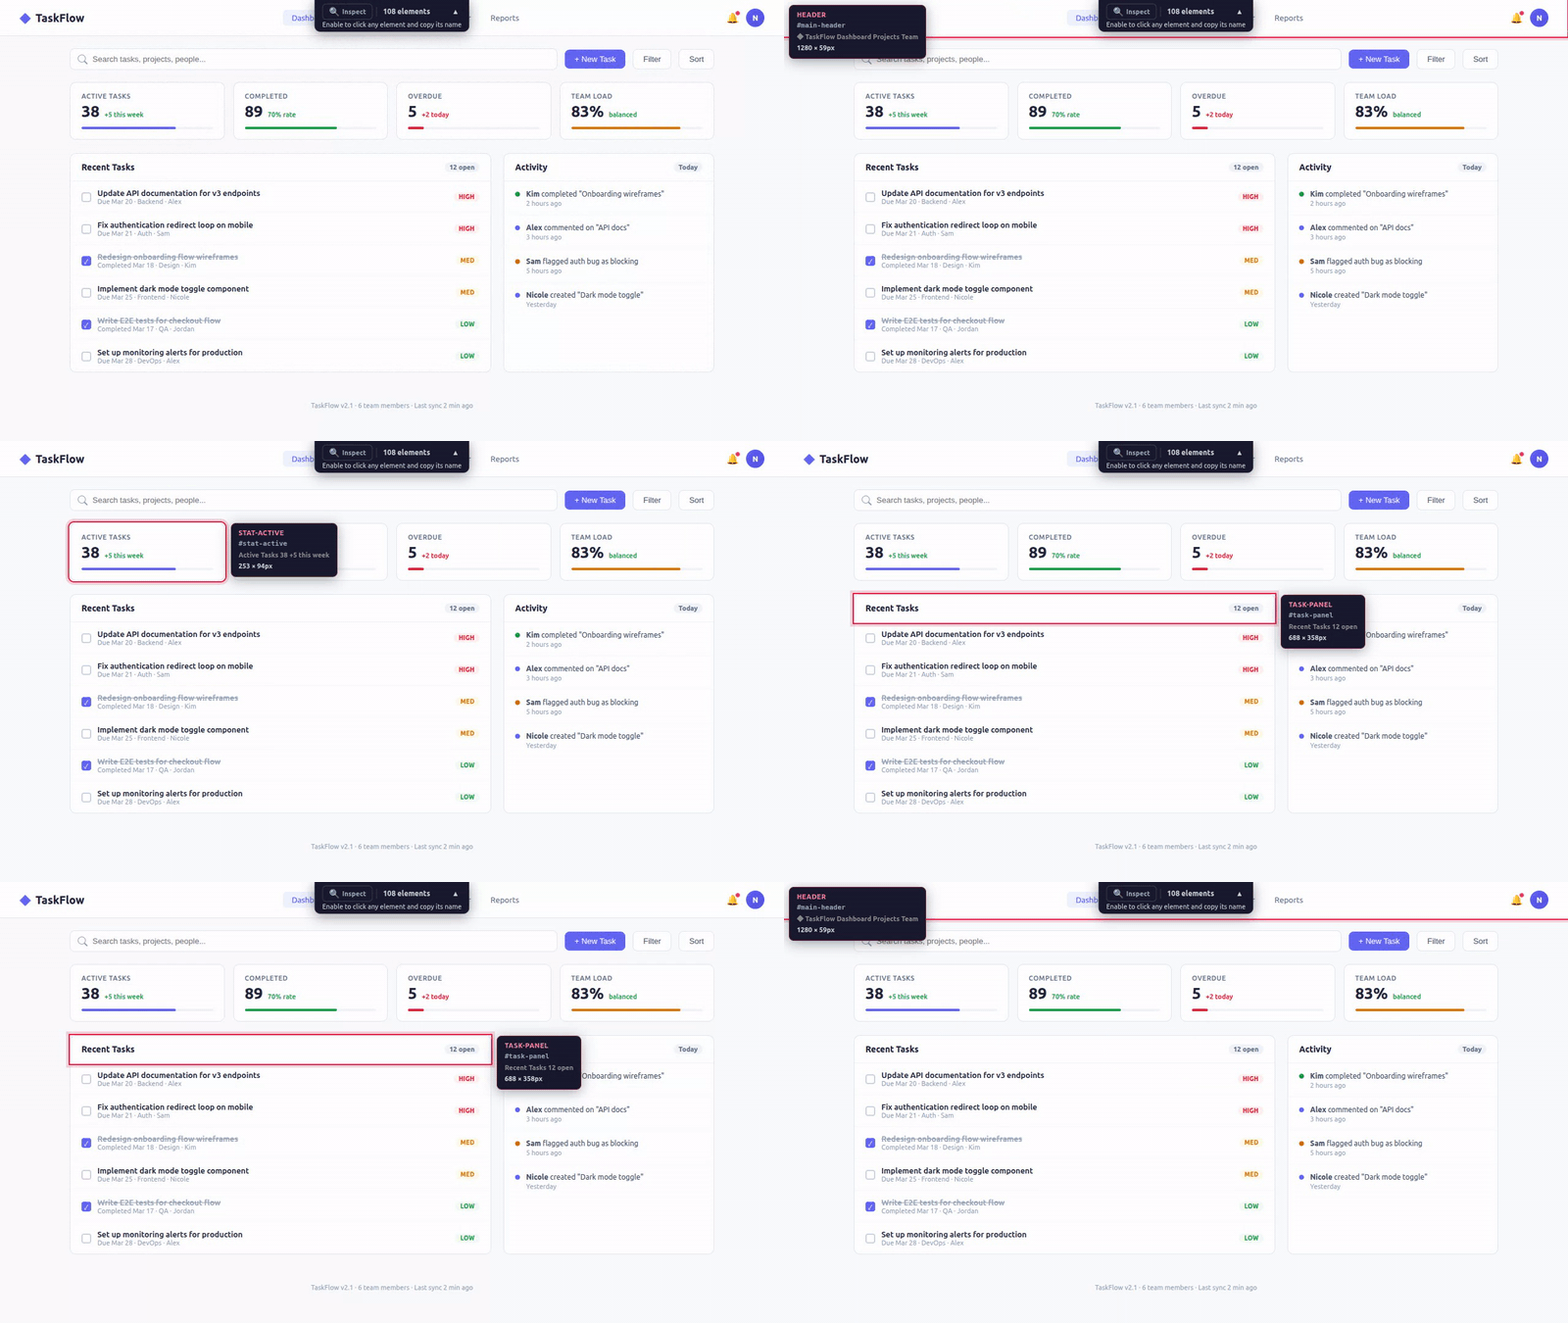
An MCP server that adds interactive hover annotations to any web page. Open a proxied URL, hover any element, see its name. Tell your AI assistant "make the sidebar wider" — it knows exactly what you mean.
The Problem
When reviewing a web UI with an AI coding assistant, the hardest part isn't the code change — it's describing which element you want changed.
> "That thing on the left... the second row... no, the one with the icon..."
You don't know what it's called. The AI doesn't know what you're pointing at. You waste time on miscommunication instead of shipping.
The Solution
Open your page through the annotator proxy. Hover any element — instantly see its name, CSS selector, and dimensions. Now you both speak the same language.
```
Sign in to leave a review
Use Google, GitHub, or an email account so ratings stay tied to real people.
No reviews posted yet.



